
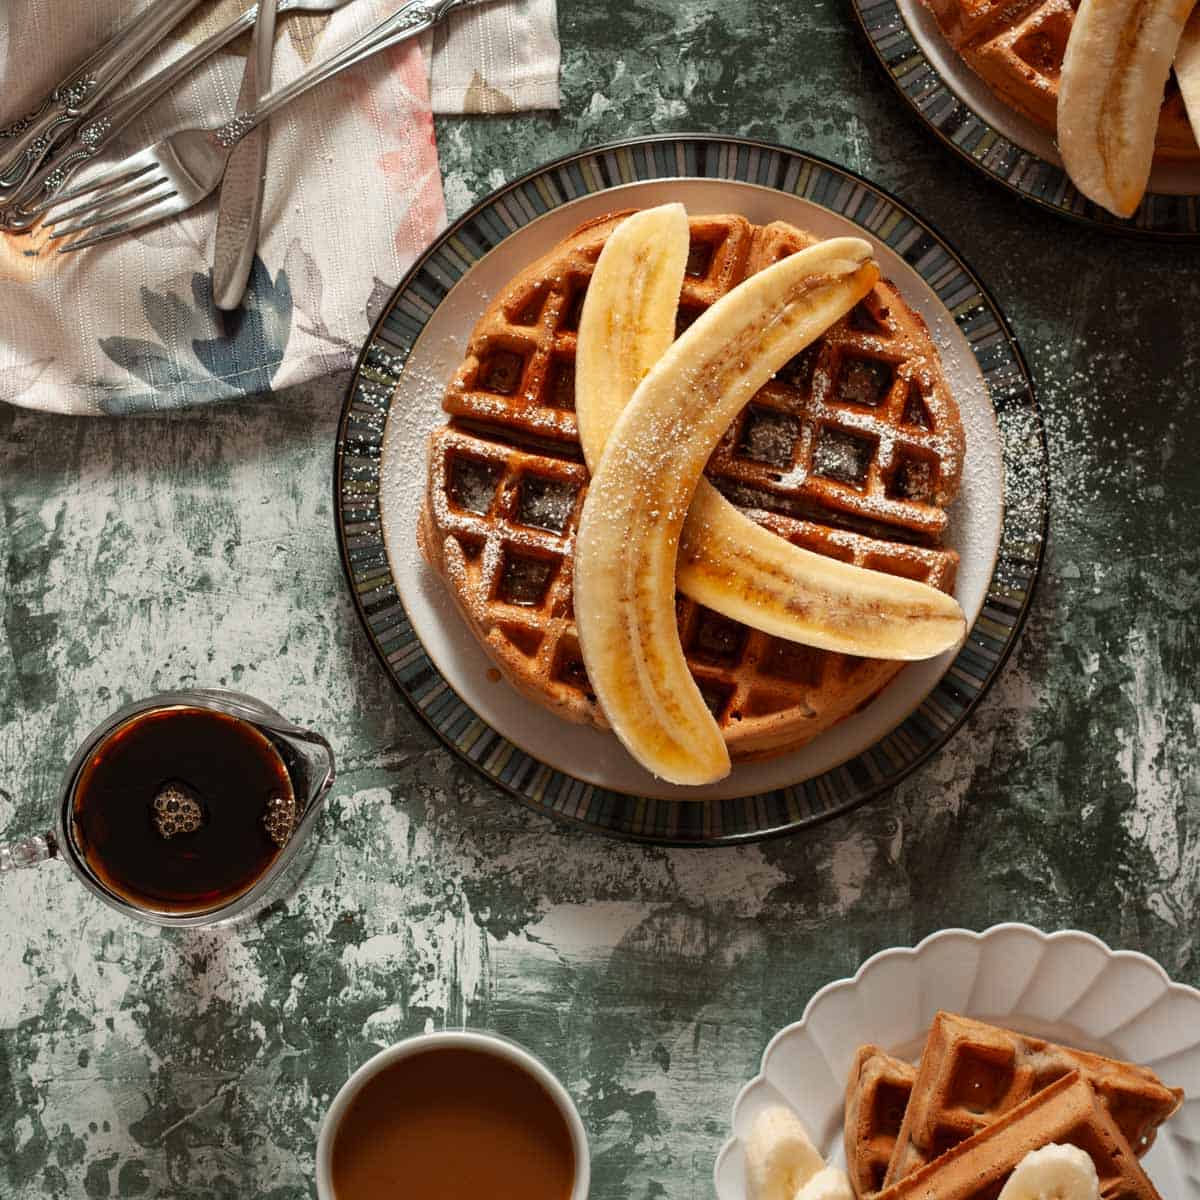
Who doesn't love crispy, fluffy vegan banana waffles? This recipe is about to make your Sunday mornings a whole lot sweeter. These oil-free plant based waffles bake up golden with soft centers and crunchy edges that beg for a drizzle of warm maple syrup. And if you really want to take them over the top, I’ve included an optional maple-glazed pecan bonus topping that will even impress your mother-in-law.
These waffles are a delectable plant-based treat made with a wholesome blend of oat flour and buckwheat, which gives them a nutty flavor and keeps them oil-free and gluten-friendly.
All you need is one mashed ripe banana for that full, natural sweetness, and the batter comes together in just minutes. If you're anything like me there are almost always ripe bananas on the counter. And every day I glance at them in passing wondering what to do before the trash can calls dibs. This is the perfect way to use them so lets grab that apron!
Want to try more of my quick and easy breakfast recipes? Get ready to splurge with this Meyer Lemon Breakfast Pudding (regular lemons are perfect too)! Or this ultra hearty Baked Vegan Breakfast Hash, it's enough to feed the whole family. If you're looking for an easy weekday 'get the kids off to school' breakfast, try my High Protein Granola, they'll love it for the flavor and crunch and you'll love that it's naturally sweetened! Want something chewy, don’t miss my Easy Vegan Date Bars — gooey, chewy, and perfect with a warm cup of coffee.
Jump to:
- 💗Why You'll Love This Wholesome Breakfast Recipe
- 🥣Your Waffle Making Equipment
- 🍌Ingredients & Helpful Substitutions
- 📖Instructions With Photos
- 🍯Optional Maple-Glazed Pecans Topping mini-recipe
- 💭Pro Tip For Perfect Waffles
- 🍓Topping Ideas
- 🧊Storage & Meal Prep
- ❓FAQ's
- ⭐Did you enjoy these Vegan Banana Waffles with Oat Flour & Buckwheat recipe?
- 👩🏻🍳Creating the shot: A behind the scenes look
💗Why You'll Love This Wholesome Breakfast Recipe
- Make ahead: Whip up a big batch on the weekend to have in the freezer, then reheat in the oven all at once for a quick, table-ready breakfast.
- School day sanity saver: Make extra on the weekend and pop in the fridge or freezer so your kiddo has an easy before school breakfast option…because on a school day there's no time for, “What do I have for breakfast?”
- Crispy and fluffy perfection: They deliver that golden crunch with a soft, pillowy inside without a drop of oil. Now we're talking!
🥣Your Waffle Making Equipment
Here’s the equipment I use (and recommend) to get perfectly crisp, fluffy waffles every time.
- Mixing Bowl
- Liquid Measuring Cups
- Dry Measuring Cups & Spoons
- Large spoon or whisk for mixing and a fork for mashing (potato masher works well too)
- Your favorite waffle maker (I used this Belgian Waffle maker and it's by far our favorite!)
🍌Ingredients & Helpful Substitutions
For the full list and measurements, see the recipe card below. Here are the main ingredients and easy swaps.
- Banana → Acts as a natural sweetener, adds moisture, and helps bind everything together. If you’re out of bananas (gasp!), try ½ cup pumpkin puree and swap the cinnamon for pumpkin pie spice. The flavor will totally make you feel like Fall has arrived, and the waffles will still be fluffy and moist!
- Oat flour → Use Certified Gluten -Free if needed. Use all oat flour if you don’t have buckwheat (the waffles will be a little softer and less nutty). Remember whenever using oat flour be careful not to overmix your batter (just enough to combine) or it will become gummy.
- Buckwheat flour → Brings depth and a subtle earthy flavor that pairs perfectly with banana and I love that it's also Gluten-Free.
- Cornstarch → The secret to crisp edges; it traps steam and balances out the heaviness of whole grain flours.
- Coconut sugar → Adds a caramel like sweetness. Regular sugar, maple sugar, or even brown sugar will work just fine.
- Ground flaxseed → Works as your egg replacer and adds fiber and omega-3s while keeping things oil-free. I love keeping calorie laden oil out of my recipes whenever possible for guilt free enjoyment.
- Plant milk → Provides the moisture to bring the batter together (Almond or Cashew work great and so do Oat and Soy if trying to stay completely nut-free).
- Vanilla extract → Adds warmth and that classic “waffle house” touch.
- Cinnamon → Gives a cozy, spiced note that makes your kitchen smell amazing. Swap out the cinnamon for pumpkin pie spice to jazz it up. You can also toss in a handful of mini chocolate chips or chopped nuts to make them fun!
📖Instructions With Photos

Gather up all of your ingredients!

Start by whisking together all of the dry ingredients in a large mixing bowl so everything is evenly distributed. In a separate bowl (plate works too) mash the banana until smooth.

Next add the vanilla to your plant milk.

Pour the wet mixture into the dry and gently stir until just combined. The batter should be pourable but not runny, and a few small lumps are perfectly fine.

Gently fold in the mashed banana.
Let the batter rest for about five minutes while your waffle iron preheats. This short pause gives the flax time to set and the flours time to hydrate, which helps create a waffle that is crisp on the outside and fluffy inside.
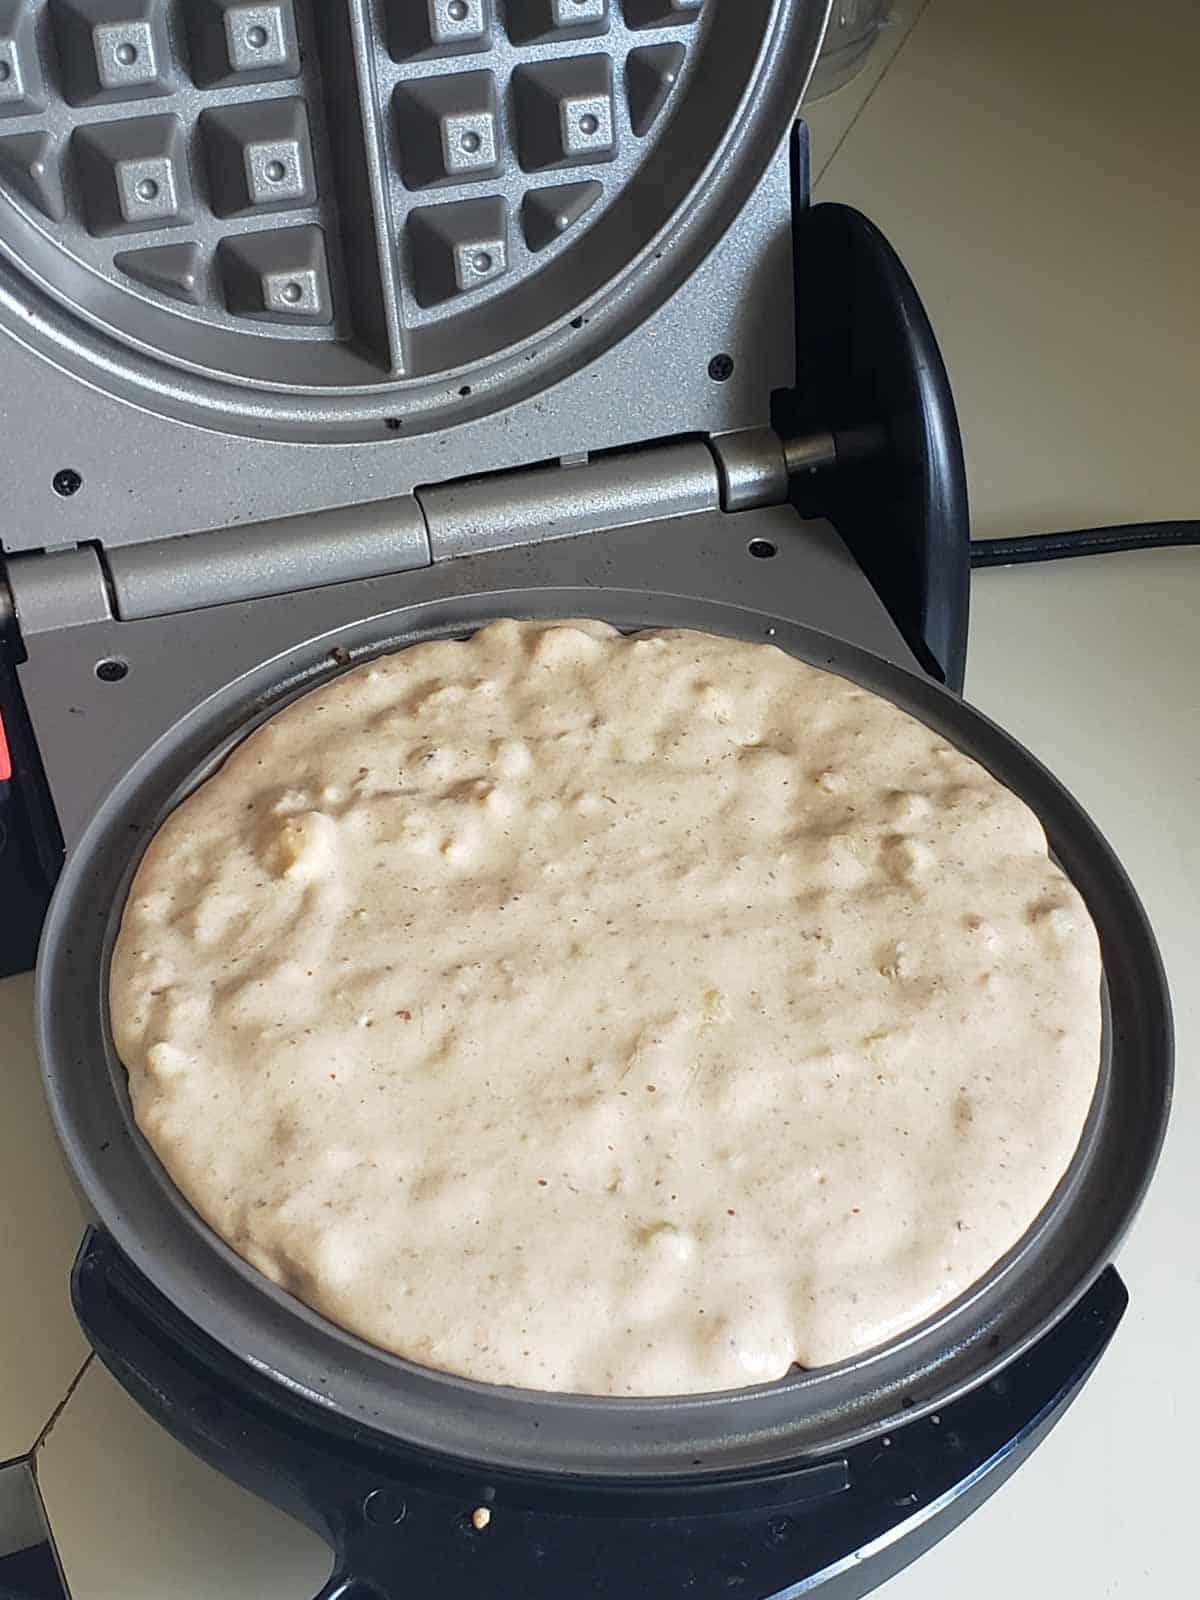
Heat your waffle iron (lightly spray with non stick spray if needed). Once your waffle maker is fully hot, pour in just enough batter to cover the grid, in my Belgian Waffle maker this is about 1 Cup of batter per waffle. About ⅔ cup in square, ¼ cup in mini. The batter starts to puff up quickly when it hits the heat so be careful not to pour too much too fast, just enough to cover.
Close the lid and cook the waffles until the steam has stopped escaping from the sides. Resist the urge to peek, the steam is your signal that the waffle is still cooking.

Carefully lift the lid and remove the waffle when it’s crisp and golden. Serve immediately for the very best texture.
Feel free to add your favorite toppings or see below for my optional bonus recipe, the maple glazed pecans we top ours with!

🍯Optional Maple-Glazed Pecans Topping mini-recipe
- ½ Cup Pecans, roughly chopped
- 1 Tablespoon Maple Syrup
- 1 Tablespoon Coconut or Brown Sugar
- (Optional) Pinch Cinnamon
Instructions for making Pecans

Roughly chop the pecans and add them to a small frying pan along with the coconut sugar and maple syrup and cook over medium to low heat for 5-6 minutes.

They will start off bubbling, take a spatula and just keep moving them around the pan to get a nice even candy coating.

After a couple of minutes they'll become more gooey and sticky. Keep stirring and reduce your heat to low.
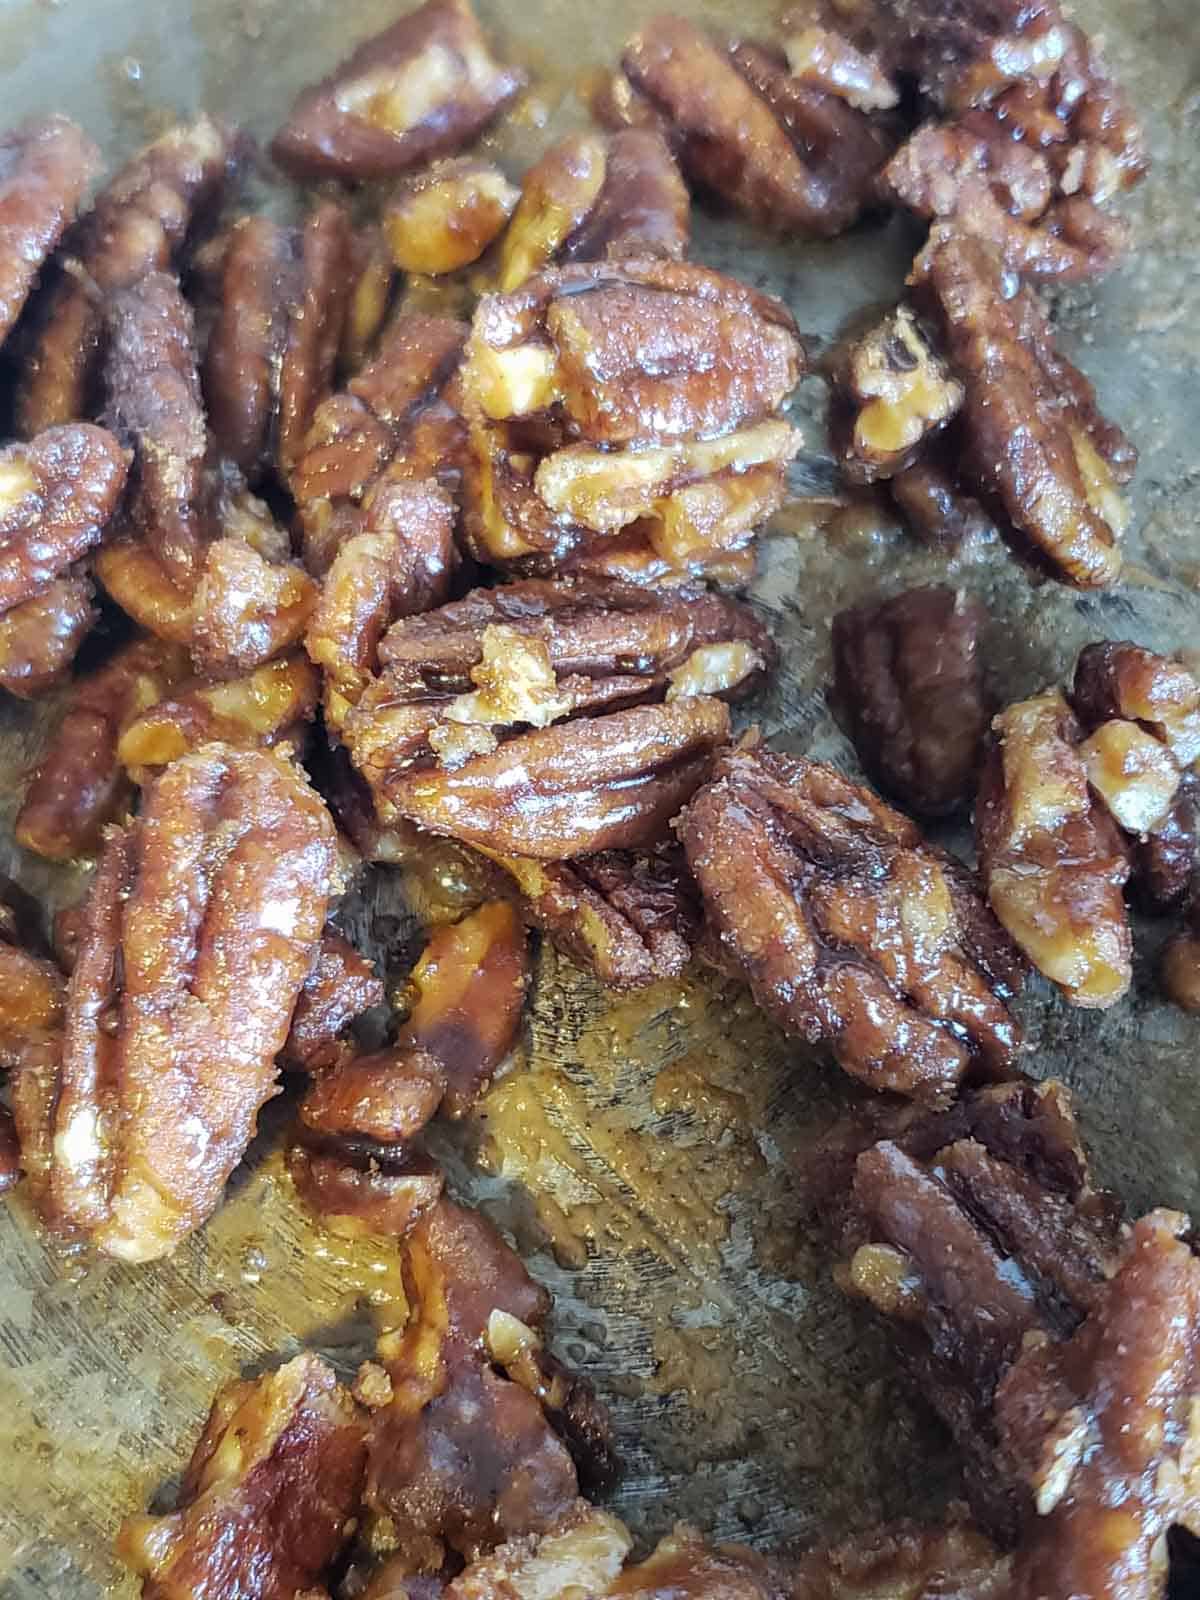
Once you start to see the gooeyness drying into a sugary candy coating and the pecans have a dry look to them they are done.
Remove from heat. Transfer to a serving dish and allow to cool for a couple of minutes before handling.
Candied Pecan Pro Tip: When candying your pecans, be sure to stir frequently to prevent burning. Start on medium heat until you see bubbles then turn heat to low. Once the pecans are done, let them cool completely then add them to the waffles or place them in a decorative dish and let everyone add their own.

💭Pro Tip For Perfect Waffles
Preheat fully before adding the batter. A hot iron is the secret to that golden crisp exterior.
Don’t overmix the batter. A few small lumps are fine and actually help keep the waffles tender instead of gummy.
Let the batter rest for 5 minutes before cooking. This gives the flax time to gel and the flours time to hydrate, which means crispier edges and a fluffier center.
Trust the steam. Resist lifting the lid early. The waffles are ready when the steam has stopped escaping from the sides. My Belgian waffle maker took 7 minutes per waffle when I tested this recipe.
Serve immediately for the best texture. If you’re cooking a big batch, cool each waffle on a wire rack, instead of stacking them, to keep the crispness.
🍓Topping Ideas
- Fresh fruit like sliced bananas or berries for a bright, juicy finish
- Nut butters such as almond, cashew, or peanut butter for extra richness
- Maple syrup or agave for that classic sweet drizzle
- A spoonful of chia jam or your favorite fruit preserves for a tangy, sweet layer
- Coconut whipped cream to make them feel dessert worthy
- Toasted nuts or seeds for crunch (pecans, walnuts, pumpkin seeds, or sunflower seeds)
- A sprinkle of dark chocolate chips or cacao nibs for a special treat
- My maple-glazed pecans if you really want to show off!
- Or, if you like these vegan banana waffles as is but want a little something extra to serve along with them try pairing them up with my Mixed Berry Smoothie for the ultimate breakfast or brunch.
🧊Storage & Meal Prep
Refrigerator – Store leftover waffles in an airtight container in the fridge for up to 3 days. They’ll lose the crispy exterior but reheat beautifully in a toaster oven.
Freezer – Let waffles cool completely, then freeze them in a single layer on a baking sheet. Once solid, transfer to a freezer bag with parchment between each waffle to prevent sticking. They’ll keep for 2–3 months.
Reheating – Skip the microwave if you want to keep that crisp! Instead, pop waffles in the toaster to regain the crunch or reheat on a baking sheet in a 375°F oven for about 8 minutes until warm.
Meal prep – Make a big batch on the weekend and keep extras in the fridge or freezer. Your kiddo can grab, toast, and go on busy school mornings. Mine doesn't even reheat them, just eats them cold and is happy as a clam.
❓FAQ's
Yes! Just spoon in enough batter to cover the bottom (usually ¼ cup or so) and cook 2–3 minutes.
Yes, you can, but the texture will be different. Oat flour alone makes waffles softer and more cake like. Buckwheat flour adds structure and a nutty depth that balances the oat’s mild flavor. The two flours together give you the best of both worlds: crispy edges and a fluffy middle.
Absolutely! Just use certified gluten-free oat flour and you’re set. Buckwheat is naturally gluten-free, so with the right oat flour this recipe works beautifully for anyone avoiding gluten.
If your waffles are turning out soggy, it’s usually one of two things: either the waffle iron wasn’t hot enough, or you stacked the waffles right after cooking. The trick is to cook until the steam stops escaping from the sides and then cool them in a single layer on a wire rack. That way, the edges stay crisp instead of steaming themselves soft.
Cornstarch absorbs surface moisture and forms a delicate coating that crisps up when it hits the hot waffle iron. It also traps steam inside the batter, which gives you that golden shell on the outside and a fluffy center on the inside, all without using oil. Coconut sugar also helps with caramelization, and a fully preheated waffle iron locks it all in. For best results, don’t stack your waffles or the steam will soften them right up.
Yes indeed! Sometimes my kiddo just prefers a plain waffle or one with a few mini chocolate chips instead. In that case you can simply omit the banana (or swap for a Tablespoon of vegan mini chocolate chips) and proceed with the recipe as written.
👩🏻🍳 Want to see some behind-the-scenes fun (and maybe a little kitchen chaos)? Keep scrollin’ — it’s all happening below the recipe card!
Print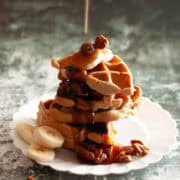
Vegan Banana Waffles — Oil-Free, Crispy and Fluffy
- Total Time: 25 minutes
- Yield: About 3 large waffles 1x
- Diet: Vegan
Description
Who doesn't love crispy, fluffy vegan banana waffles? This recipe is about to make your Sunday mornings a whole lot sweeter. These oil-free plant based waffles bake up golden with soft centers and crunchy edges that beg for a drizzle of warm maple syrup.
Ingredients
For the Vegan Banana Waffles
1 medium ripe banana - ½ cup mashed (120 g)
1 cup oat flour (100 g)
½ cup buckwheat flour (60 g)
2 teaspoons cornstarch (15 g)
2 Tablespoons coconut sugar (25 g)
1 Tablespoon ground flaxseed (10 g)
2 teaspoons baking powder (8 g)
¼ teaspoon salt (2 g)
1 ½ cups unsweetened plant milk - soy, oat, almond, or cashew all work (360 g)
½ teaspoon vanilla extract (2 g)
(Optional: ½ teaspoon cinnamon / 1 g)
For the Optional Maple-Glazed Pecans
½ cup Pecans, roughly chopped (55 g)
1 Tablespoon Maple Syrup (15 g)
1 Tablespoon coconut sugar or brown sugar (12 g)
(optional) Pinch of cinnamon
Instructions
For the Banana Waffles
-
Mix the dry ingredients by whisking together the oat flour, buckwheat flour, ground flaxseed, coconut sugar, baking powder, cinnamon, and salt in a large bowl.
-
In a separate bowl, mash the banana until smooth, then stir in the plant milk and vanilla.
-
Pour the wet mixture into the dry and stir just until combined. The batter should be thick but still pourable—add a splash more milk if it feels too stiff.
-
Let the batter rest for 5 minutes so the flax can hydrate and the flours can absorb the liquid.
-
Preheat your waffle iron (lightly spray with non stick spray if needed), then pour in enough batter to cover the grid. Cook until the waffles are golden and crisp—your best cue is when the steam stops escaping from the sides of the iron.
-
Serve right away with fresh fruit, maple syrup, or a drizzle of nut butter.
Note about cook time: Cook time is based on using a Belgian waffle maker (about 7 minutes per waffle). Time will vary depending on your waffle iron size and style.
For the Optional Maple-Glazed Pecans
- Roughly chop the pecans and add them to a small frying pan along with the coconut sugar and maple syrup and cook over medium to low heat for 5-6 minutes.
- They will start off bubbling, take a spatula and just keep moving them around the pan to get a nice even candy coating.
- After a couple of minutes they'll become more gooey and sticky. Keep stirring and reduce your heat to low.
- Once you start to see the gooeyness drying into a sugary candy coating and the pecans have a dry look to them they are done.
- Remove from heat. Transfer to a serving dish and allow to cool for a couple of minutes before handling.
Notes
Candied Pecan Pro Tip: When candying your pecans, be sure to stir frequently to prevent burning. Start on medium heat until you see bubbles then turn heat to low. Once the pecans are done, let them cool completely then add them to the waffles or place them in a decorative dish and let everyone add their own.
Let the batter rest for 5 minutes so the flax can set and the flours hydrate—this helps with crisp edges and a fluffy center.
Waffles are ready when the steam stops escaping from the iron; resist lifting the lid too early.
For a gluten-free version, use certified gluten-free oat flour (buckwheat is naturally gluten-free).
Swap the banana with ½ cup pumpkin puree and swap the cinnamon for pumpkin pie spice. The flavor will totally make you feel like Fall has arrived, and the waffles will still be fluffy and moist!
- Prep Time: 10 minutes
- Cook Time: 15 minutes
- Category: Breakfast, Brunch
- Method: Waffle Iron
- Cuisine: Plant Based
⭐Did you enjoy these Vegan Banana Waffles with Oat Flour & Buckwheat recipe?
If you give these Banana Waffles a try please leave a comment and rating below! Justin and I read every one! Your feedback helps more people find my recipes and keeps the delicious messy chaos going in the Fresh Fun Flavor kitchen. Plus, we just love hearing from you!
👩🏻🍳Creating the shot: A behind the scenes look
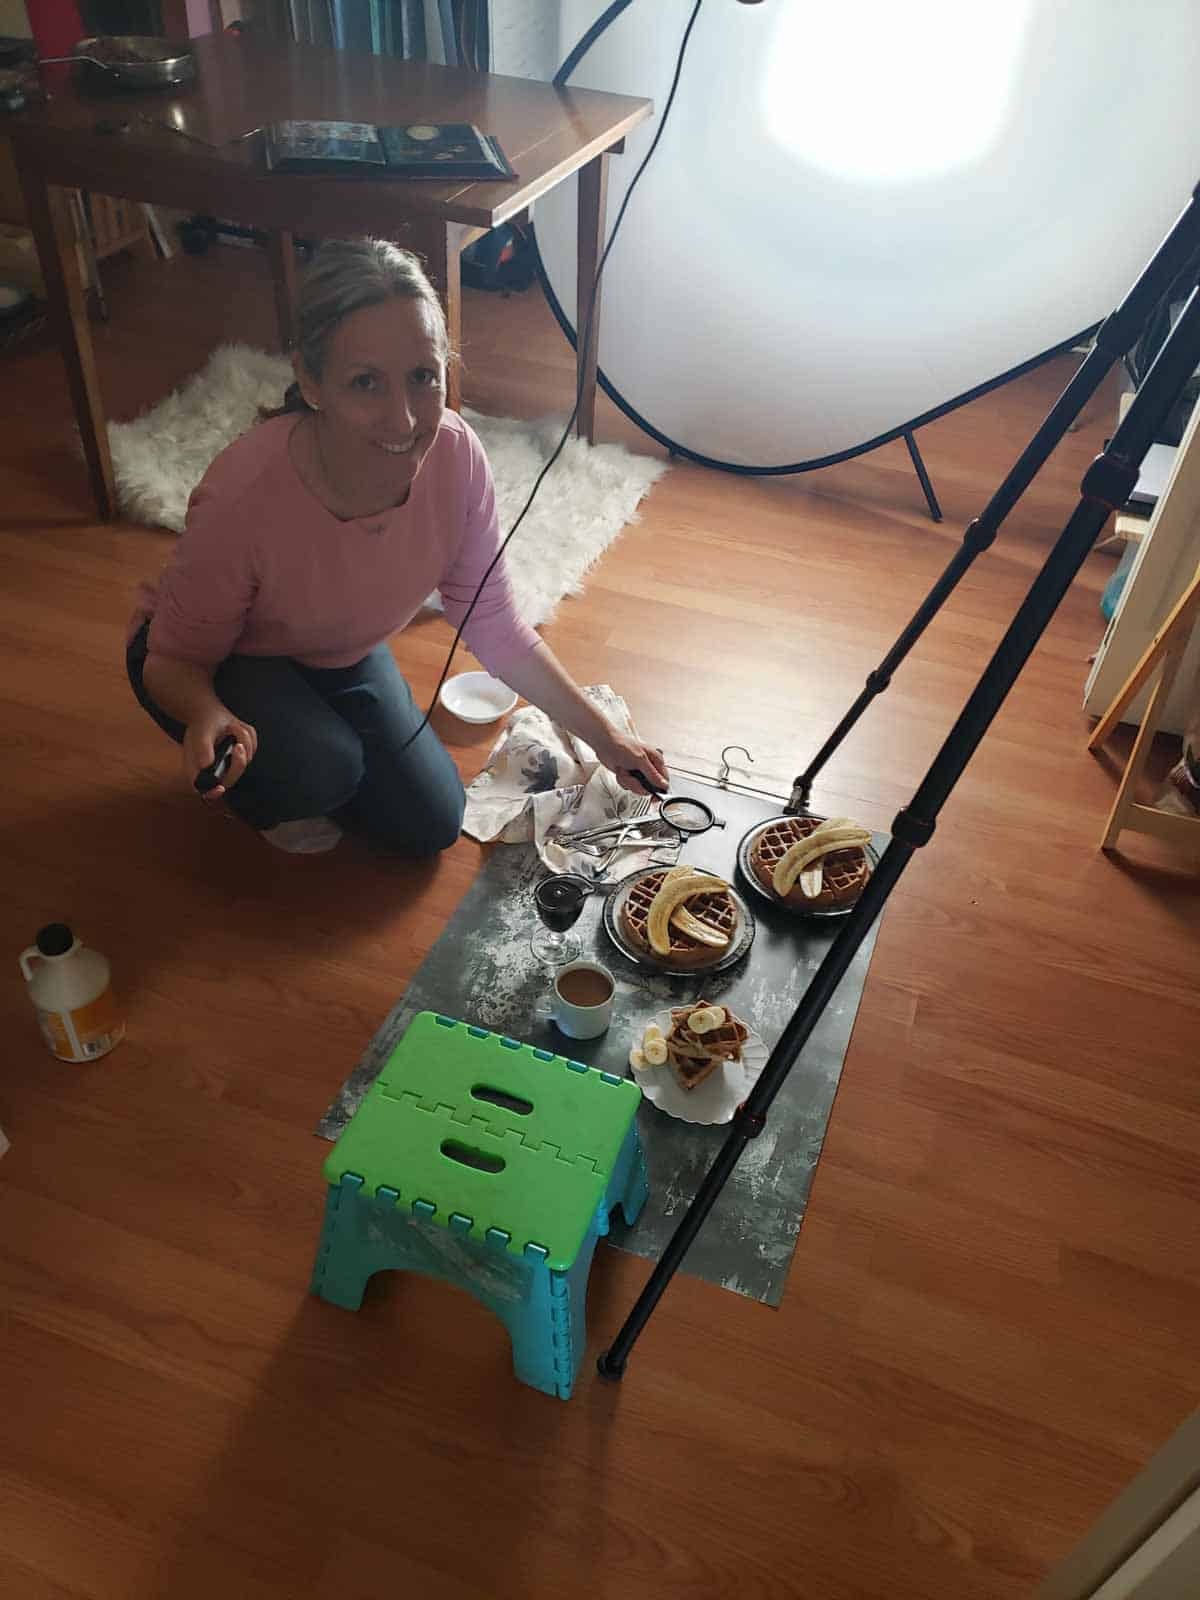
Staging the perfect scene!

Justin being the world's greatest photography assistant as always.

Finally time to eat the star dish! This is the BEST part of recipe testing!
What really happened
Sacrifices were made. Nailing the perfect feature photo for you folks can take time and waffles soak up syrup like it's their job. But you definitely want the syrup to show all of it's syrupy goodness on camera because what's a show stopping waffle without syrup?
So here's how it went down. Justin snapped the photos while I poured so-much-syrup. Pour, snap, pour some more, snap, pour a bucket full, quick snap! Then we were done and I announced, "Breakfast is ready!". The three of us sat down to the table and ate the most soggy, syrup drenched glorious waffles that would have made Will Farrell in Elf proud enough to pull up a chair at our table and ask if we had any spaghetti to go with it.


Disclaimer: The nutritional information provided for Vegan Banana Waffles is an estimate calculated using Nutrifox, an online tool. Please note that this information is for general guidance only and should not replace advice from a qualified professional. Additionally, this page may include affiliate links, meaning I may earn a small commission if you purchase through those links at no extra cost to you. Thank you for supporting Fresh Fun Flavor!


Comments
No Comments