
If your weeknight dinners have been feeling a little “meh,” allow me to introduce a Creamy Lemon Artichoke Soy Curl masterpiece that’s about to strut into your kitchen like it owns the place. A vegan piccata with all the flavors of the original, but made with tender soy curls simmered in a silky cashew cream sauce that loves to cling to artichokes and capers. Oh, and it lands on the table in about 30 minutes. It’s simple, it’s vibrant, and it tastes like something you’d order at a cute little bistro minus the dairy, the fuss, and the price tag.

For awhile I’ve been wanting to create a lemony piccata-style dinner, and this one finally came together exactly the way I imagined. A dinner that felt fancy without requiring… you know… effort. I love things that can be made in 30 minutes with minimal clean up. The steps are fairly simple so even a new cook can pull this off beautifully! No need for take out tonight, grab your apron and let's get cooking!
If 30-minute meals are your love language, don’t miss my Vegan Enchilada Bake or my creamy Tuscan Gnocchi—they’re speedy, cozy, and full of flavor. Need dessert? Definitely try my chewy Lemon Blueberry Crinkle Cookies for the perfect sweet little finale to your meal!
Jump to:
💗 Why You’ll Love This Vegan Piccata
- Great for new or seasoned plant-based cooks. Whether you’re familiar with soy curls or this is your first rodeo, this recipe is beginner-friendly, quick, comforting, and flavorful.
- Goes with almost anything. Serve it with pasta, mashed potatoes, crusty bread, or eat it straight from the pan like I did.
- Leftovers? Still amazing. The sauce thickens and gets even more velvety — perfect for a next-day lunch that makes future you say, “Thank you, past me.”
- Perfect date night dinner. The soy curls, artichokes, and capers soak up that silky cashew sauce giving you a plant-based twist on vegan chicken piccata that feels fancy, decadent and satisfying. Add this quick homemade garlic bread for the perfect date night menu!
🍋 Ingredients & Helpful Substitutions
For the full list and measurements, see the recipe card below. Here are the main ingredients and easy swaps.
- Soy Curls: These little beauties soak up flavor like champs and give this dish that tender, protein-packed bite. There’s really no true substitute here without creating a completely different recipe, so stick with soy curls for the best texture and results. They're so easy to cook with and make a great chicken replacement, you'll love them!
- Vegetable Broth: Used to soak the soy curls and build the base of your piccata-style sauce. Low-sodium or regular are both fine.
- All-Purpose Flour: Helps the soy curls brown up beautifully and thicken the sauce just enough. Sub with a gluten free flour if needed.
- Vegan Butter: Adds richness and helps the soy curls get that golden edge. Any plant-based butter you love will do the trick.
- Garlic: Fresh or jarred minced garlic both work here—use whatever keeps dinner moving. I used jarred, nobody pushed their dinner away.
- White Wine: A splash of Pinot Grigio or Sauvignon Blanc adds brightness and depth. I used Sutter Home for a vegan friendly brand of wine.
- Lemon Juice: Fresh lemon juice is always the move for piccata, but bottled lemon juice works in a pinch (we’ve all had those days).
- Raw Cashews: Blended with water to create that silky, creamy sauce. Be sure to use raw unsalted.
- Marinated Artichoke Hearts: I've tried nearly every brand and love Del Monte because they’re reliably soft.
🍲 How to Make Creamy Lemony Soy Curls
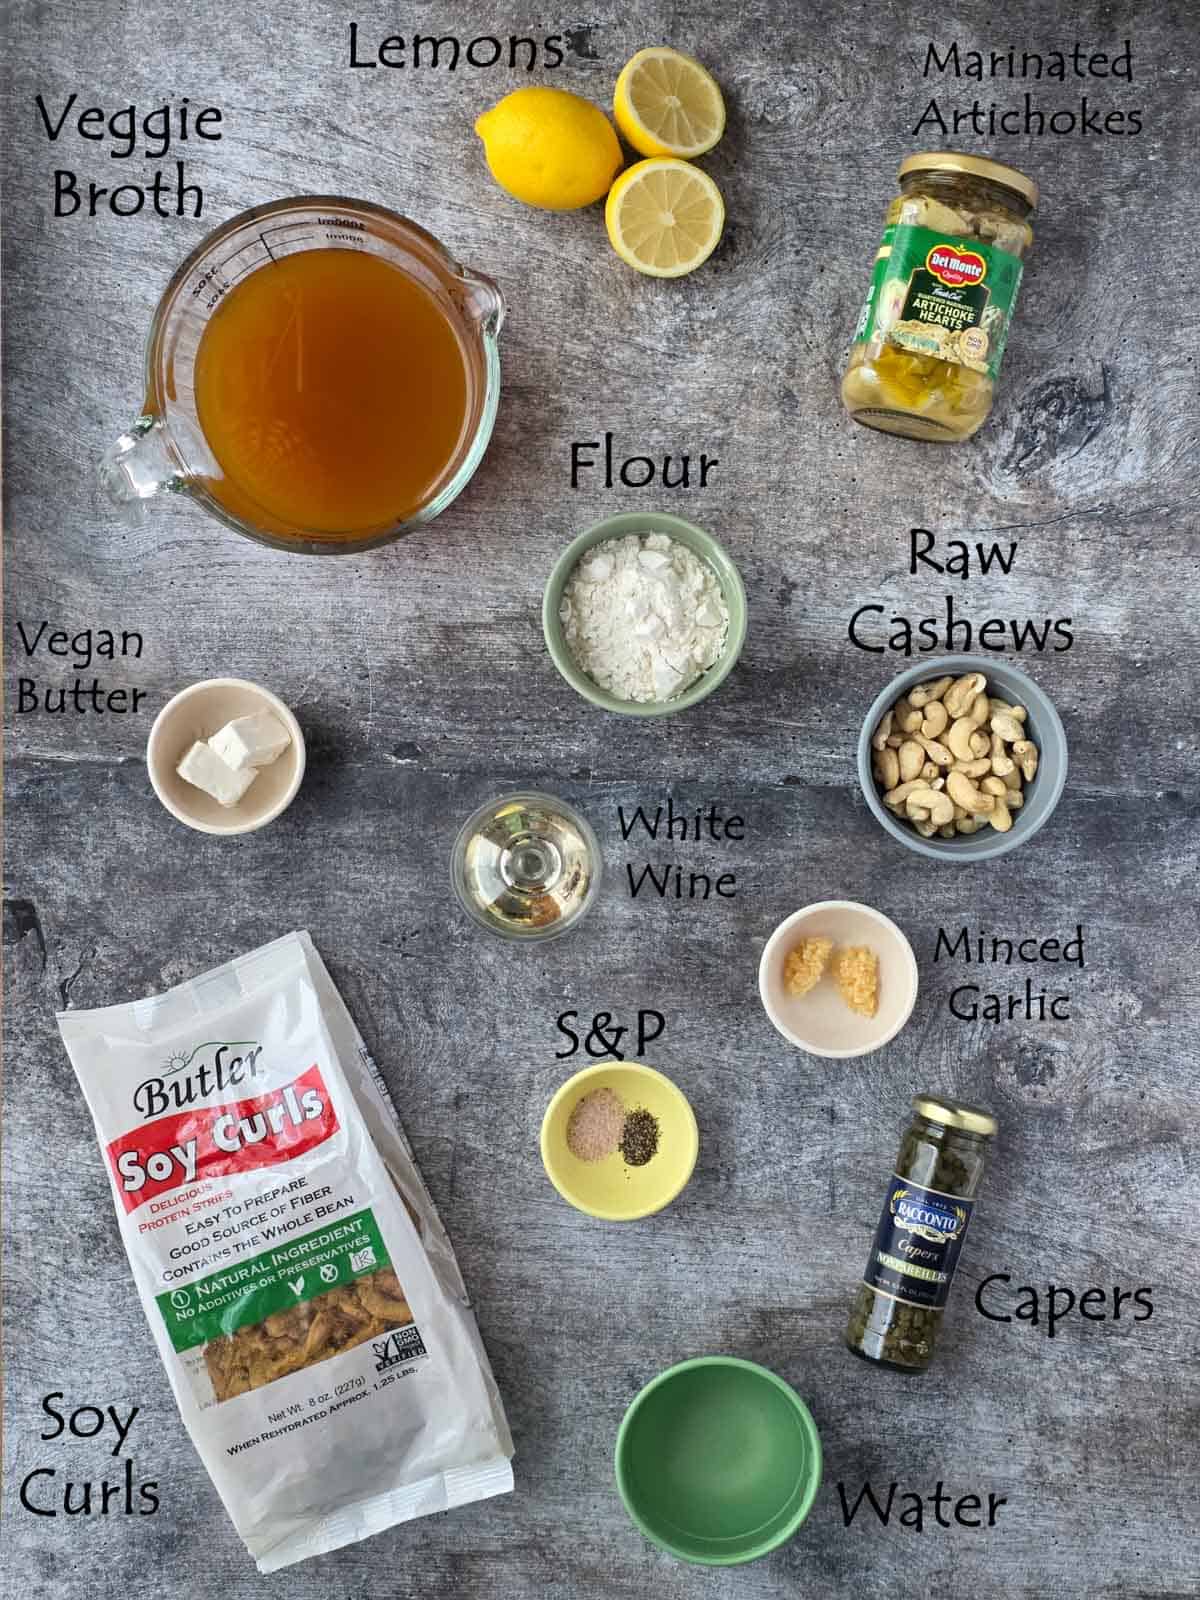
Gather up your ingredients
Lay everything out so you’re ready to roll — soy curls, broth, flour, seasonings, garlic, vegan butter, white wine, lemon juice, cashews, artichokes, and capers.
Advance Prep: (If you don’t have a high-speed blender, soak cashews in hot water for 20 minutes first so they are ready when you make the sauce.) If using a high speed blender you can skip this step and go back to your 30 minute meal!.


Let them soak for 10 minutes.
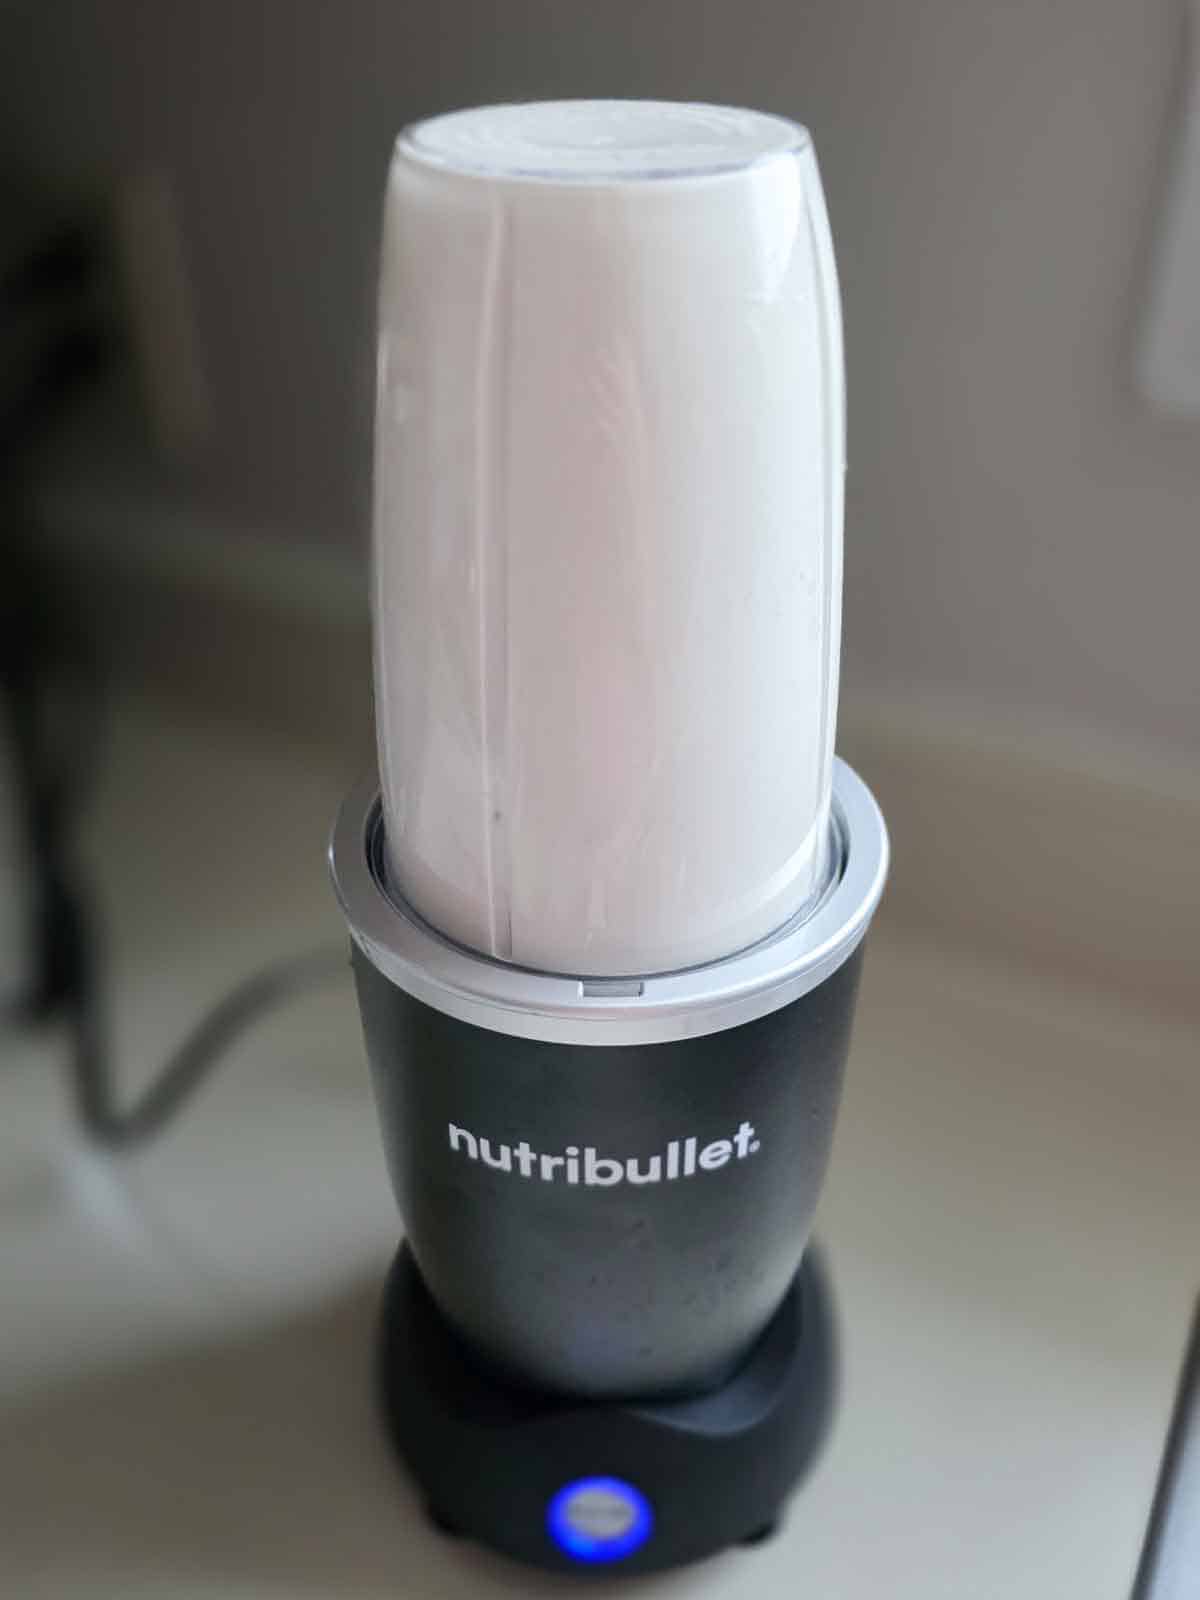
Blend the Cashew Cream
While the soy curls are doing their thing, add the cashews and water to a high-speed blender. Blend for 60 seconds, or until completely smooth and creamy. Set aside.

Drain the Broth (my no-squeeze trick!)
Use a bowl with a lid and hold it slightly ajar as you pour the excess broth into a measuring cup. No squeezing squishy soy curls, no mess — and you’ll use that broth for the sauce.
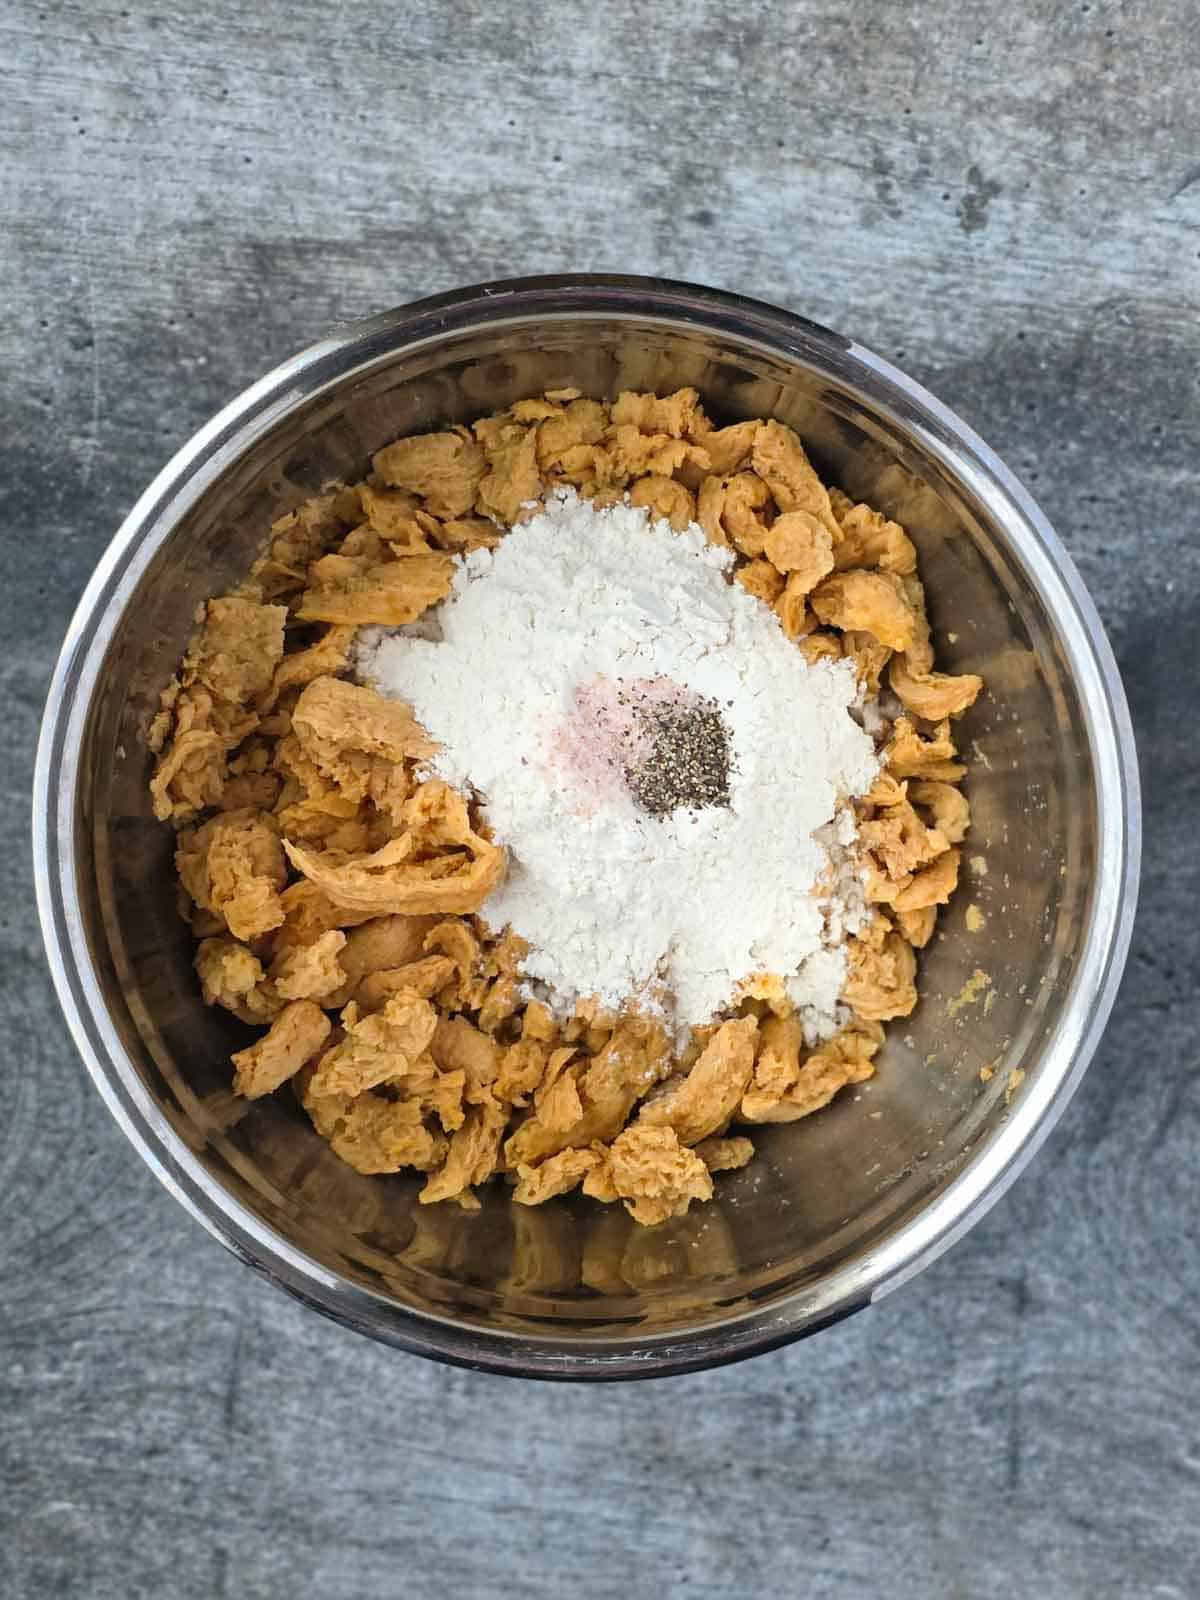
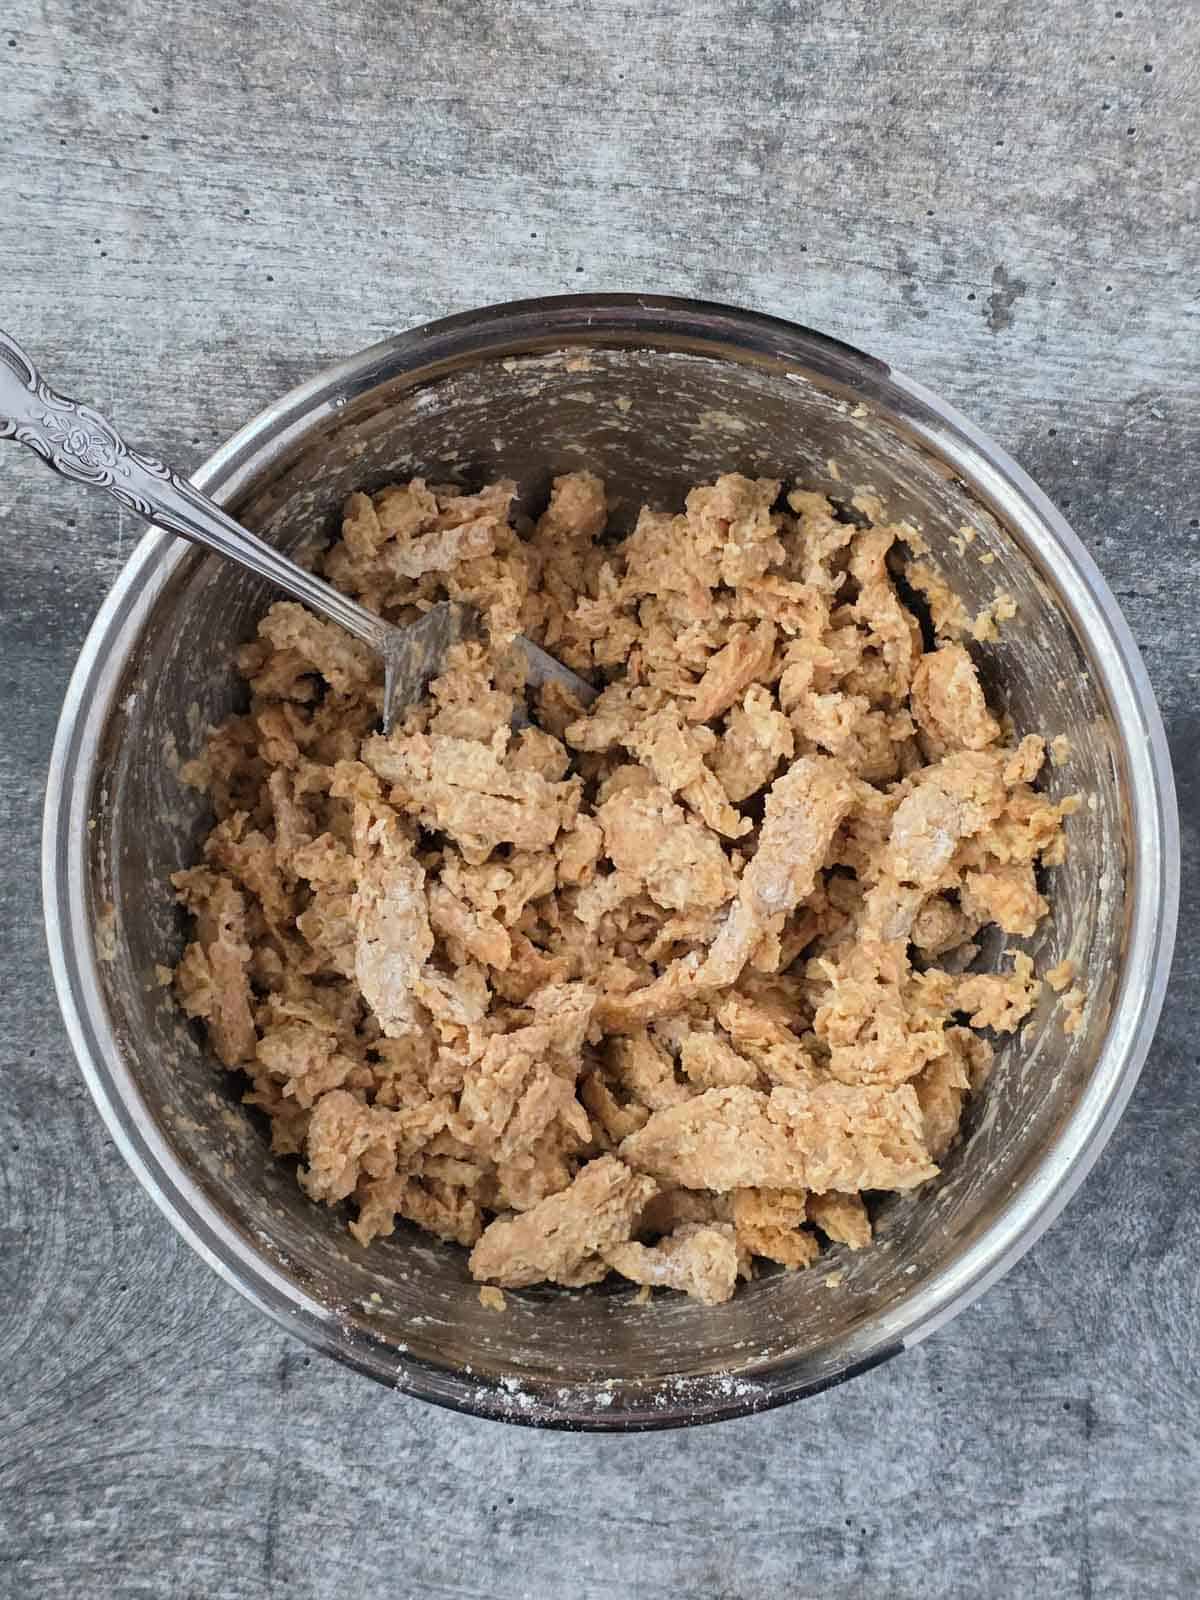
Toss with a fork until they’re lightly and evenly coated.
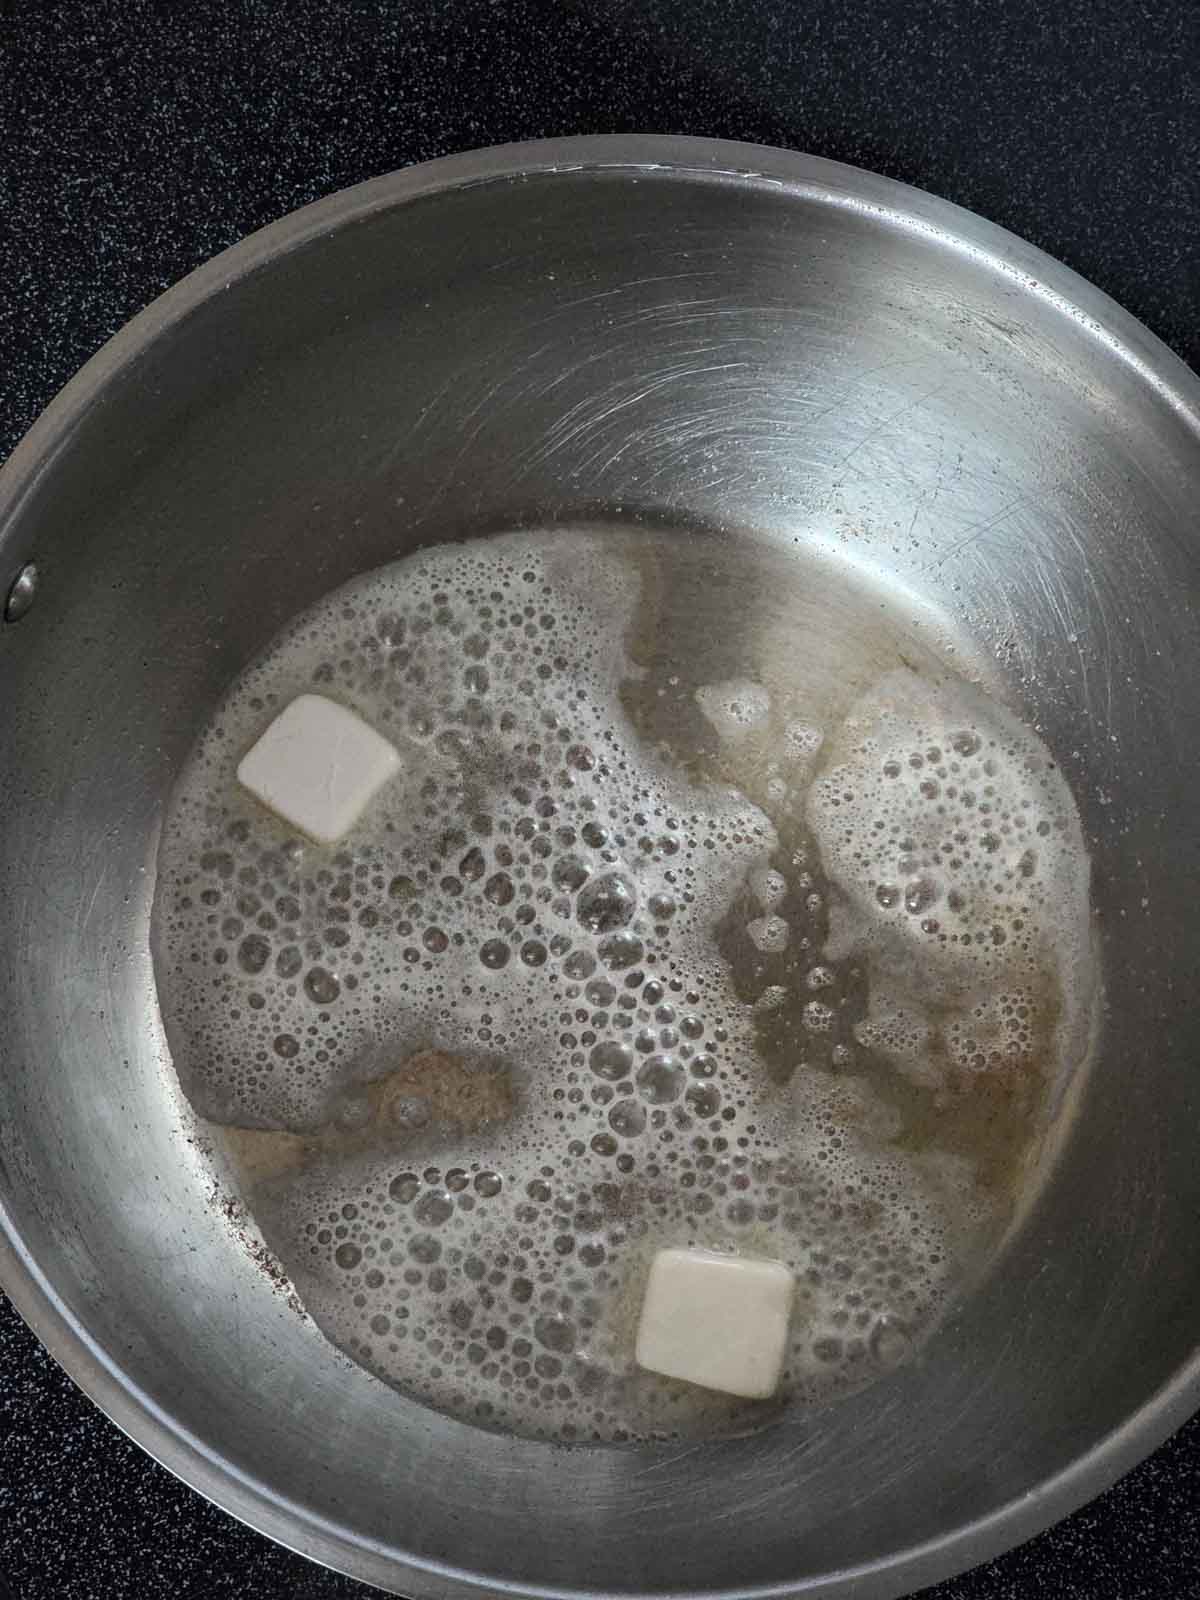
Preheat the Pan
Heat a large pot over medium heat. Add the vegan butter.
Add the Curls
Pour in the coated soy curls. Cook for about 10 minutes, stirring occasionally so they can develop those beautiful golden edges.

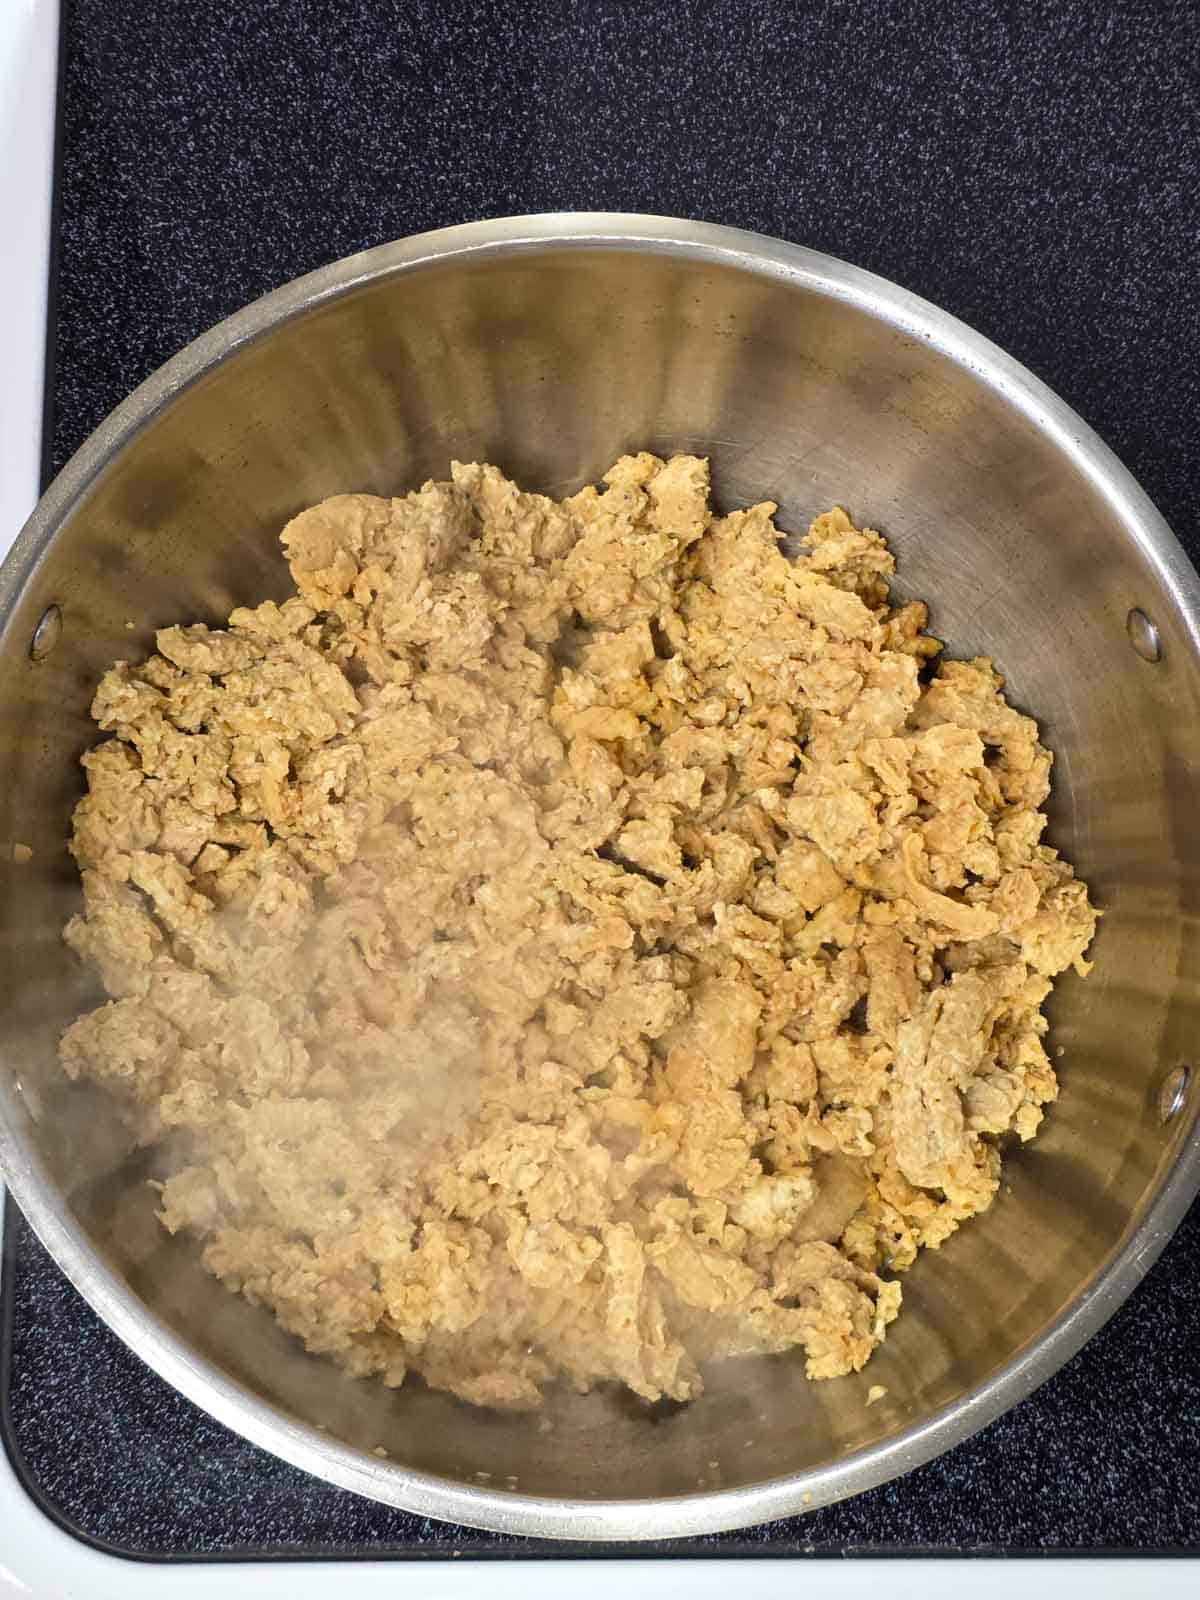
Golden Brown & A Slight Crunch
Be sure not to stir constantly or they won't have time to brown, a light toss every 2-3 minutes is fine. You're looking for that gorgeous color.
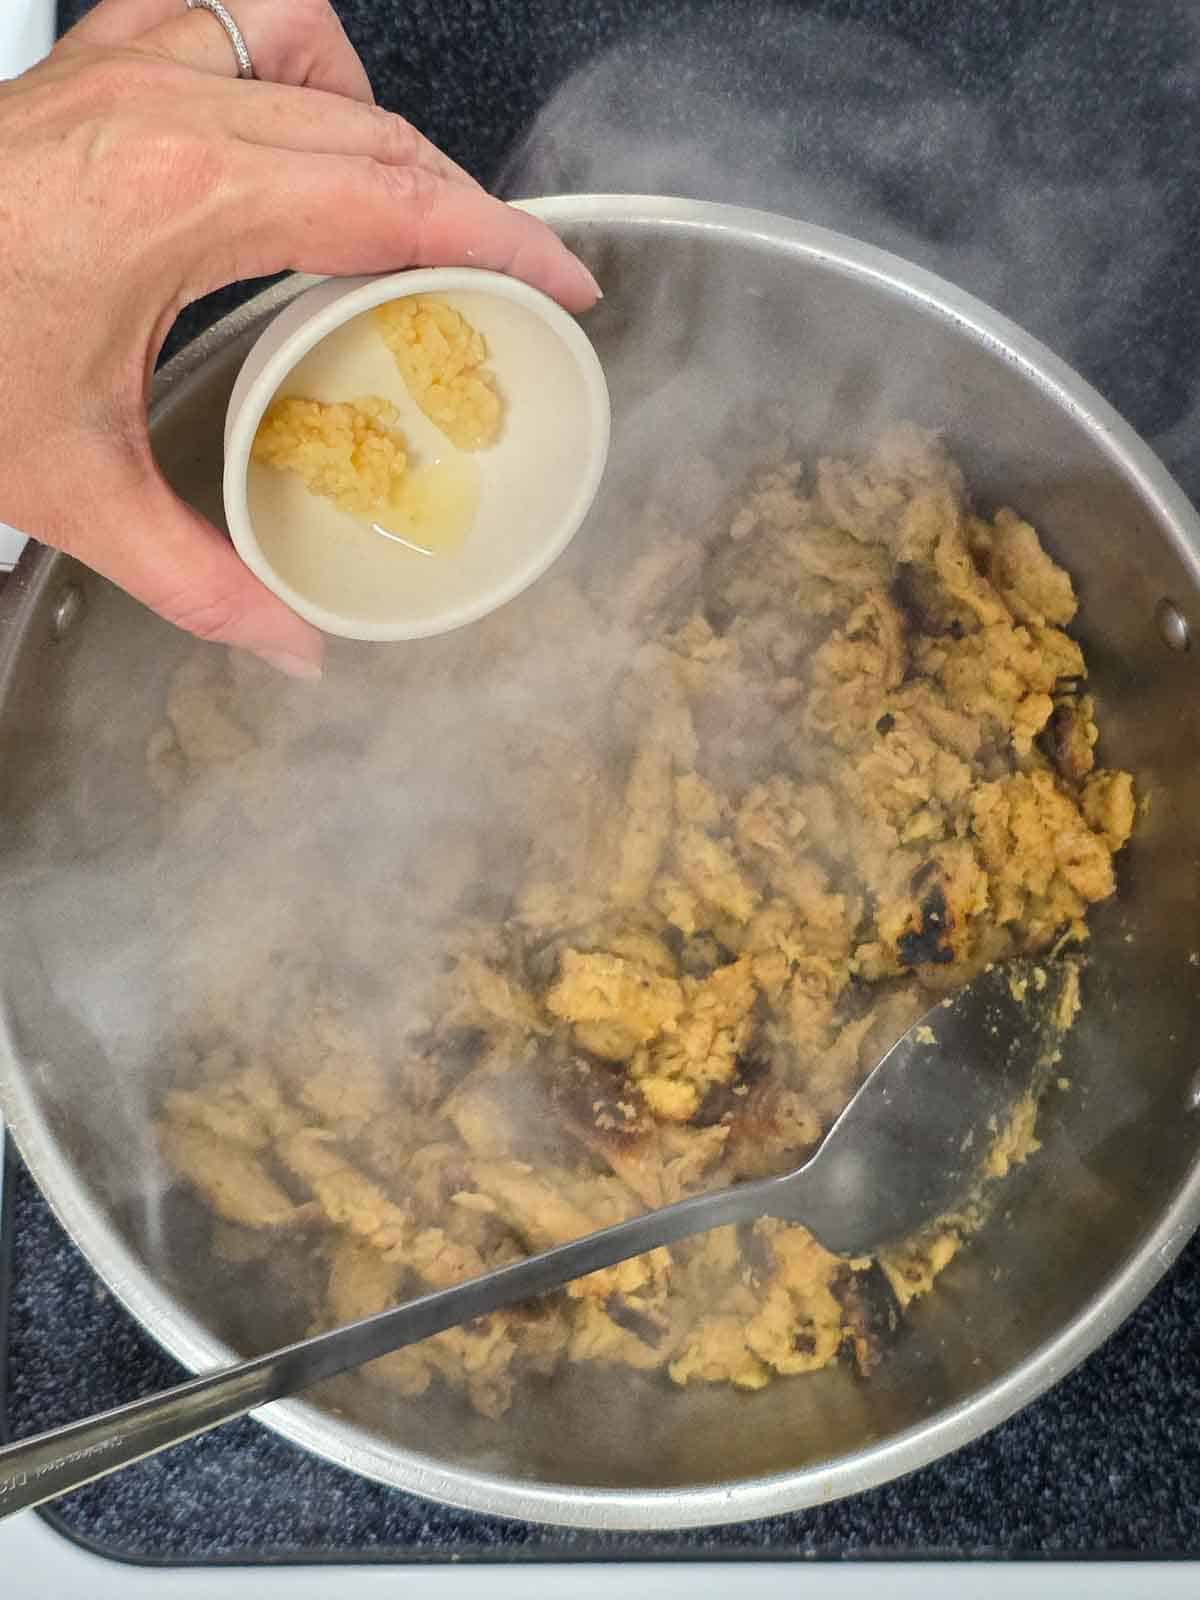
Add the Garlic
Once the soy curls are nicely browned, stir in the minced garlic and cook for about 30 seconds, just until fragrant.
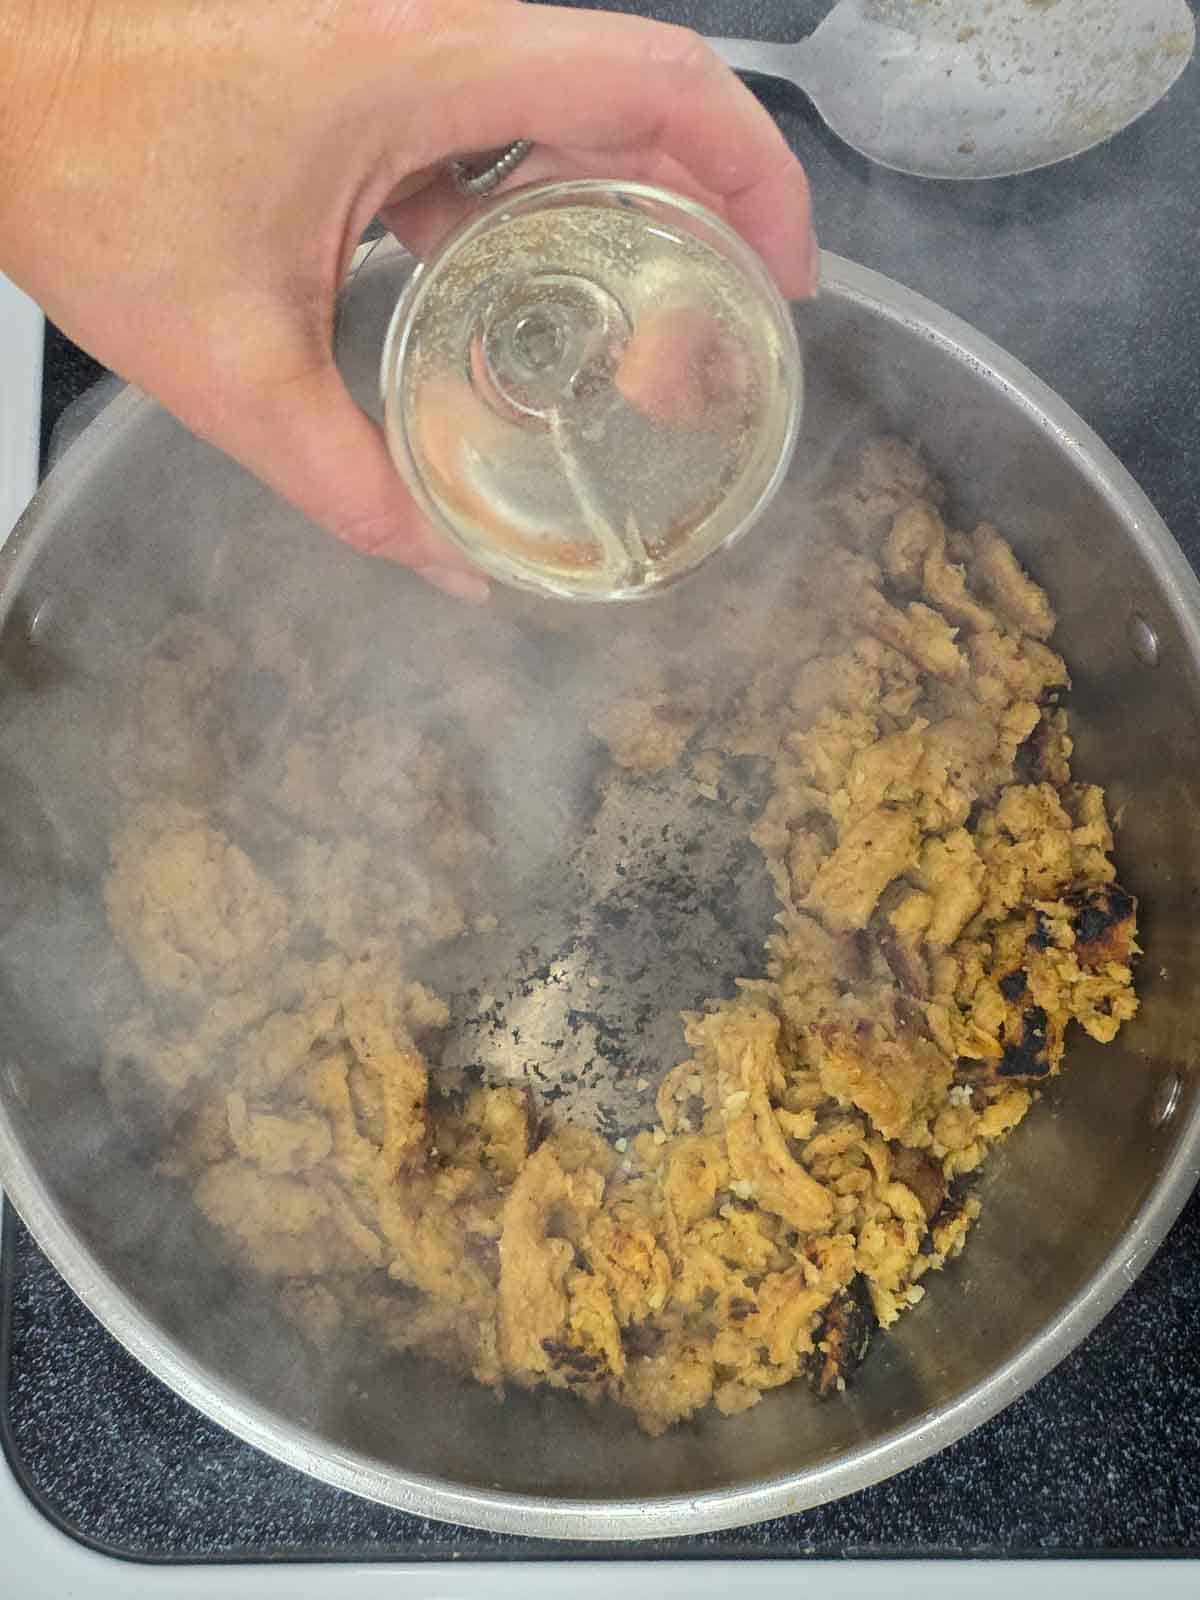
Deglaze the Pan
Push the soy curls to the outer edges of the skillet and pour the white wine into the open center to deglaze the pan. Scrape up any browned bits — that’s where the flavor lives.

Build the Sauce
Pour in the reserved broth.
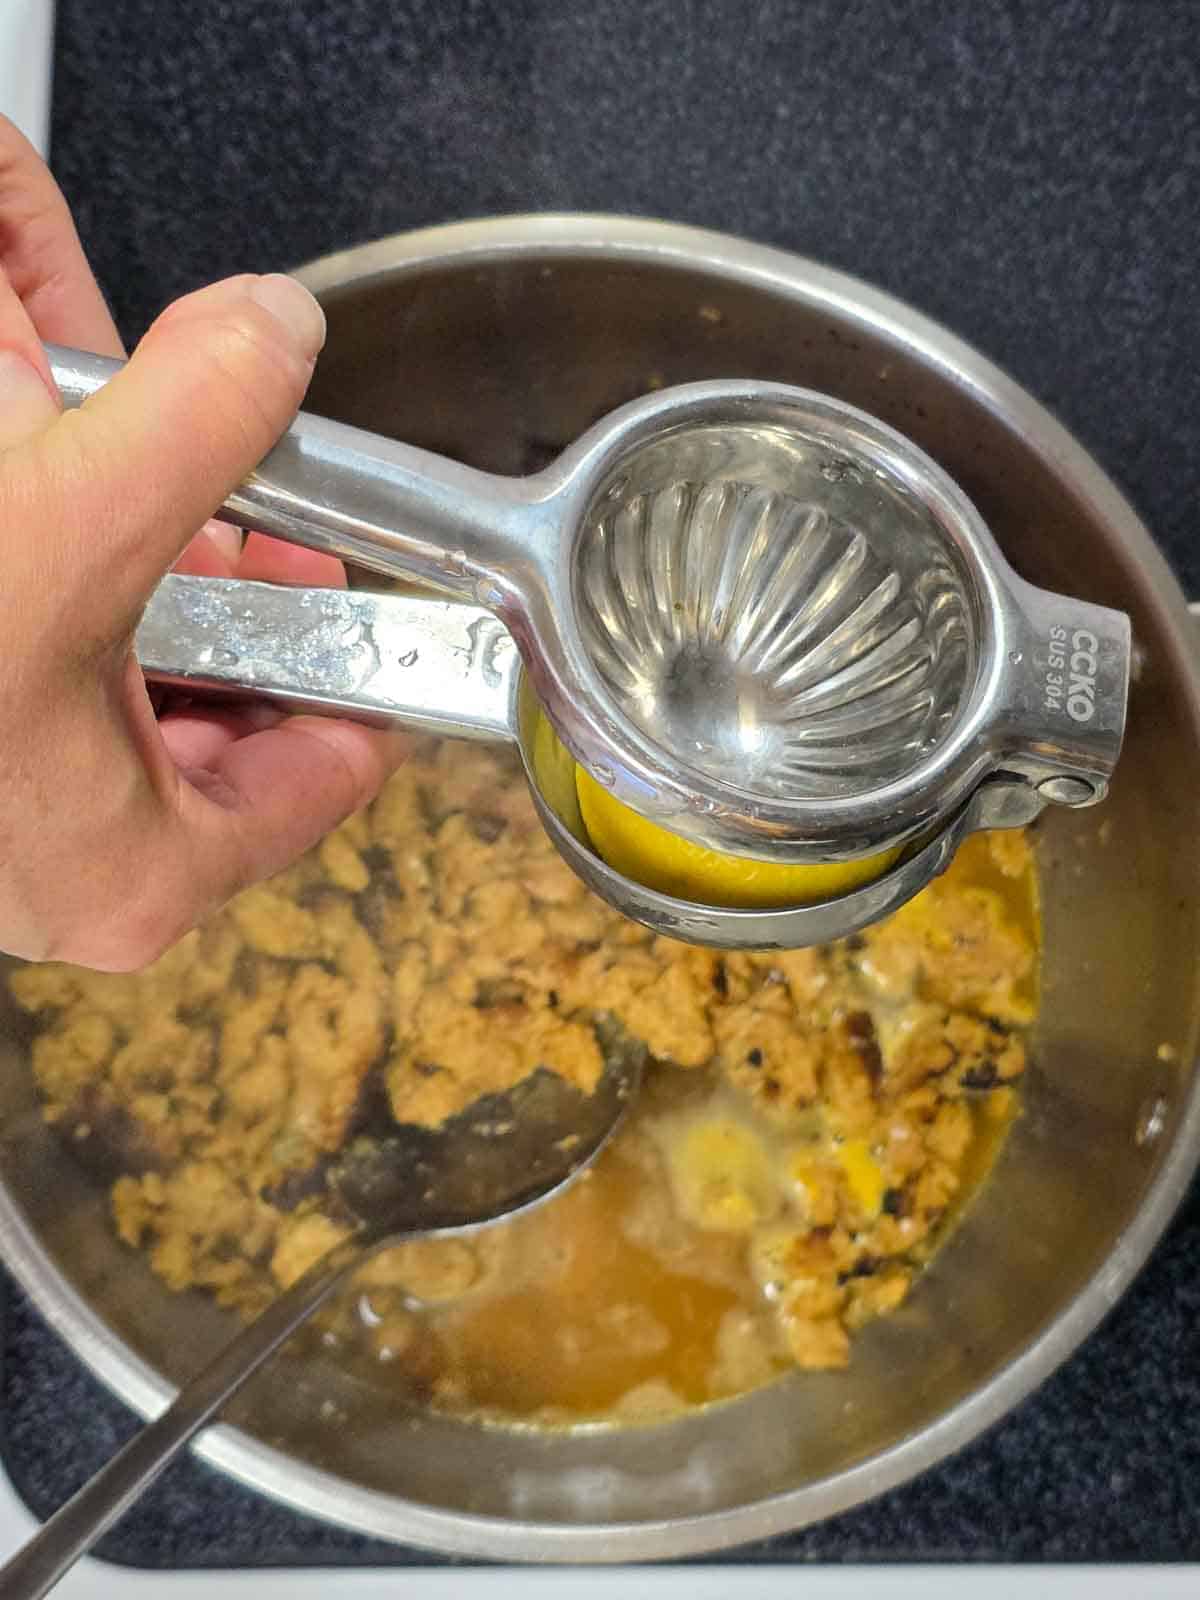
Add the fresh lemon juice.
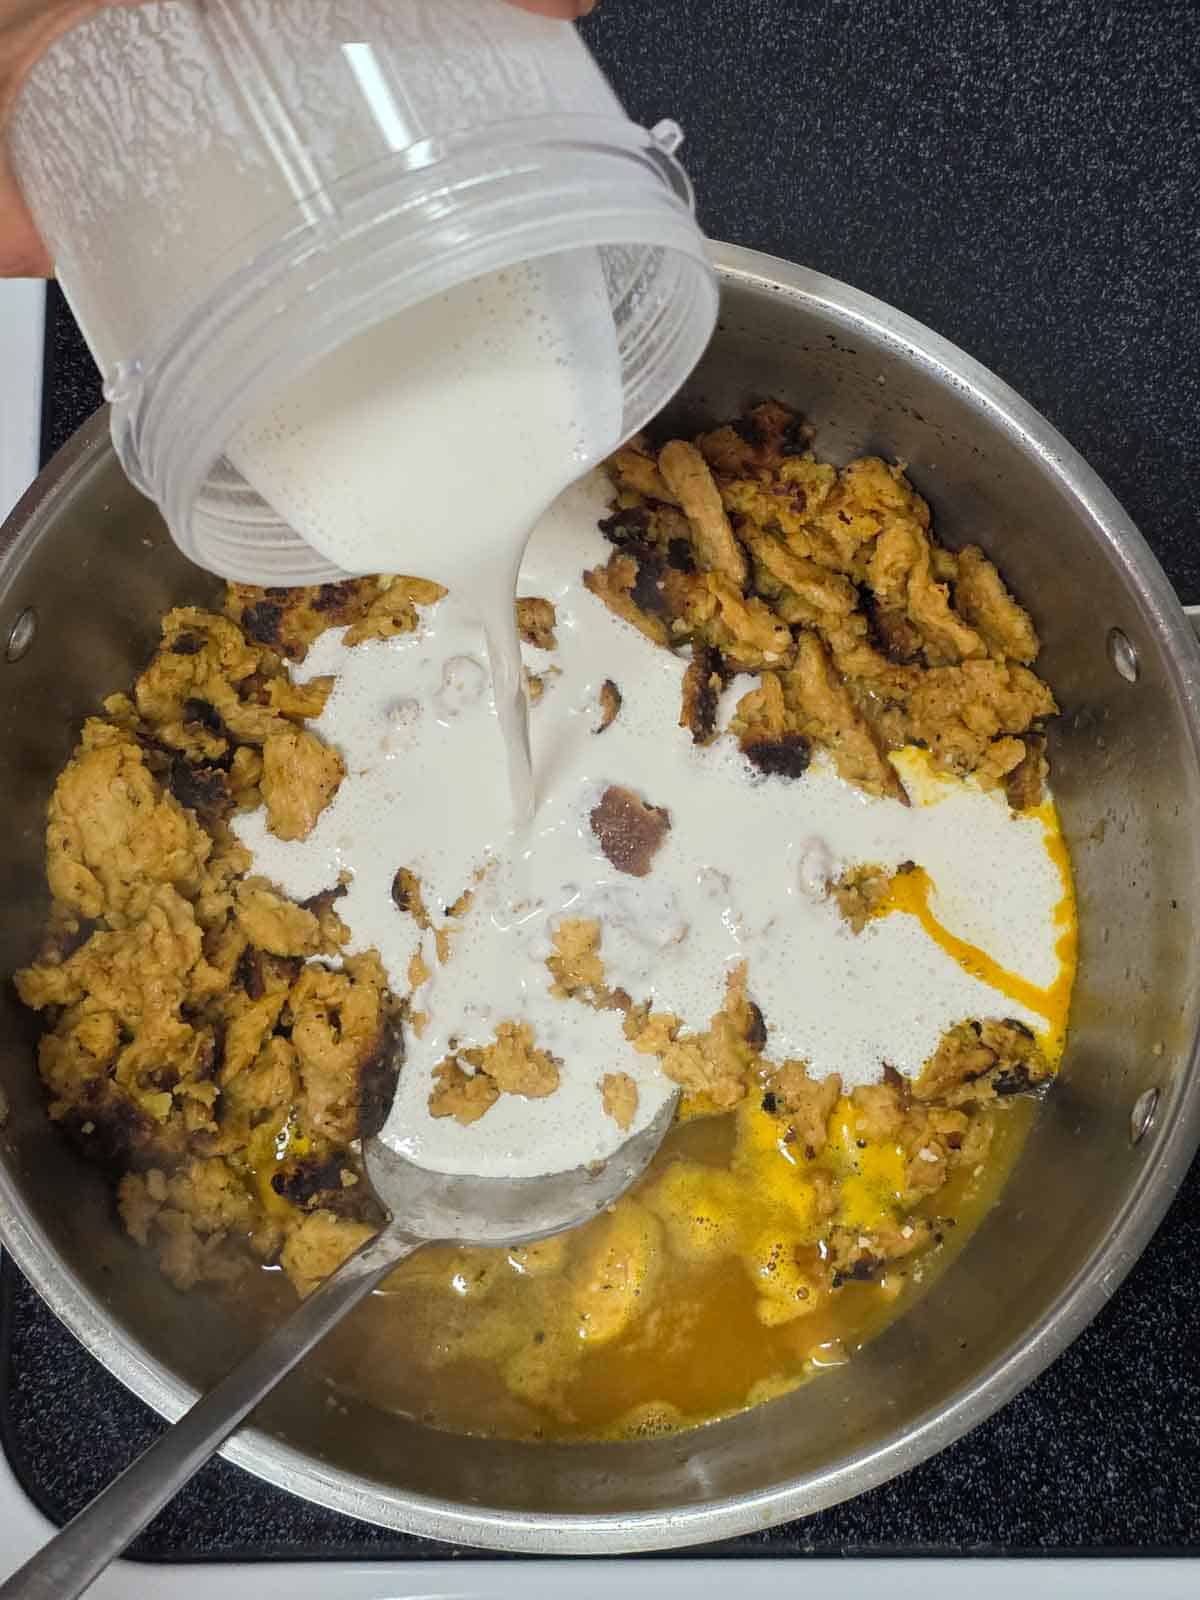
Then add the blended cashew cream.

Reduce the Heat
Bring the heat down to low and let the sauce thicken for 2–3 minutes, stirring occasionally.
Chop Chop!
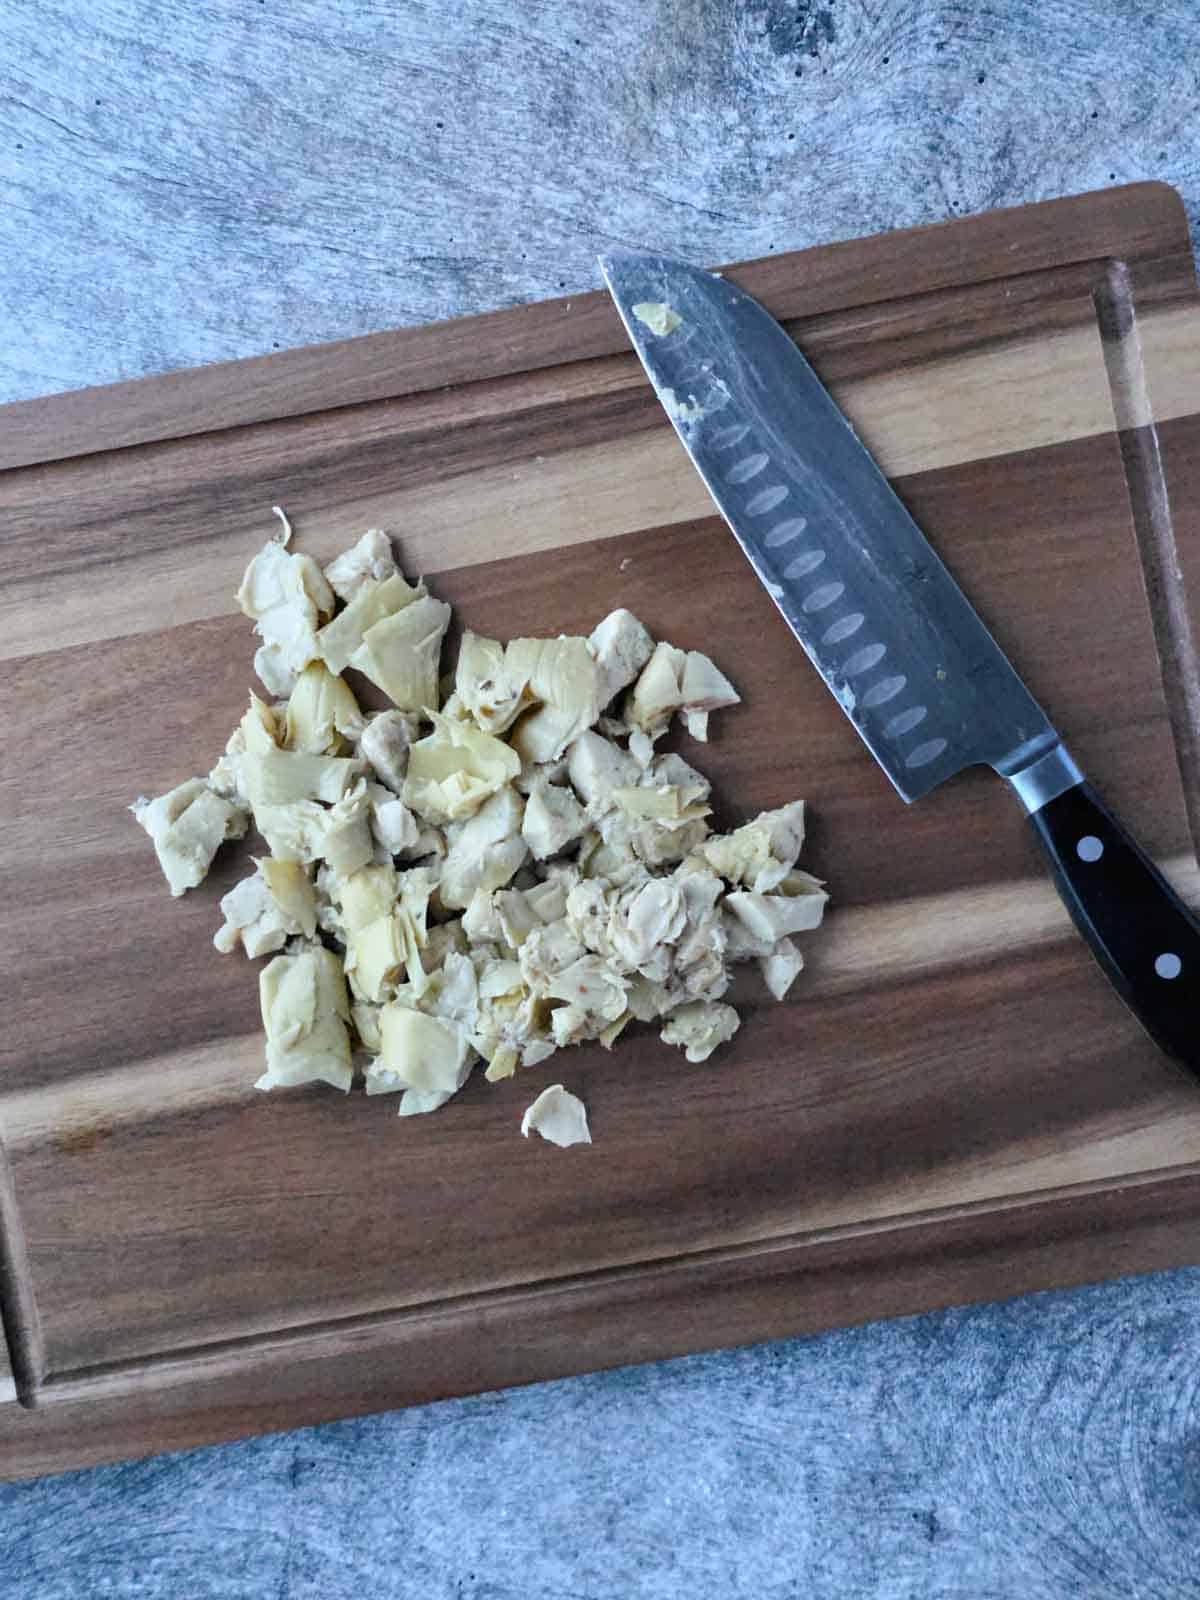
Give your artichokes a quick chop. I like to do this for more even distribution of flavors and so you're not just getting a big bite of artichoke.
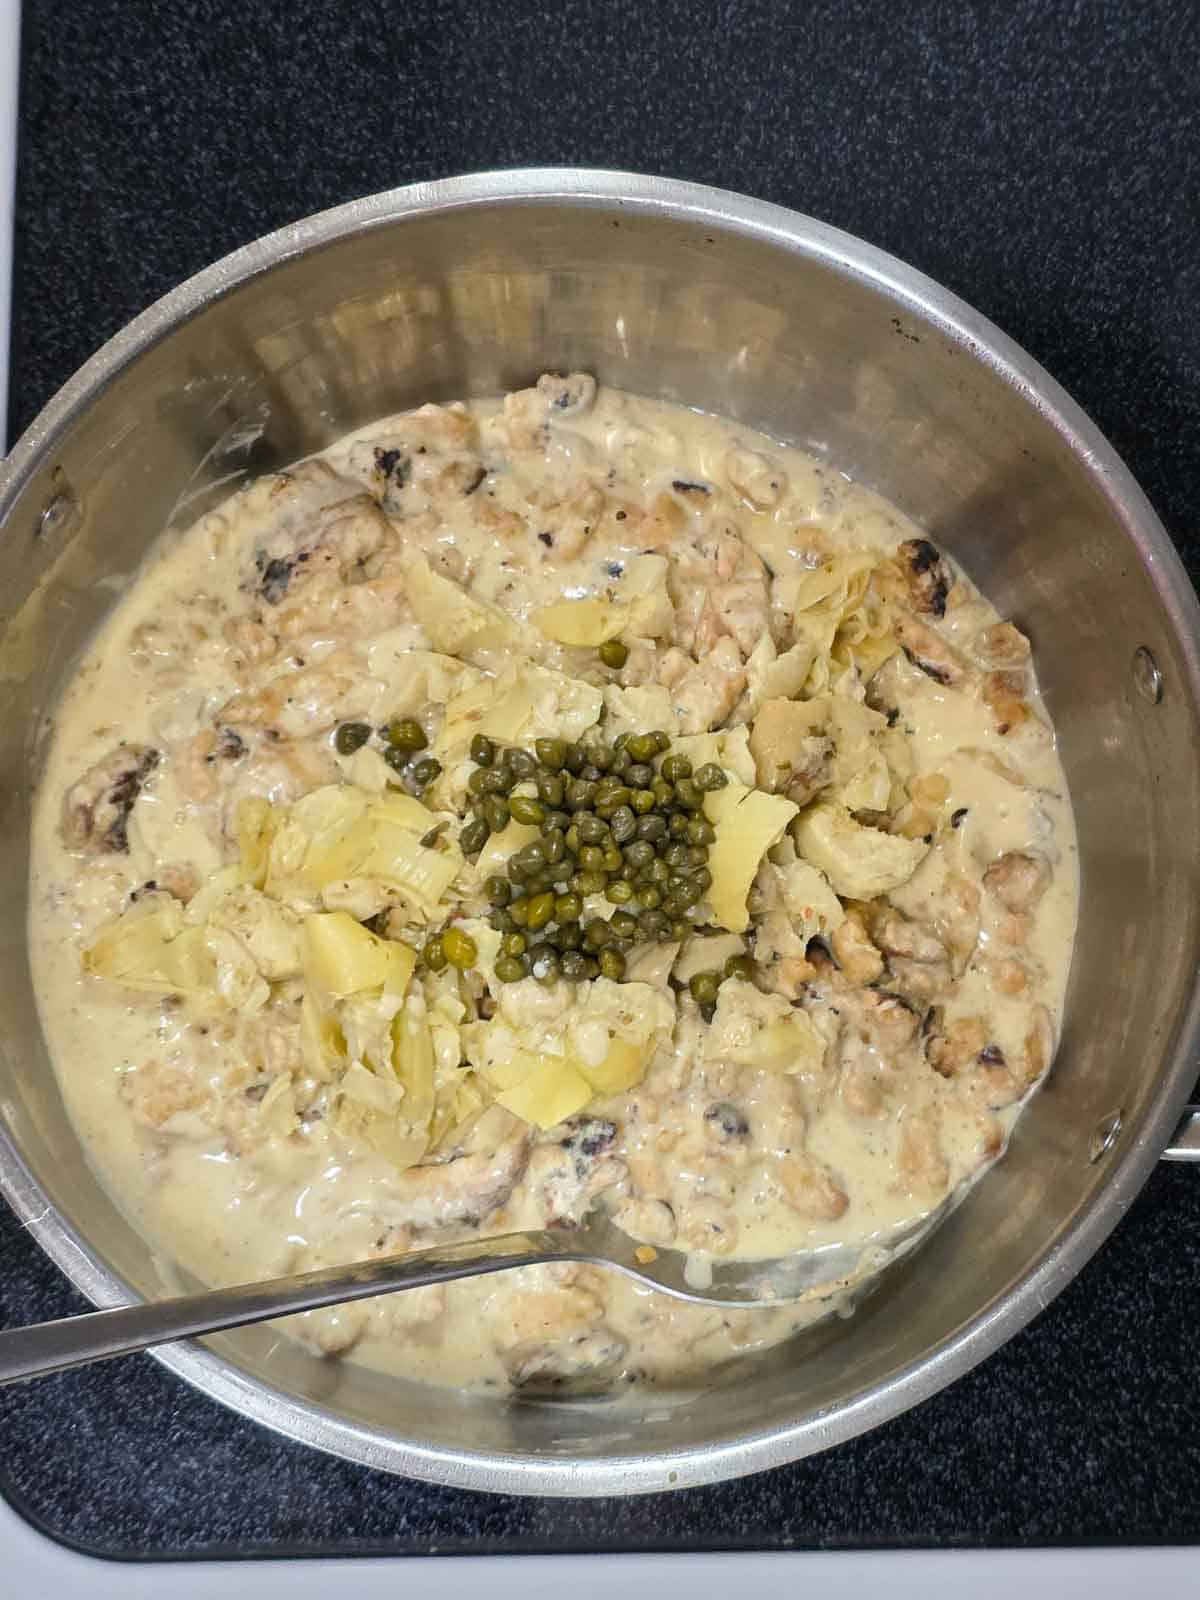
Add the Artichokes and Capers
Stir in the drained, chopped artichoke hearts and capers. Let everything warm through for another minute, then give it a taste and adjust the seasoning if needed. I loved it as is, Chris likes extra lemon. If you want it more lemony feel free to add another squeeze!

Serve and Enjoy
Serve immediately — over pasta, mashed potatoes, or with crusty bread to soak up every last bit of that creamy lemon sauce.

🧊Storage & Meal Prep
Refrigerator: Store leftovers in an airtight container for 4–5 days. The sauce thickens a bit as it chills, but it reheats beautifully.
Freezer: Freeze in a freezer-safe container for up to 3 months. Thaw overnight in the fridge before reheating.
Reheat (Oven): Warm leftovers in an oven-safe dish at 350°F (175°C) for 12–15 minutes, or until heated through.
Reheat (Skillet): Add a splash of broth to a nonstick skillet and reheat over medium-low heat, stirring occasionally until hot and silky again.
Meal Prep Friendly: This is a great make-ahead dish! Prep it on Sunday and enjoy easy reheatable lunches or dinners during the week.
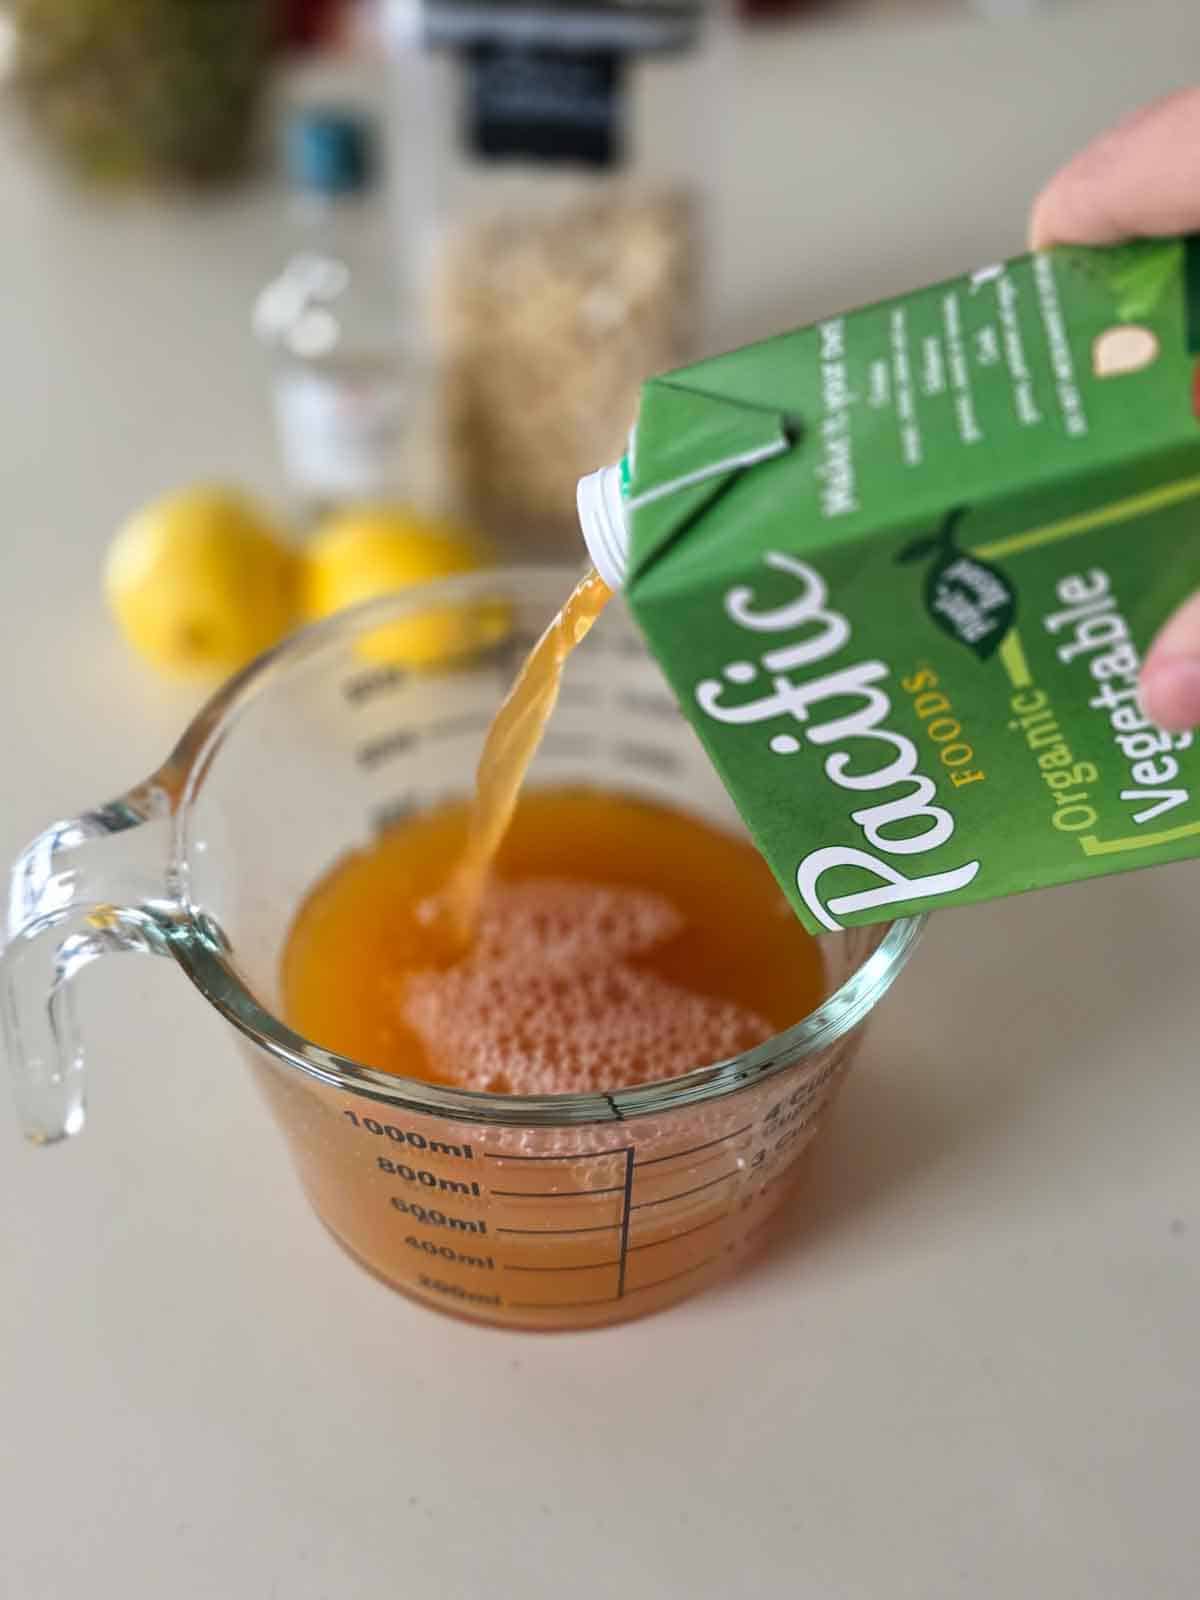
👩🏻🍳Pro Tip: Did you know the spout on a broth carton should face up, not down toward your glass? Pouring with the spout on top gives you a smooth, steady stream, no splashing!
❓FAQ's
Yes! Replace the wine with an equal amount of vegetable broth plus an extra squeeze of lemon. You’ll still get that bright piccata flavor without losing any depth.
Your sauce thickens as it simmers — and even more as it cools.
If it’s too thin, let it bubble on low heat for 1–2 minutes.
If it’s too thick, whisk in a splash of broth until silky again.
I love the Del Monte brand marinated artichoke hearts for this recipe because they are always so soft (no tough parts) and they lend a bit of extra flavor to the dish. However, you can use canned if needed. Just trim the tough ends, if you find any, before adding them to the pan.
Soy curls don’t taste like chicken on their own, they don't taste like anything really — they taste like whatever delicious sauce you cook them in. In a lemony piccata-style sauce, they take on that bright, savory vibe beautifully. They also have a somewhat similar chewiness to chicken so they make a great chicken replacement in many recipes.
Yes! Use a gluten-free 1:1 flour blend for coating the soy curls. Everything else in the recipe is naturally gluten-free.
👩🏻🍳 Want to see some behind-the-scenes fun (and maybe a little kitchen chaos)? Keep scrollin’ — it’s all happening below the recipe card!
Print
Creamy Lemon Artichoke Soy Curls
- Total Time: 30 minutes
- Yield: 4-6 servings 1x
- Diet: Vegan
Ingredients
8 ounces soy curls
3 cups low-sodium vegetable broth
½ cup all-purpose flour
½ teaspoon salt
⅛ teaspoon black pepper
½ cup raw cashews
1 cup water
2 tablespoons vegan butter
2 garlic cloves, minced (or 2 teaspoons jarred minced garlic)
⅓ cup white wine (Pinot Grigio recommended)
¼ cup fresh lemon juice (juice of 2 lemons)
1 jar marinated artichoke hearts, drained and chopped
2 tablespoons capers
Instructions
- Soak the Soy Curls. Add the soy curls to a bowl with a lid (we'll be using the lid later for easier draining) and pour in 3 cups low-sodium vegetable broth. Let them soak for 10 minutes.
- Blend the Cashew Cream (While the Curls Soak): Add the cashews and water to a high-speed blender. Blend for 60 seconds, or until completely smooth. Set aside.
- Drain the Soy Curls: When finished soaking, hold the lid slightly ajar and pour the excess broth into a measuring cup to reserve for later.
- Coat the Soy Curls: Add the flour, salt, and pepper to the bowl of soaked soy curls. Toss with a fork to coat evenly.
- Brown the Soy Curls: Preheat a large pan over medium heat. I love my 5.5 Quart Pot for this. Once hot, add the vegan butter and the coated soy curls. Cook for 10 minutes, stirring occasionally (not too often — browning is your friend, about every 2-3 minutes should do).
- Add the Garlic: Stir in the minced garlic and cook for about 30 seconds, still over medium heat.
- Deglaze and Build the Sauce: Move the soy curls to the edges of the pan to create a space in the center. Pour in the white wine, then add the remaining broth, fresh lemon juice, and the blended cashew cream. Reduce heat to low and let the sauce thicken for 2–3 minutes.
- Finish the Dish: Add the drained chopped artichoke hearts and capers. Stir gently to combine, let everything warm through, then remove from heat and serve.
Notes
Gluten-Free Option: If you need this to be gluten-free, replace the all-purpose flour with a 1:1 gluten-free flour blend. The texture comes out just as golden and lightly crisp — no other modifications needed.
Storing Leftovers: This dish keeps beautifully! Store leftovers in an airtight container in the fridge for 4–5 days. The sauce thickens as it chills (hello, flavor boost!), but loosens right back up when reheated.
Freezing for Later: Yes, you can freeze it! Place cooled leftovers in a freezer-safe airtight container and freeze for up to 3 months. Thaw overnight in the refrigerator before reheating.
Reheating: Reheat gently in a nonstick skillet over medium-low heat until warmed through, or place in an oven-safe dish at 350°F (175°C) for 12–15 minutes. Add a splash of broth if you want a slightly saucier finish.
- Prep Time: 15 minutes
- Cook Time: 15 minutes
- Category: Dinner, Main Dish
- Method: Stove Top
- Cuisine: Italian-Inspired
⭐Did you enjoy this Creamy Lemon Artichoke Soy Curls Recipe?
If you give this "Vegan Piccata" a try please leave a comment and rating below! Justin and I read every one! Your feedback helps more people find my recipes and keeps the delicious messy chaos going in the Fresh Fun Flavor kitchen. Plus, we just love hearing from you!
👩🏻🍳Creating the shot: A behind the scenes look

Just your average day in my mini studio — lighting that won't cooperate, enough props to open a thrift store, and me totally pretending my food is going on the cover of Bon Appétit.

Proof that I really do shoot everything myself… including the moment my camera caught the dish looking prettier than I felt after cooking it twice in one afternoon.
What Really Happened
Ohhh this vegan piccata recipe had been living rent-free in my brain for weeks. I finally had all the ingredients precisely figured out, so I decided to whip it up for lunch fully expecting it to be “pretty good.” Lies. It was so good I ate nearly half the pan. Just a little bite… then another… and suddenly a lot of it was gone.
I knew I had a winner but I was also running out of daylight. And of course, I had already washed every dish, put everything away, and become emotionally attached to the idea of sitting down. Did that stop me? No ma’am. I dragged it alllll back out and made the entire recipe again because you guys are counting on me for your weekly deliciousness!
Naturally, the Michigan Winter gloom rolled in like, “Oh, you thought you’d have natural light today? That's adorable🙄.” Which is why my chopped-artichoke process shot looks like it was taken with a polaroid. But hey — silver lining? We ended up with bushels of vegan piccata and have been eating it for breakfast, lunch, dinner, snack time, second snack time… it makes a LOT. Especially when you cook it twice in one day. Trust me, this will feed your family well. I hope you enjoy this recipe as much as we do!


Disclaimer: The nutritional information provided for Vegan Piccata is an estimate calculated using Nutrifox, an online tool. Please note that this information is for general guidance only and should not replace advice from a qualified professional. Additionally, this page may include affiliate links, meaning I may earn a small commission if you purchase through those links at no extra cost to you. Thank you for supporting Fresh Fun Flavor!


Comments
No Comments