
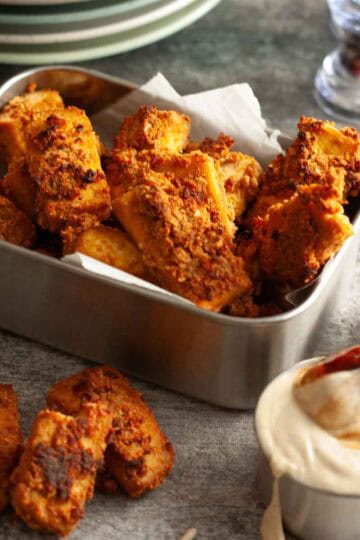
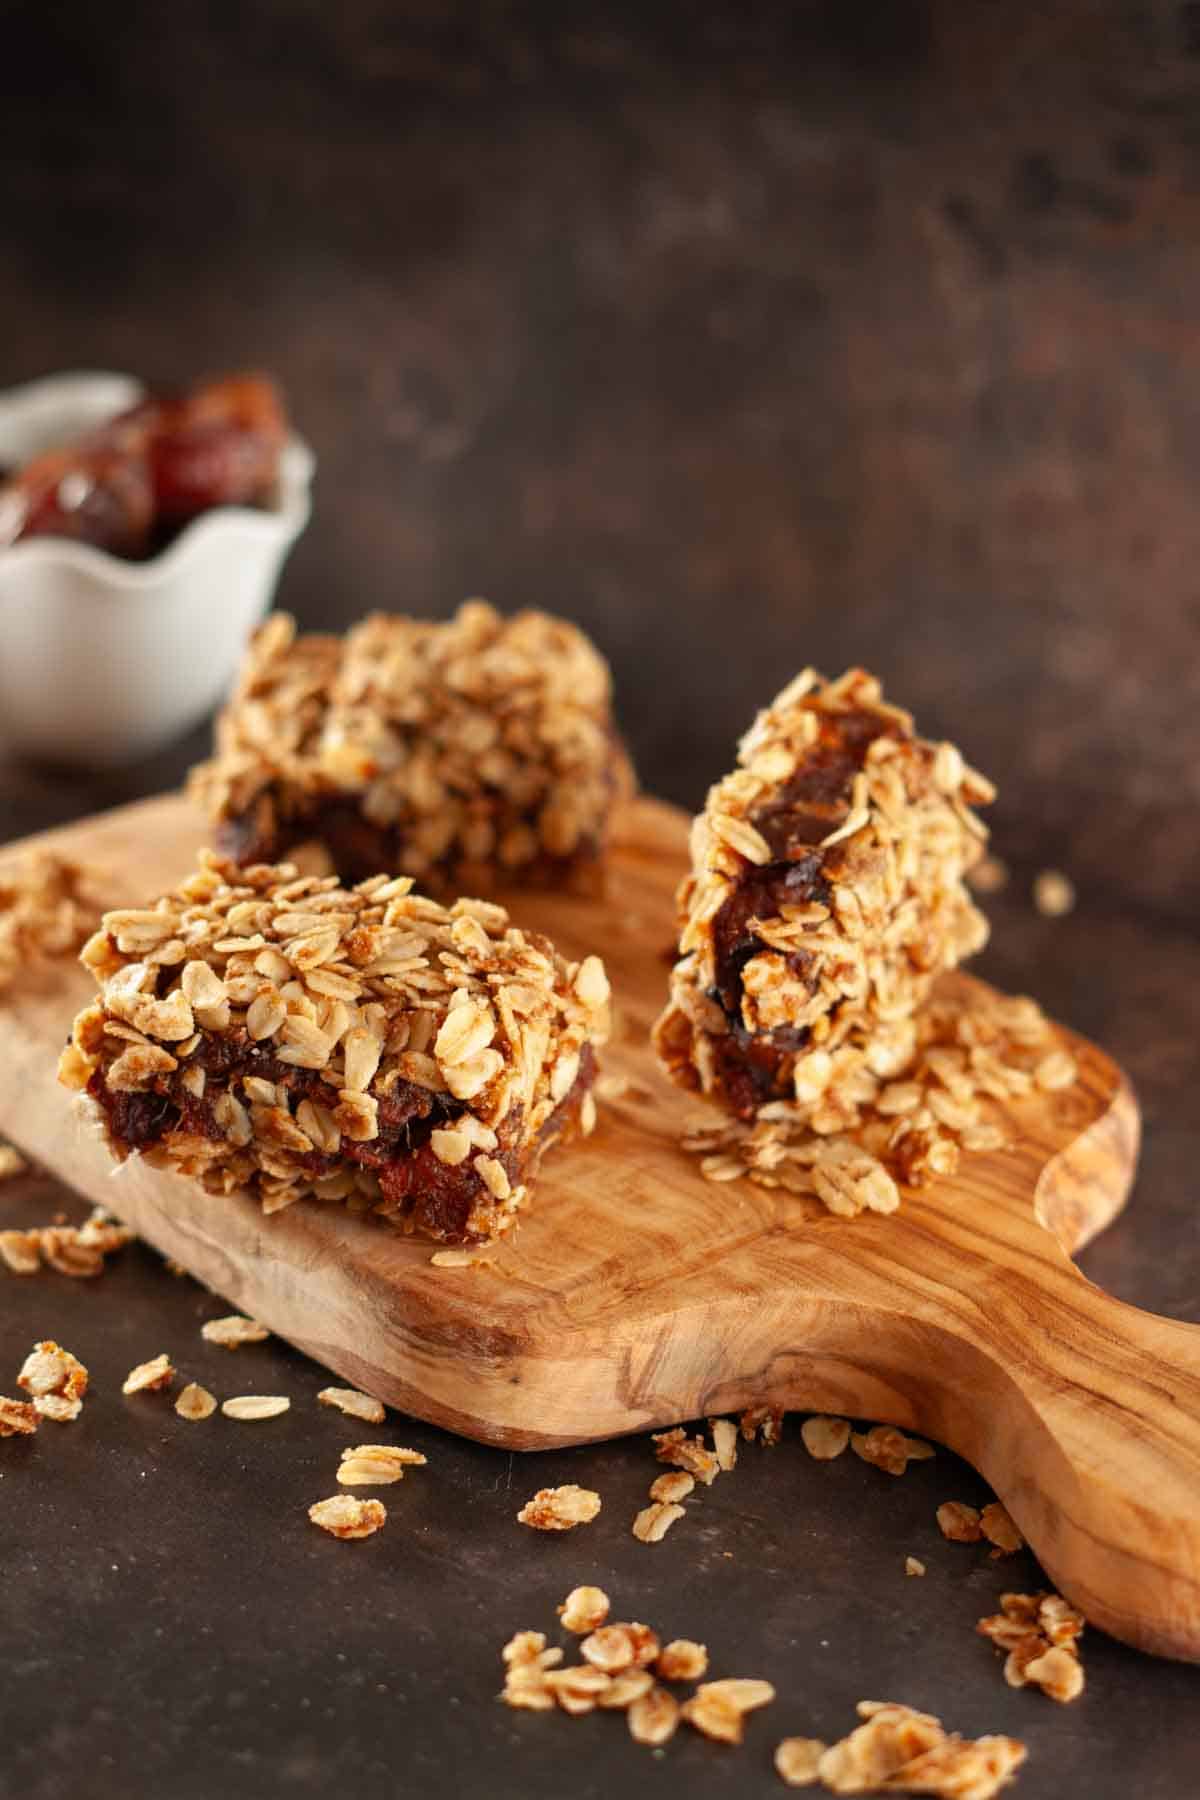
Move over regular Date Bars, these gooey, chewy, sweet and salty Vegan Date Bars are here to steal the show! These bars are built on a buttery oat and coconut sugar crust, stuffed with a gooey layer of simmered dates softened to spreadable perfection, then finished with a sweet-salty oat crumble that bakes up golden and irresistibly chewy. My Grandpa used to make the most insanely delicious date bars when I was a kid, when our family became vegan I knew a plant-based version had to happen! This recipe will earn you rave reviews.
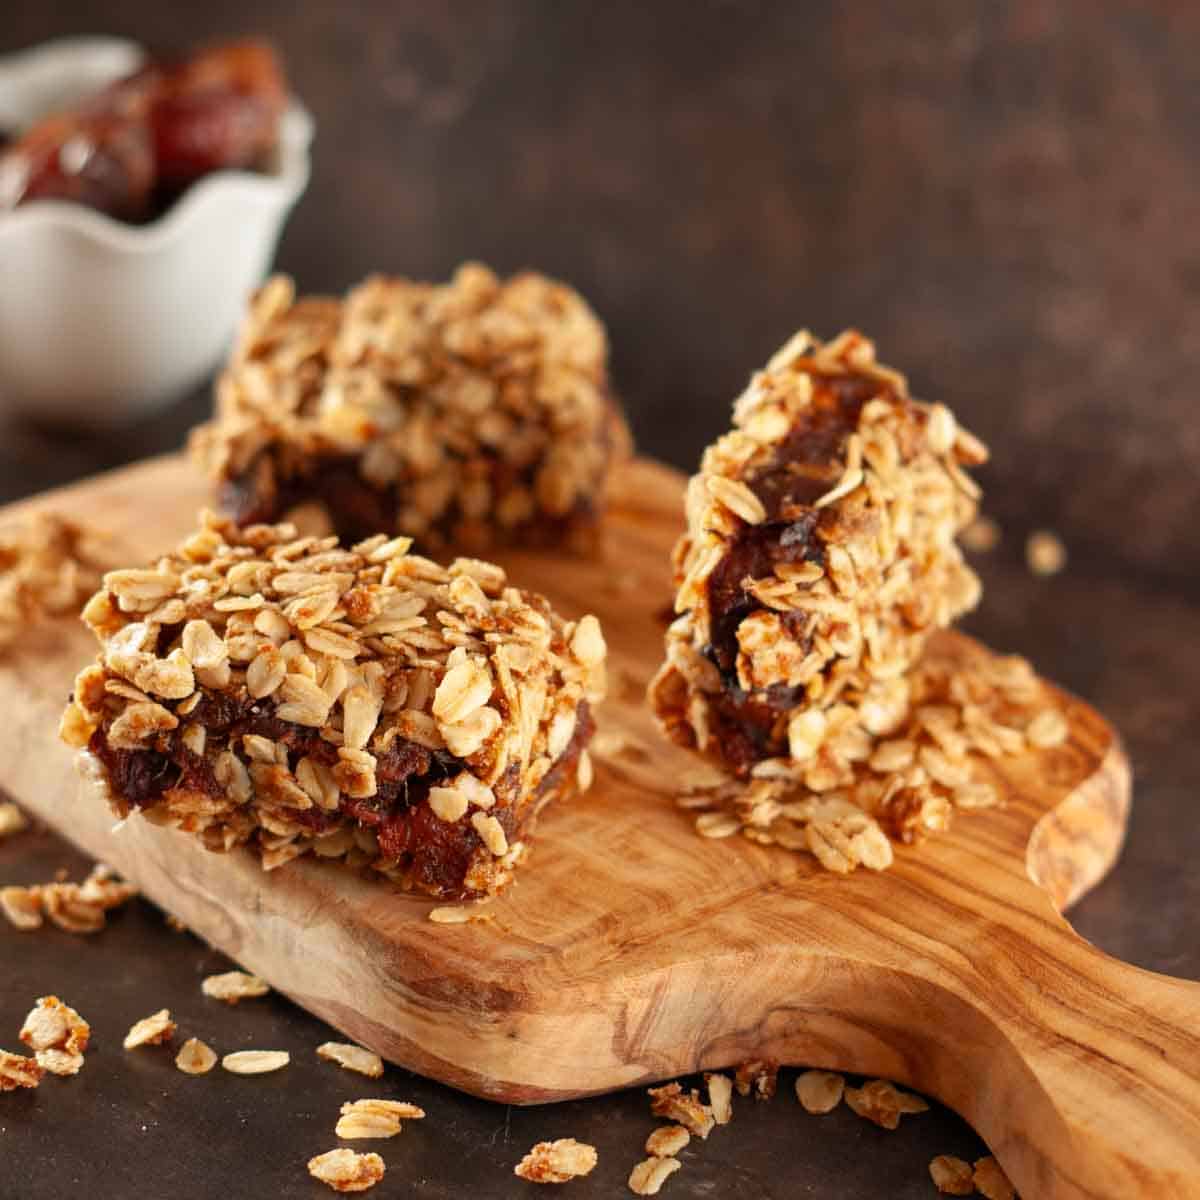
These vegan date bars are just like classic oatmeal date squares — but totally plant-based. They're automatically on our breakfast menu whenever we make them, and they are oh so yummy with that relaxing morning cup of warm coffee. They're simple to make and always disappear quickly. The combination of oats, vegan butter, coconut sugar, and dates makes them irresistibly delicious and the perfect balance of sweet and salty. It's hard to eat just one.
Looking for some other oat-tastic dessert ideas? Try these Vegan Oatmeal Raisin Cookies, so soft and chewy! Or my super delicious, Chewy Chocolate Oatmeal Refrigerator Cookies! Setting up a fancy schmancy brunch spread? My One Bowl Classic Vegan Banana Bread sitting along side these Date Bars will make you the talk of the party!
Jump to:
💗Why you'll love these Date Bars
- Sweet + Salty Balance – Naturally sweet Medjool dates meet a pinch of salt for that perfect sweet-and-salty combo everyone goes wild for. These chewy vegan date bars are irresistible for snack lovers and dessert people alike.
- Gooey, Chewy Center – The stovetop date filling turns into a rich, sticky caramel-like layer that makes every bite taste like a bakery-style oatmeal date bar.
- Crunchy, Buttery Oat Crumble – Toasty oats and coconut sugar come together for a golden, slightly crisp top and bottom — the perfect contrast to the soft center. Totally plant-based, totally crave-worthy.
- Crowd-Pleaser (Even for Non-Vegans!) – These vegan dessert bars impress everyone — brunch guests, picky kids, and even the most old-school dessert eaters like my Dad. They’re a huge hit at gatherings.
- Great for Breakfast, Snacks, or Dessert – Enjoy them packed into lunchboxes, served for brunch, or as a healthier feel-good treat.
🍽Equipment
To make these date bars you'll need a few things. An 8x8 baking dish, a medium mixing bowl, parchment paper, measuring cups and spoons, a big spoon for mixing, a potato masher for mashing, a 1.5 QT sauce pan, a knife for chopping, a cutting board, and a fork for spreading the date mixture (after trial and error I can attest that a fork works the best here).
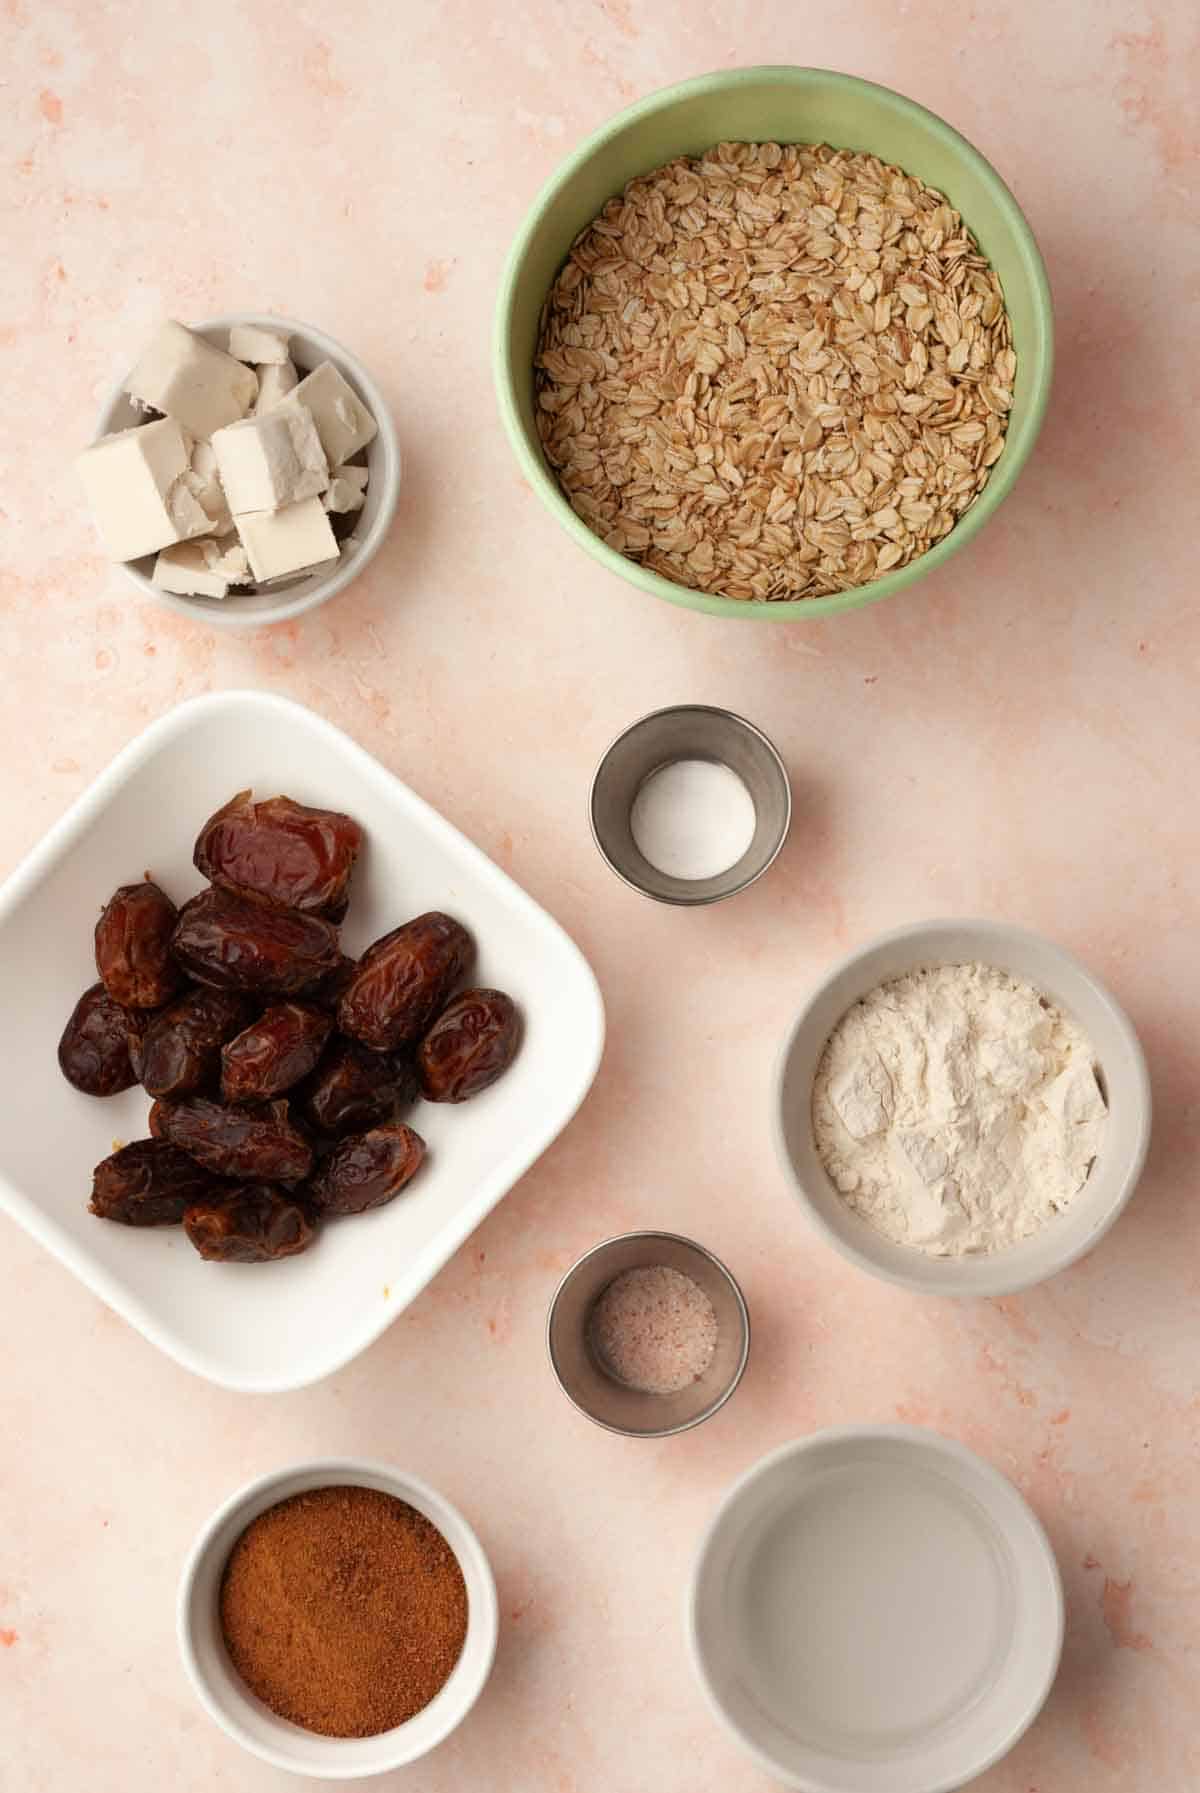
🌾Ingredients
- Dates: Medjool or Deglet will both work. Pitted will make your life easier. I love that this date filling is made without refined sugar.
- Oats: Uncooked Old Fashioned or Quick oats are both fine. For this recipe I used Old Fashioned for a chewier oatmeal date bar crust result.
- Flour: Feel free to use all purpose flour or gluten free oat flour if following a GF lifestyle, both will work!
- Coconut Sugar: We love coconut sugar for it's caramelly flavor and lower glycemic index level, however, if you prefer brown sugar that will work equally well.
- Vegan Butter: For all of my recipes requiring butter I am a huge fan of Miyoko's. This brand seems to yield the best results similar to dairy butter.
- Water and Baking Soda: For softening the dates.
- Salt: Because what is sweet without salty?!
🔪Instructions:
1.) Gather up all your delicious ingredients and pre-heat your oven to 350 degrees F (175 C).
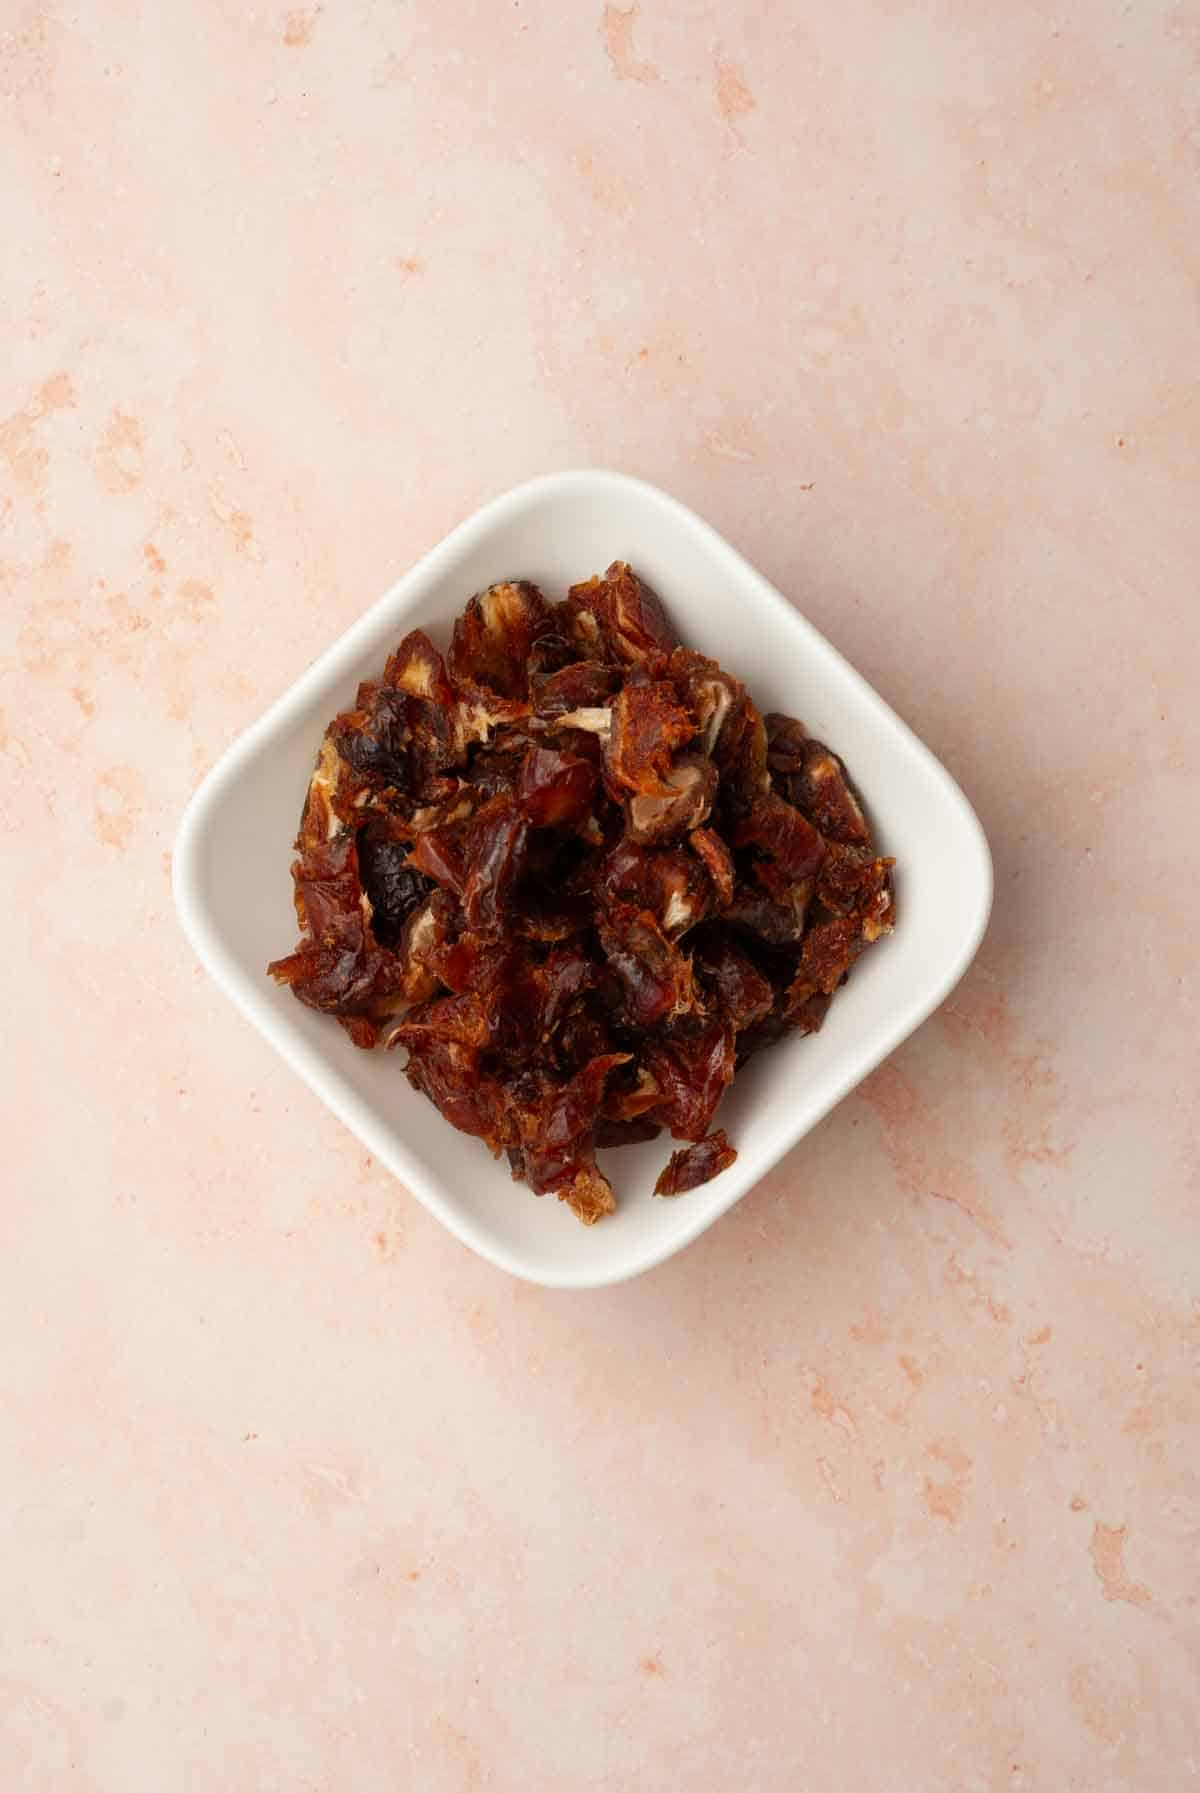
2.) Use your chopping knife to roughly chop your pitted dates.
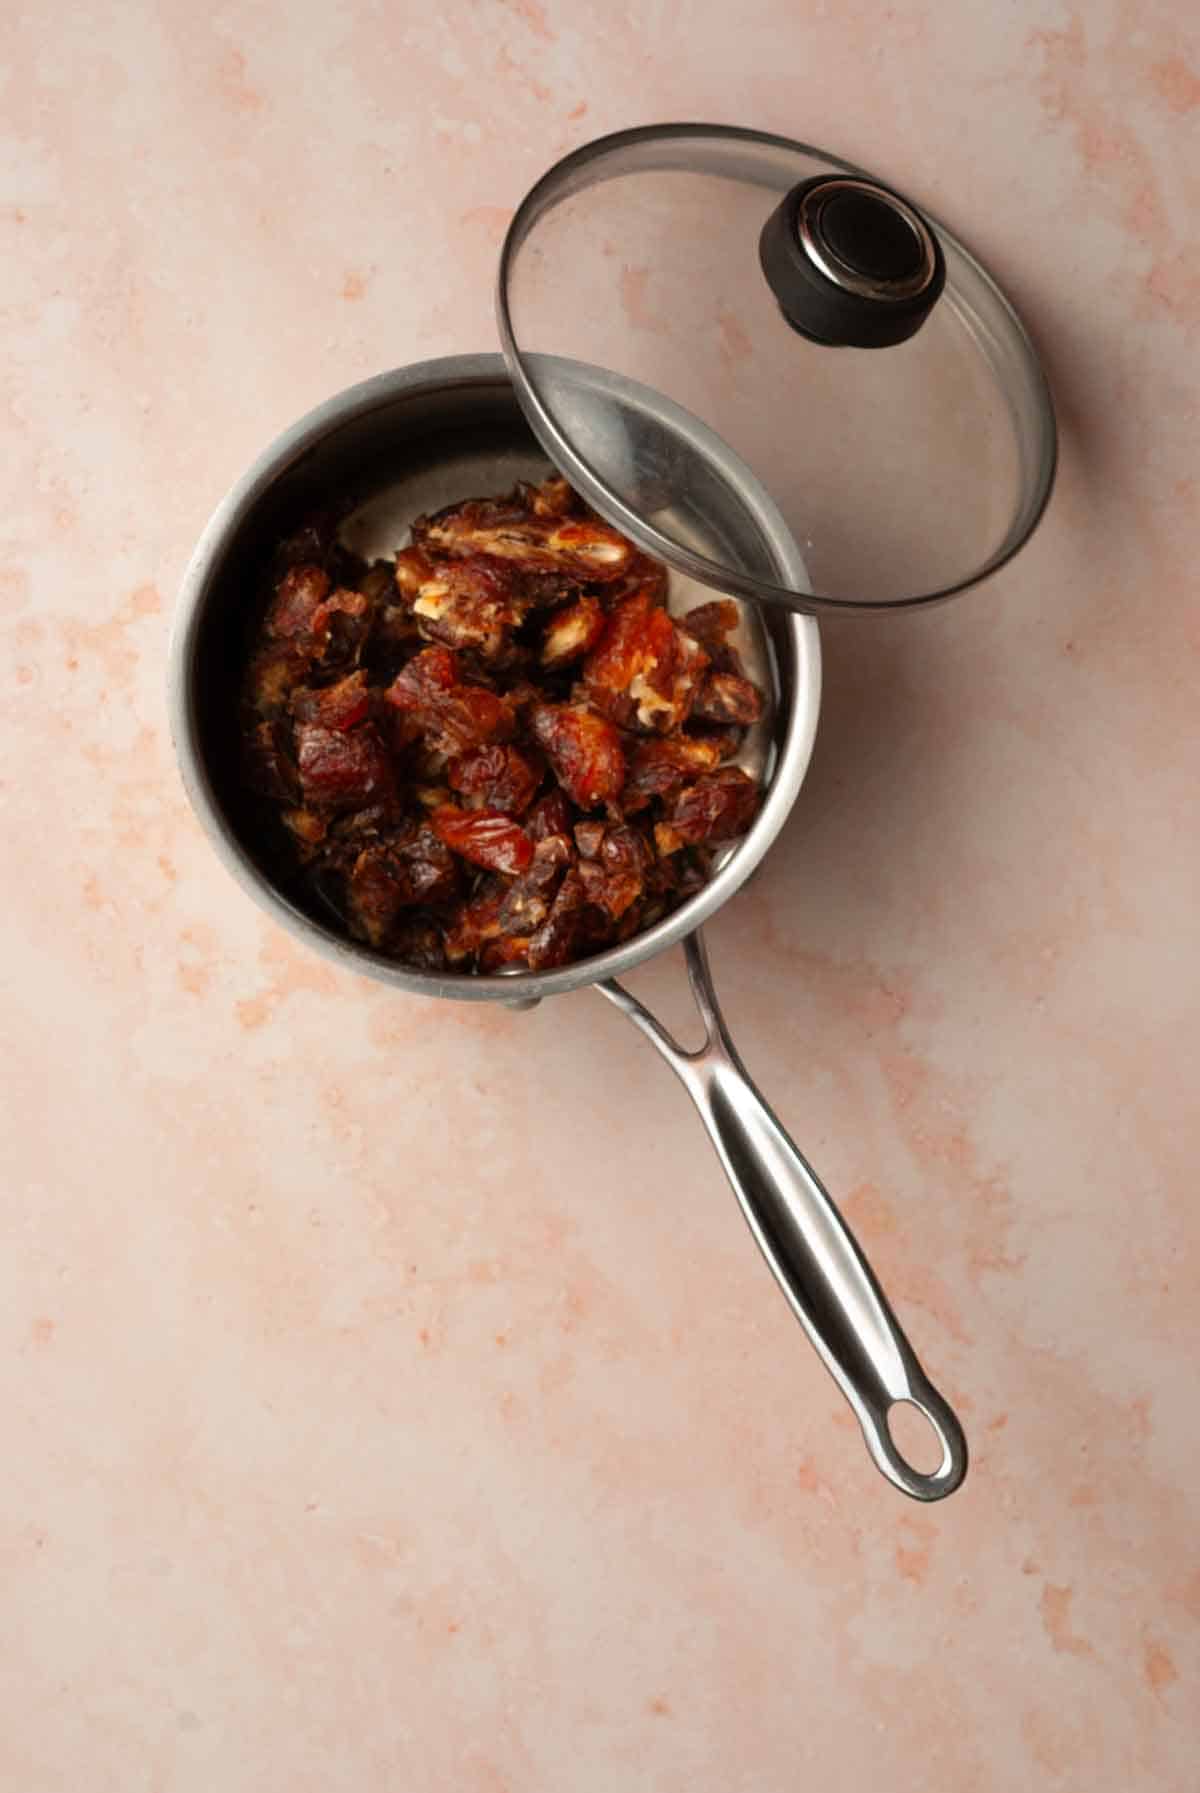
3.) Place your dates into your 1.5 quart sauce pan. Combine the water and baking soda together and pour over the dates. Bring to a boil, cover with a lid, and reduce to a simmer. Let simmer for 5 minutes, stirring occasionally.

4.) Mash dates with the potato masher and set aside.
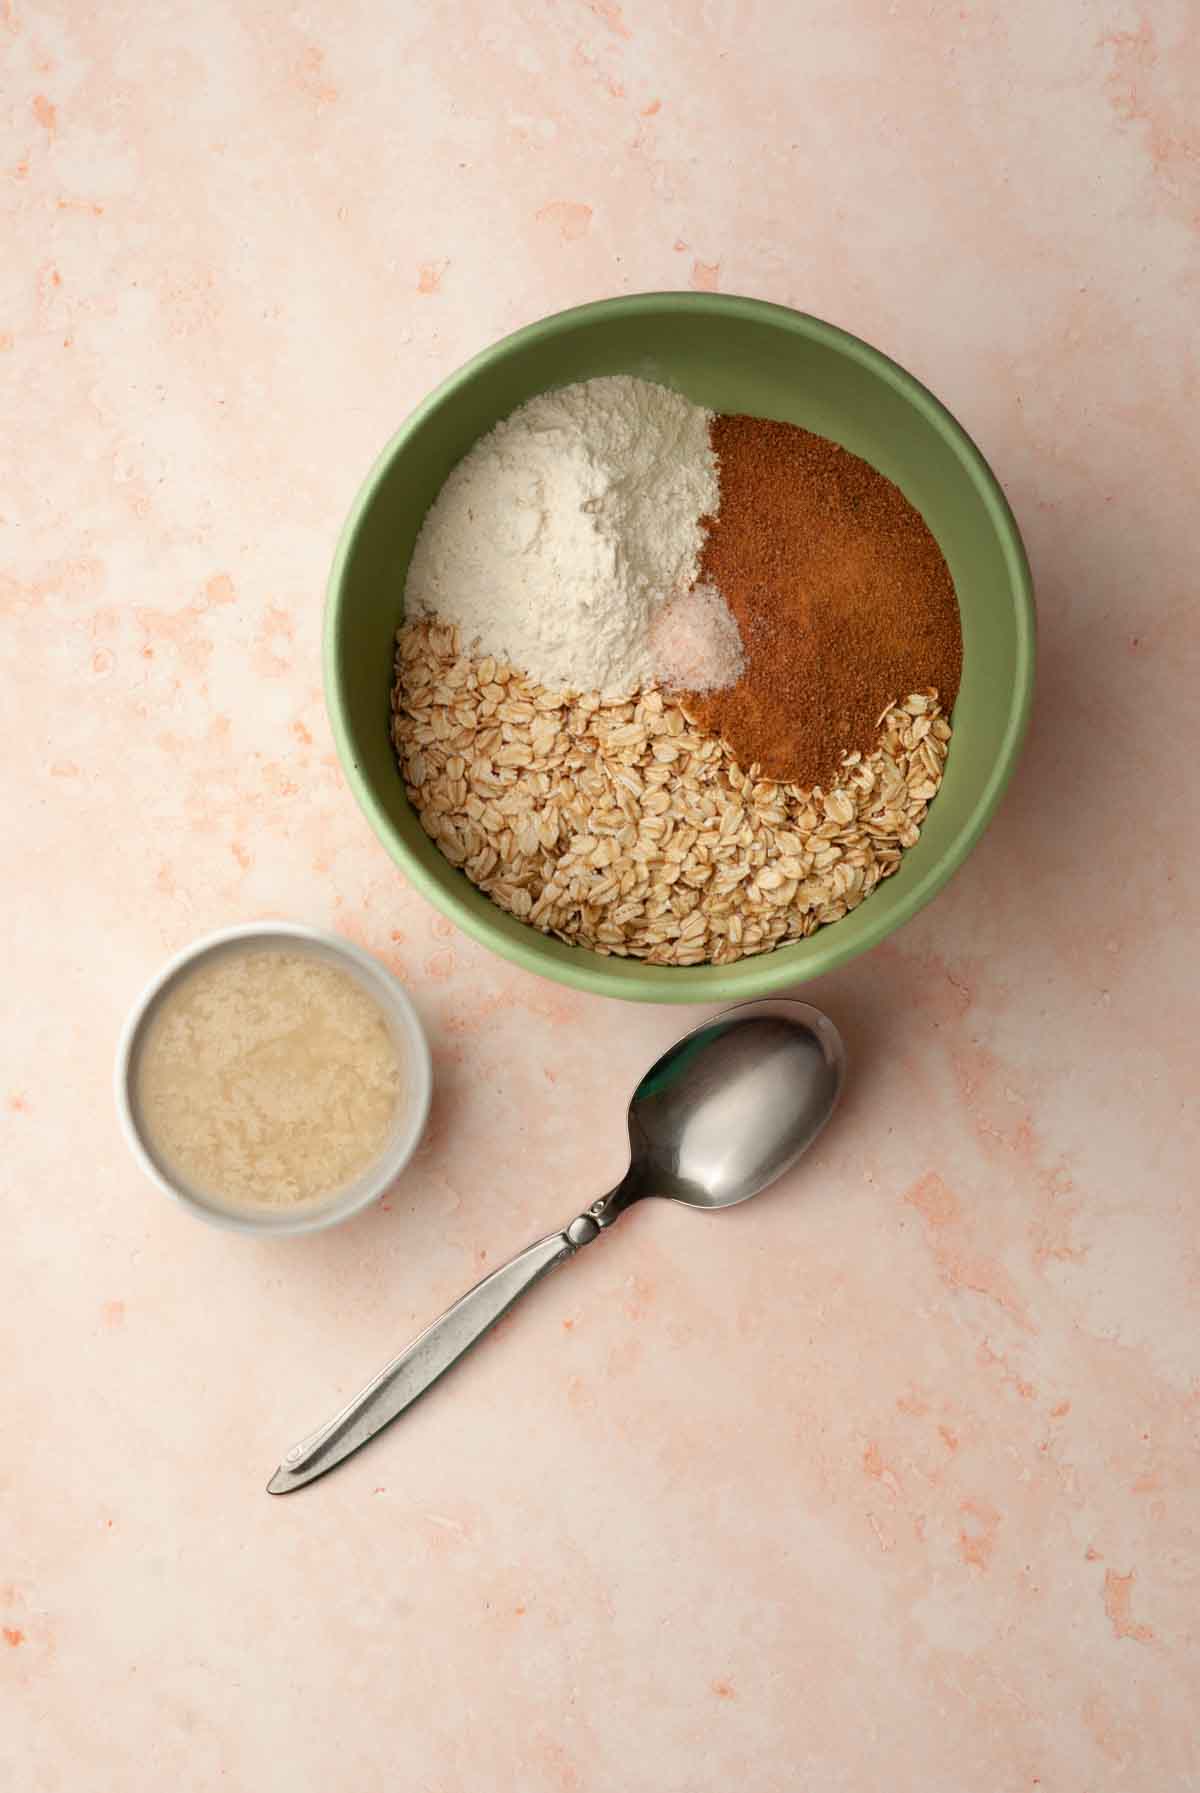
5.) In a medium sized mixing bowl combine the oats, flour, coconut sugar, and salt. Mix well.

6.) Melt butter in the microwave for 30 seconds and pour over the oat mixture.

7.) Stir until everything is combined well.
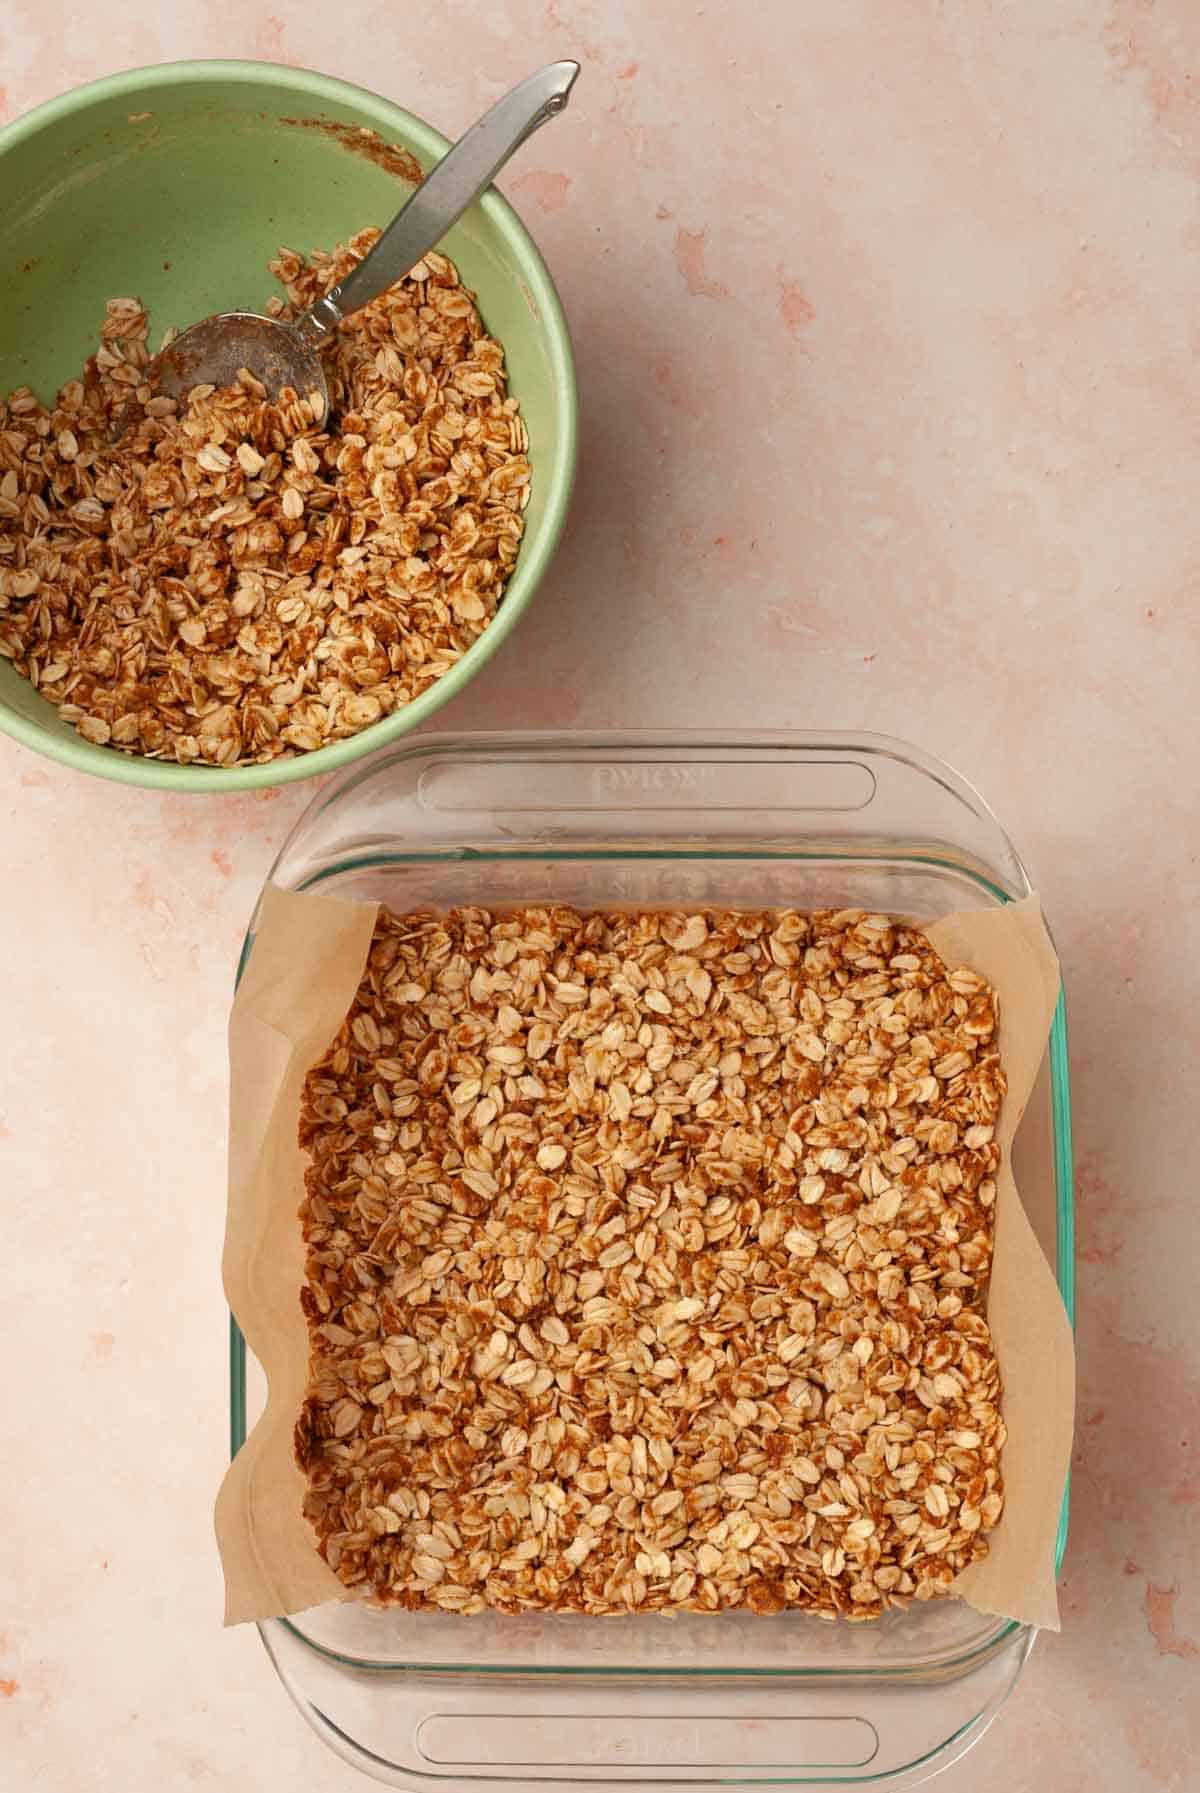
8.) Firmly press 2 ¼ cups of the oat mixture into a parchment lined 8x8 baking dish. Pop it into the oven and bake for 10 minutes.
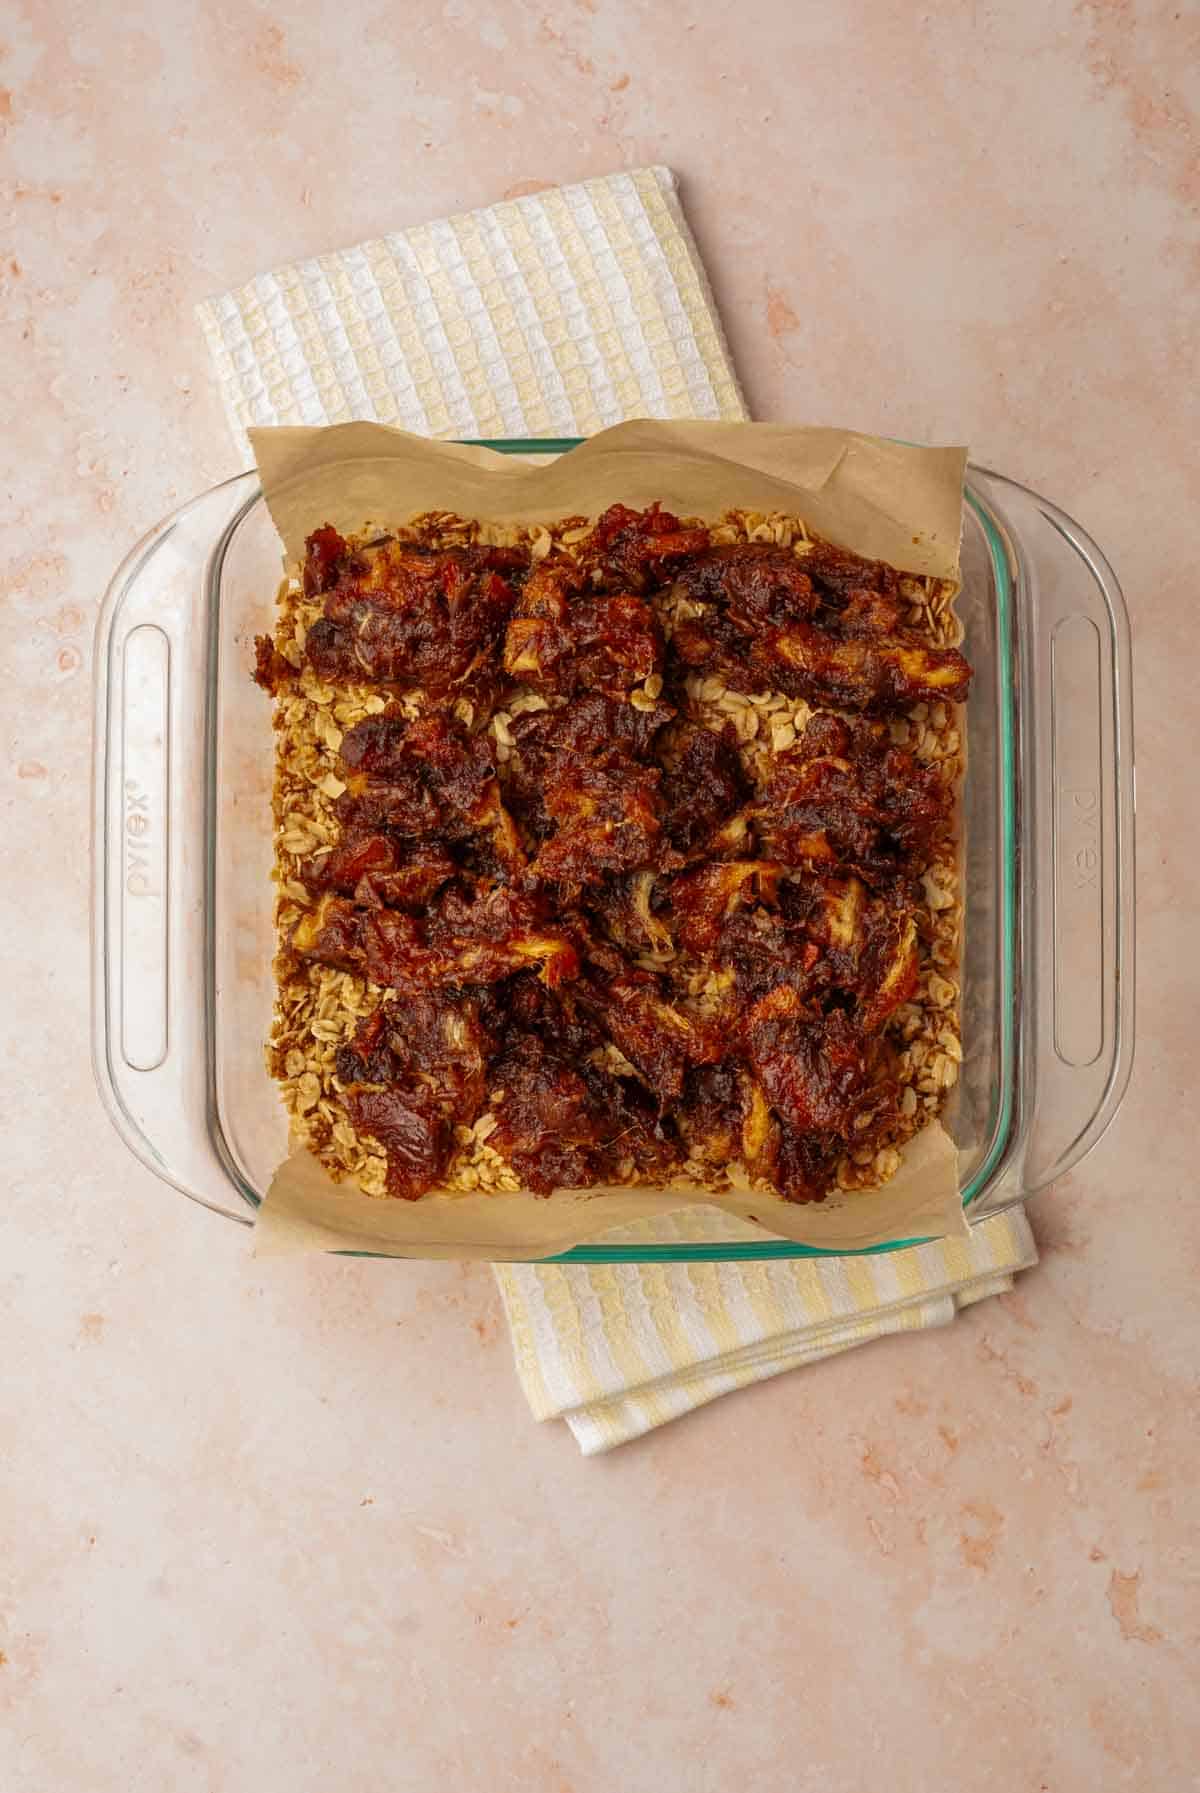
9.) Remove the baking dish from the oven and allow to cool for 10 minutes. Once the dish is safe to touch carefully drop spoonfuls of the date mixture over the crust.
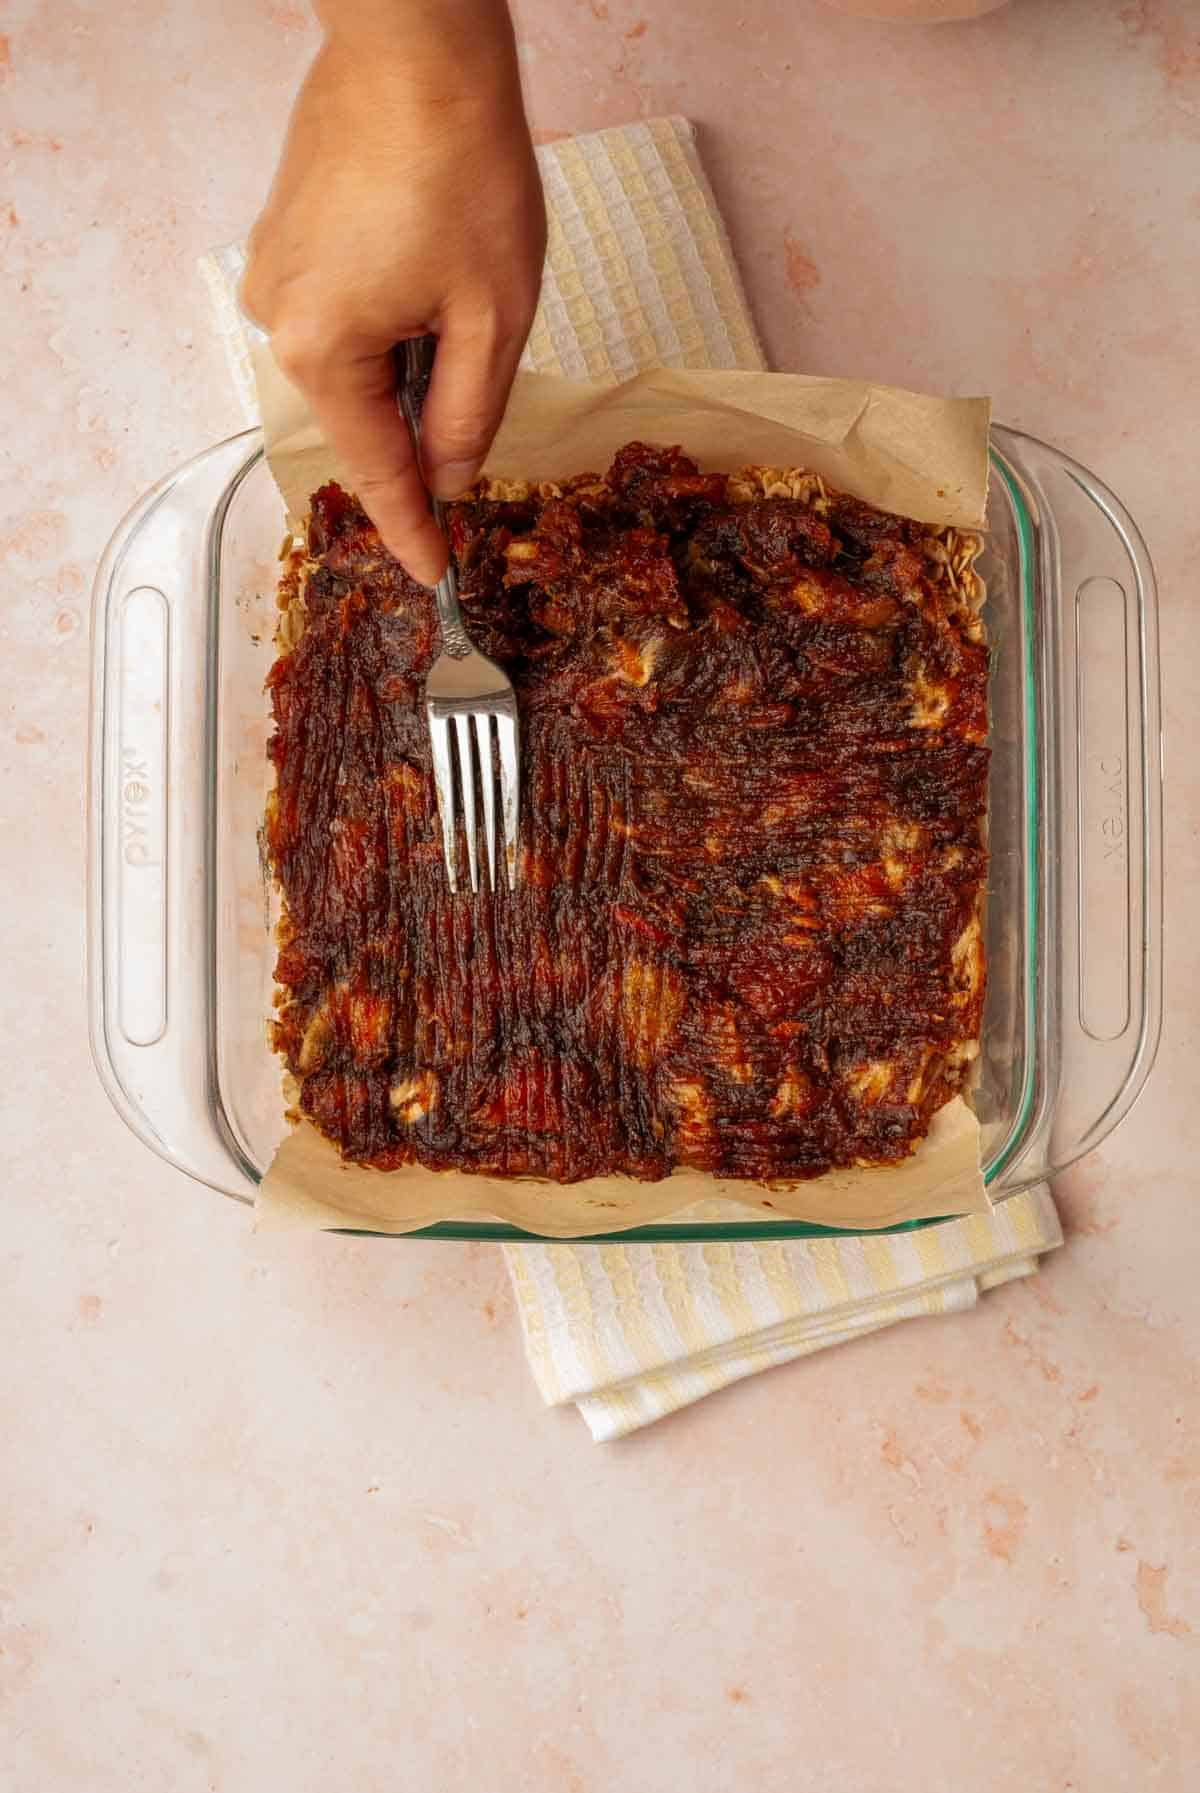
10.) Using a fork gently press and drag it across the date mixture in both directions to evenly spread it across the crust. A fork is the best option for this as the dates will not stick to it.

11.) It should look like this. Hooray!
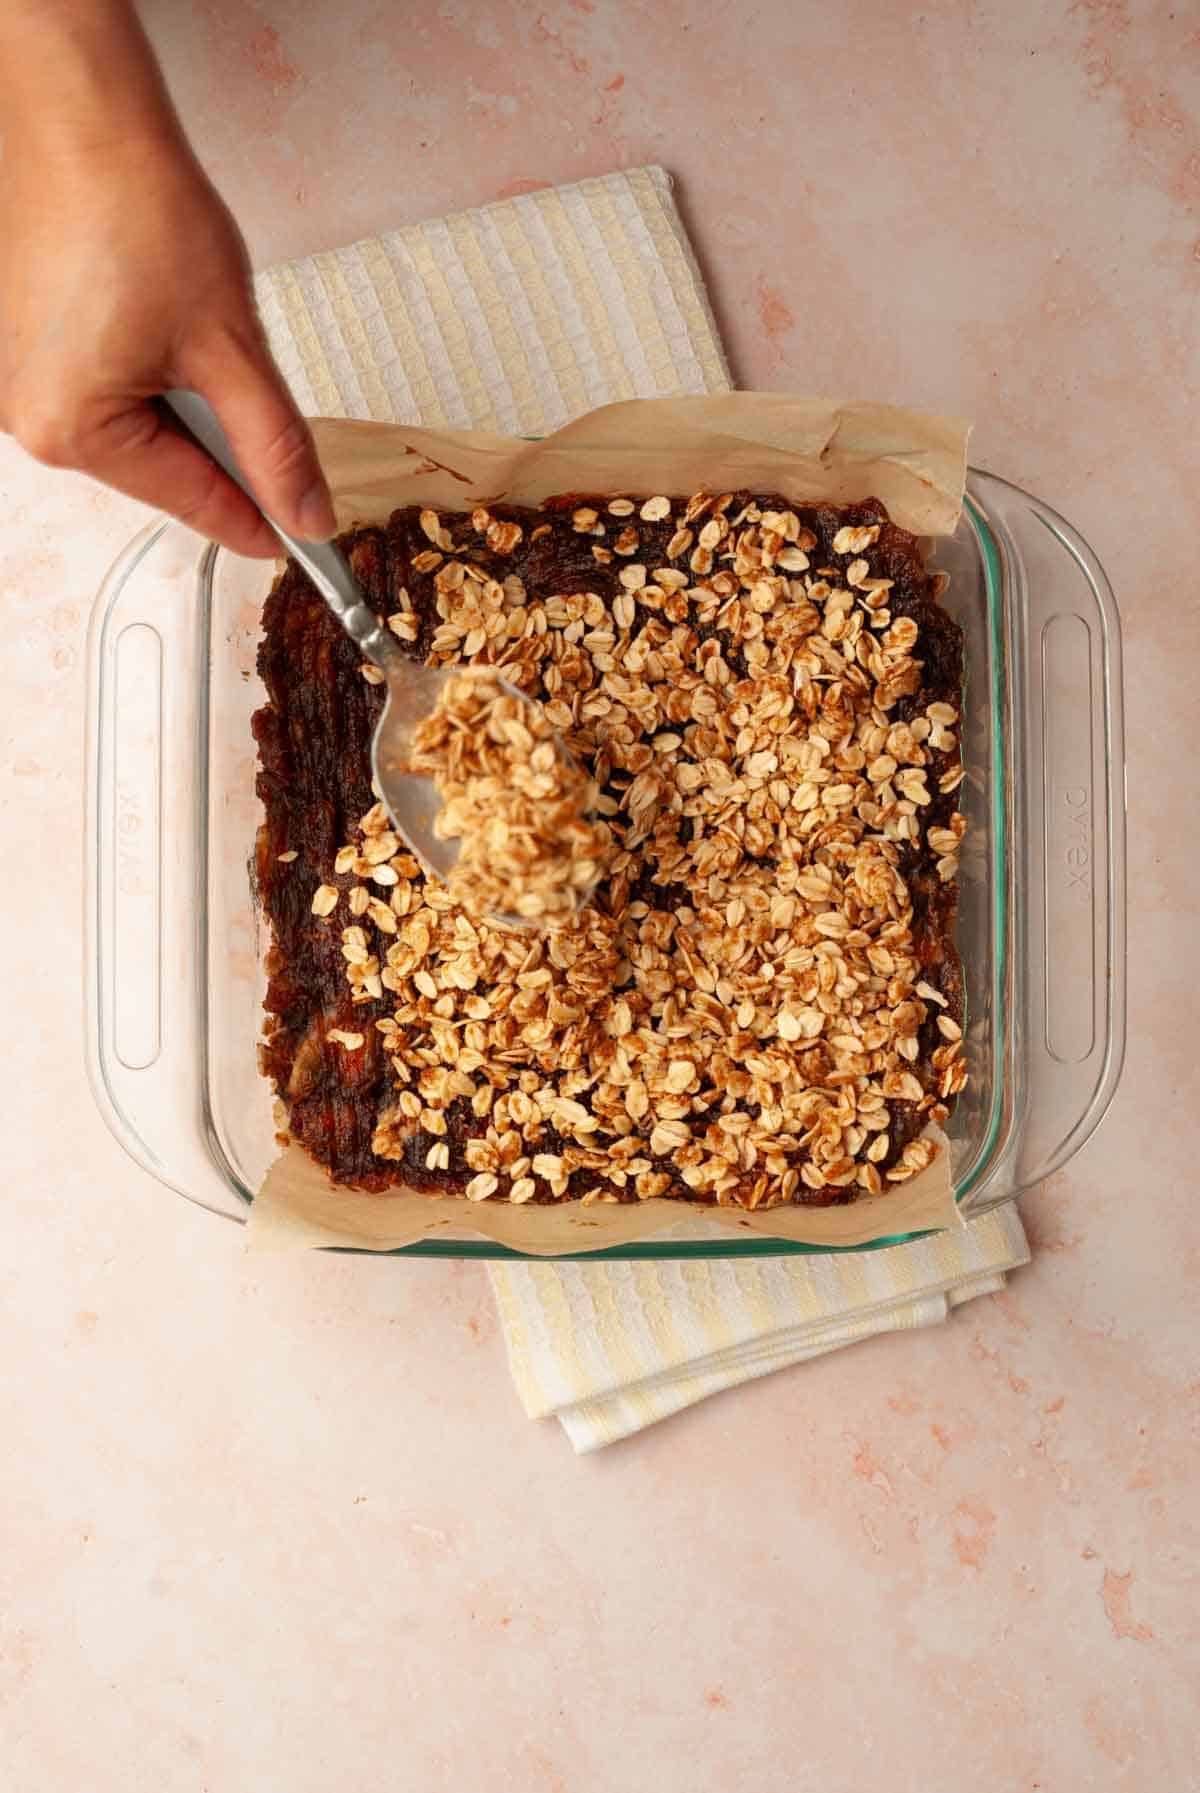
12.) Spoon the remaining oat mixture over the date layer. Give those oats a gentle little press into the dates and pop it back into the oven.
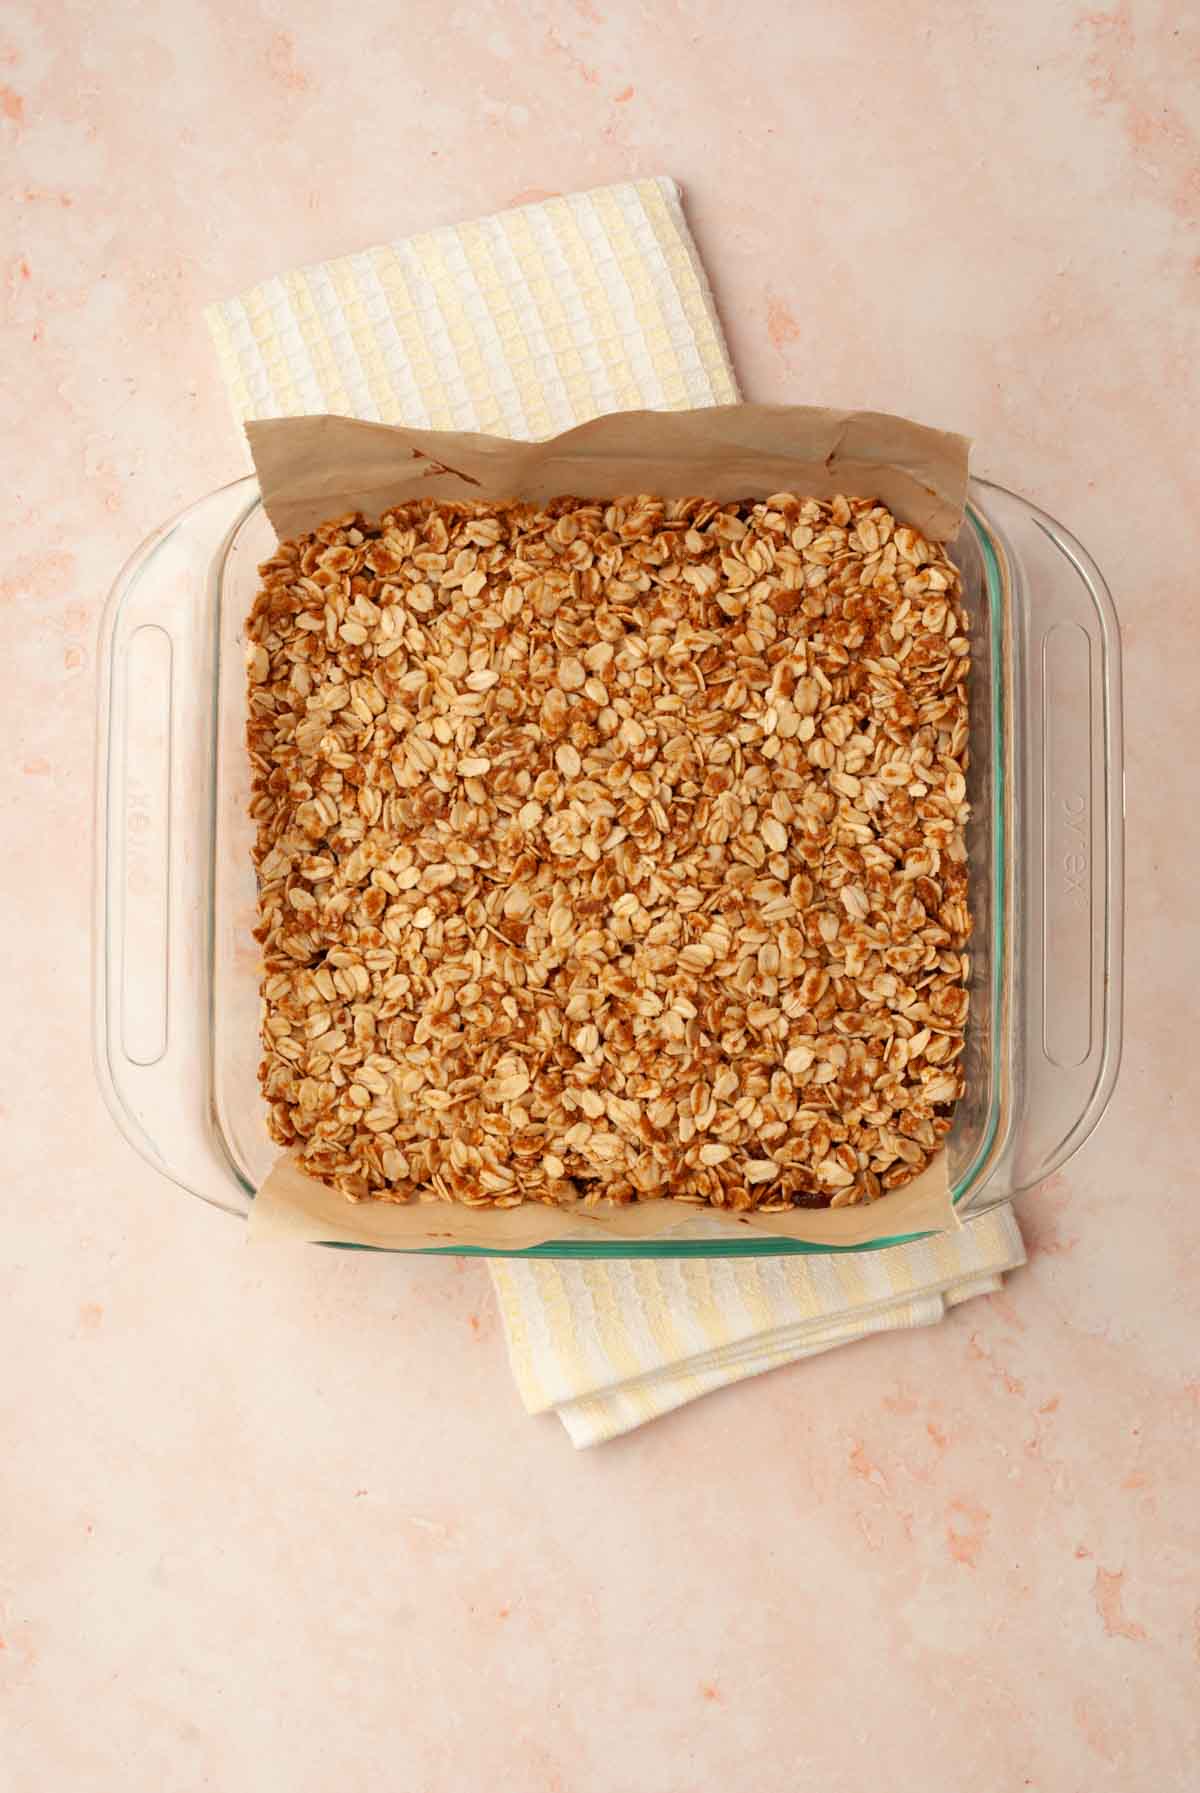
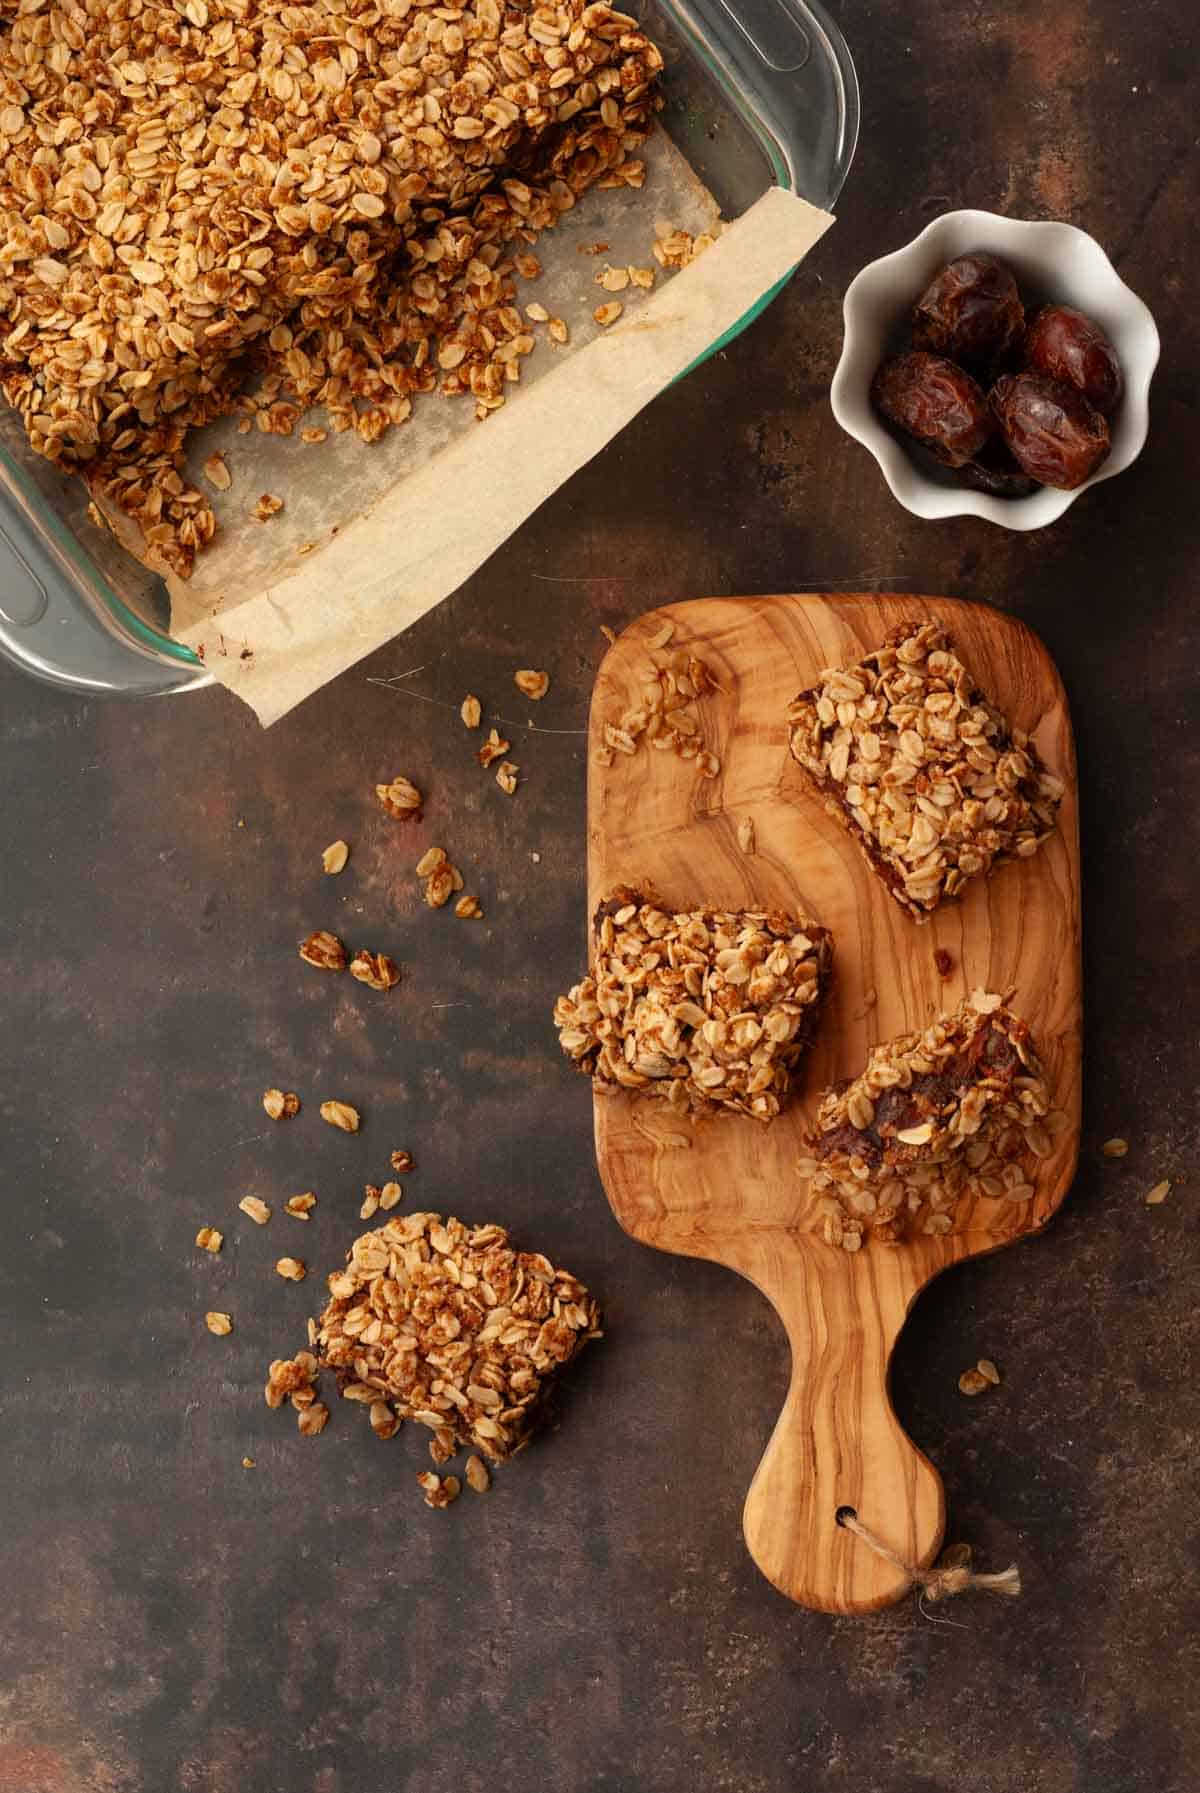
13.) Bake for 20-22 more minutes until golden brown. Once the bars are done cooking remove them from the oven and allow to cool for at least ten minutes. Cut into bars and serve!
These vegan date bars are great any time of day. They make a great addition to a fancy brunch with a delicious cup of coffee or tea. Or if you are planning to serve these as a dessert they would be amazing warm from the oven with a scoop of plant based Vanilla Ice Cream (Our favorite is So-Delicious Very Vanilla).
💭Pro Tips from the Kitchen
- Use Pitted Dates for Convenience: This will save you so much time and effort.
- Don’t Skip the Baking Soda: Baking soda helps with softening the dates. You want them to spread easily so the end result is a nice smooth texture.
- Use a Fork for Spreading the Date Mixture: For the best results when spreading the sticky date mixture, use a fork. The tines of the fork allow you to spread the mixture evenly without it sticking, ensuring a smooth and even layer! Yay!
- Serve warm or cooled: We prefer these bars warm from the oven, but this means you'll need to eat them with a fork (and maybe some vegan ice cream!). When cut warm they may not hold shape as well as if they are allowed to cool completely first. But, we say, who cares! They're way too delicious to wait!
📖Variations
- Add Some Crunch: For a bit of extra texture, feel free to toss in some chopped walnuts or pecans. They add a delightful crunch and work beautifully with the sweetness of the dates.
🧊Storage
Room Temperature: These date bars are perfectly fine at room temperature for up to 24 hours. We often enjoy them the next morning for breakfast, no need to refrigerate overnight!
Refrigerator: Store your date bars in an airtight container in the fridge for up to a week. They’ll stay fresh and gooey this way!
Freezer: For longer storage, wrap each bar tightly in plastic wrap and freeze for up to 6-8 weeks. Just pull out a yummy plant-based bar whenever you need a quick snack or breakfast!
❓FAQ's
Most definitely! If you need a gluten free version, simply swap the all purpose flour for oat flour or GF flour. Just make sure to use certified gluten free oats as well as oat flour to keep everything safe.
If you are not following a vegan life style but still want to make these bars the recipe will work with regular dairy butter.
Sure, get creative! You can top these bars with chopped walnut or pecans. You could also serve them in fancy little dishes with a scoop of plant based vanilla ice cream for a special treat!
Yup! Make the bars, allow them to cool completely then cut and wrap each bar tightly in plastic wrap and freeze for up to 6-8 weeks.

Easy Vegan Date Bars
- Total Time: 55 minutes
- Yield: 9 Bars 1x
- Diet: Vegan
Description
These Vegan Date Bars are a deliciously sweet and salty treat, made with wholesome ingredients like oats, dates, and coconut sugar. Perfect for a quick breakfast, snack, or dessert, these gooey, chewy bars are sure to please!
Ingredients
16 Ounces Medjool or Deglet pitted dates (about 2 ½ cups)
½ teaspoon baking soda
½ cup water
2 ½ cups Old Fashioned or Quick Oats uncooked
½ cup all purpose flour (see notes for GF)
⅓ cup coconut sugar
½ teaspoon salt
½ cup melted vegan butter (I used Miyoko's for this recipe)
Instructions
-
Preheat the oven to 350°F (175°C). Chop the pitted dates and place them in a saucepan.
-
Add water and baking soda to the dates, bring to a boil, then cover and simmer on low heat for 5 minutes stirring occasionally. Using a potato masher mash the dates and set aside.
- In a bowl, mix oats, flour, coconut sugar, and salt. Melt butter and stir into the oat mixture.
- Press 2 ¼ cups of the oat mixture into a parchment-lined 8x8 baking dish and bake for 10 minutes.
- Allow crust to cool for 10 minutes before adding date mixture. Spoon the date mixture over the crust. Use a fork to spread it evenly.
- Add the remaining oat mixture on top, gently pressing it down. Bake for another 20-22 minutes, until golden brown.
- Cool for at least 10 minutes before cutting into bars and serving!
Notes
Make It Gluten-Free: If you need a gluten free version, simply swap the all purpose flour for oat flour or GF flour. Just make sure to use certified gluten free oats as well as oat flour to keep everything safe.
Both quick oats and old fashioned oats works perfectly in this recipe. I opt for the old fashioned oats because I feel like it gives the bars a delightful chewiness.
Both Deglet and Medjool dates are excellent options for this recipe, so go with whichever you prefer or have on hand. Remember to go with pitted, you'll thank me later!
For the best results when spreading the sticky date mixture, use a fork. The tines of the fork allow you to spread the mixture evenly without it sticking, ensuring a smooth and even layer!
Baking soda helps with softening the dates, be sure not to skip it. You want them to spread easily so the end result is a nice smooth texture.
- Prep Time: 35 minutes
- Cook Time: 20 minutes
- Category: Dessert, Snack
- Method: Baked
- Cuisine: American
👩🏻🍳Did you enjoy this Easy Vegan Date Bars recipe?
If you give these Vegan Date Bars a try please leave a comment and rating below! Justin and I read every one! Your feedback helps more people find my recipes and keeps the delicious messy chaos going in the Fresh Fun Flavor kitchen. Plus, we just love hearing from you!


Disclaimer: The nutritional information provided for Easy Vegan Date Bars is an estimate calculated using Nutrifox, an online tool. Please note that this information is for general guidance only and should not replace advice from a qualified professional. Additionally, this page may include affiliate links, meaning I may earn a small commission if you purchase through those links at no extra cost to you. Thank you for supporting Fresh Fun Flavor!


Susan says
Could I replace the butter with coconut oil?
Rhonda Jones @ Fresh Fun Flavor says
Hi Susan! Thank you for your question! You can substitute coconut oil 1:1 for the vegan butter. Coconut oil actually works well in crumbly oat based toppings and crusts like these date bars. I recommend using solid coconut oil, melting it first and measuring it in liquid form so it incorporates evenly into the crumble. If you’d like to keep the flavor more neutral (date centered), use refined coconut oil. Unrefined (virgin) coconut oil will add a coconut flavor, however, dates and coconut pair nicely together, so it can still be delicious — just slightly different from the original version. Vegan butter produces a more golden color in baked goods whereas coconut oil tends to have a lighter crispier finish, so no need to worry if the oat crumble doesn't turn golden brown. Chilling the bars before slicing will also help them set up nicely. Although warm out of the oven is still super tasty too! Happy baking! -Rhonda