
We've finally hit the weeknight dinner jackpot! A flavorful vegan burger recipe that’s low in sodium and picky eater approved. These Textured Vegetable Protein (TVP) burgers are hearty with a firmer texture, and come together with just 9 pantry friendly ingredients (don't worry, NO BEANS). They're ready to eat in just 45 minutes and are perfect for backyard burger night!
If you've been searching for a super kid friendly plant-based burger recipe your search is over. The red lentils sneak in a boost of nutrition but melt right into the mix, so even the pickiest kids (or spouses) won’t notice them. Textured Vegetable Protein gives these burgers that meaty, chewy bite, and baking them means no oil, no fuss, and super fast cleanup.
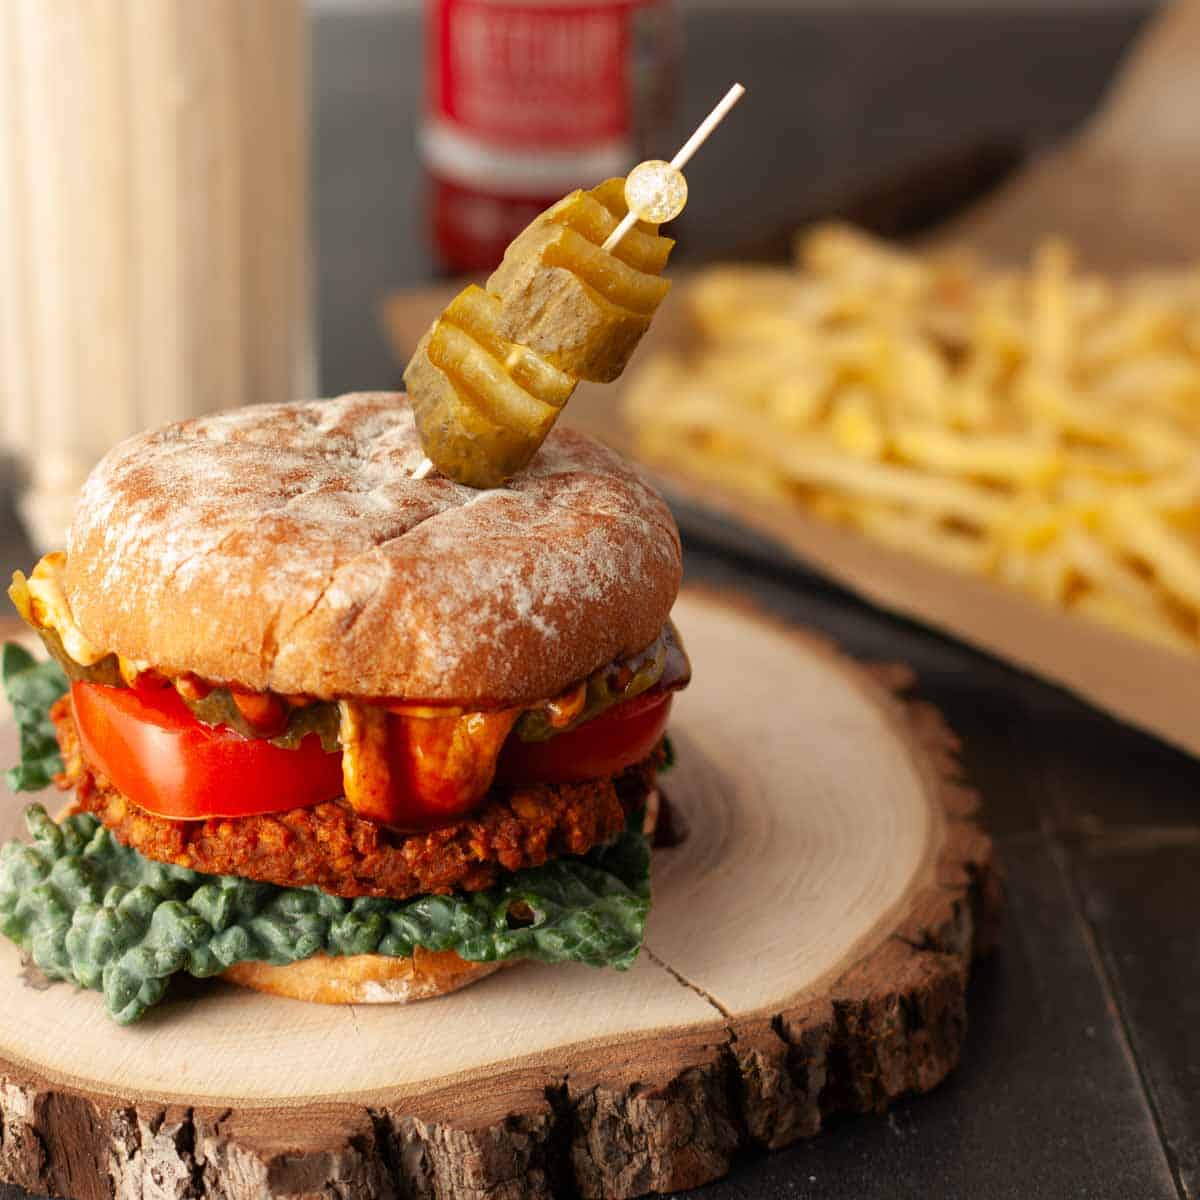
Serve these burgers with my Tomato, Basil, and Cucumber Salad with Candied Pecans for a fresh and tangy contrast — it’s summer on a plate! And, if you really want to take these burgers up a notch slather on some of my Homemade Dairy Free Ranch for creamy, herby goodness in every bite. It's ready in 5 minutes and also makes a killer dip for some crispy French fries.
Jump to:
💗Why you'll love these TVP and Lentil Burgers
- Fast: These burgers are prepped and in the oven in under 15 minutes. Then they bake for 25 to 30 minutes allowing for just enough time to throw together a quick side or perhaps these super easy Dark Chocolate Toasted Coconut Cups for dessert!
- Low Sodium: Many store bought veggie burgers have an average of 300-500 mg of sodium per serving. But, your new homemade veggie burger is naturally low in sodium and weighs in at just 122 mg per 2.5 ounce patty. If you want to make your burgers a bit larger a three ounce patty has 162 mg, still about half the amount of store bought. That's the size I make and Chris and I only need one to fill up especially if paired with a side.
- Freezer Friendly: These burgers freeze incredibly well. I tested this recipe soooooo many times and we've been eating these out of the freezer for weeks. You can even freeze buns allowing you throw together a weeknight meal in just minutes.
- Kid Friendly: Kids love these burgers because of their simplicity and texture, and the fact that there are no squishy beans!
📖Okay, what is TVP anyway?
Some of you may be thinking, "Rhonda, you promised us no weird ingredients, what gives?" But, I promise you this one's not as weird as it sounds. It's actually quite versatile and as a plant based foodie you are going to love all the things you can do with it.
Textured Vegetable Protein is just dehydrated soy protein that looks sort of like cereal but cooks up like crumbled meat. Once you add broth or water, it gets tender and chewy and takes on all the yummy flavors you give it. It's a blank slate and a perfect meat replacement for so many dishes. Think burgers, breakfast sausage, chili, and tacos.
🍽Equipment
We're doing things easy peasy today. All you need to make these burgers will be a large mixing bowl and spoon for combining everything, a small pot for cooking the lentils, a baking sheet lined with parchment paper, and perhaps a large scoop for evenly sized burgers and some cutting boards for toppings. Along with measuring cups and spoons.
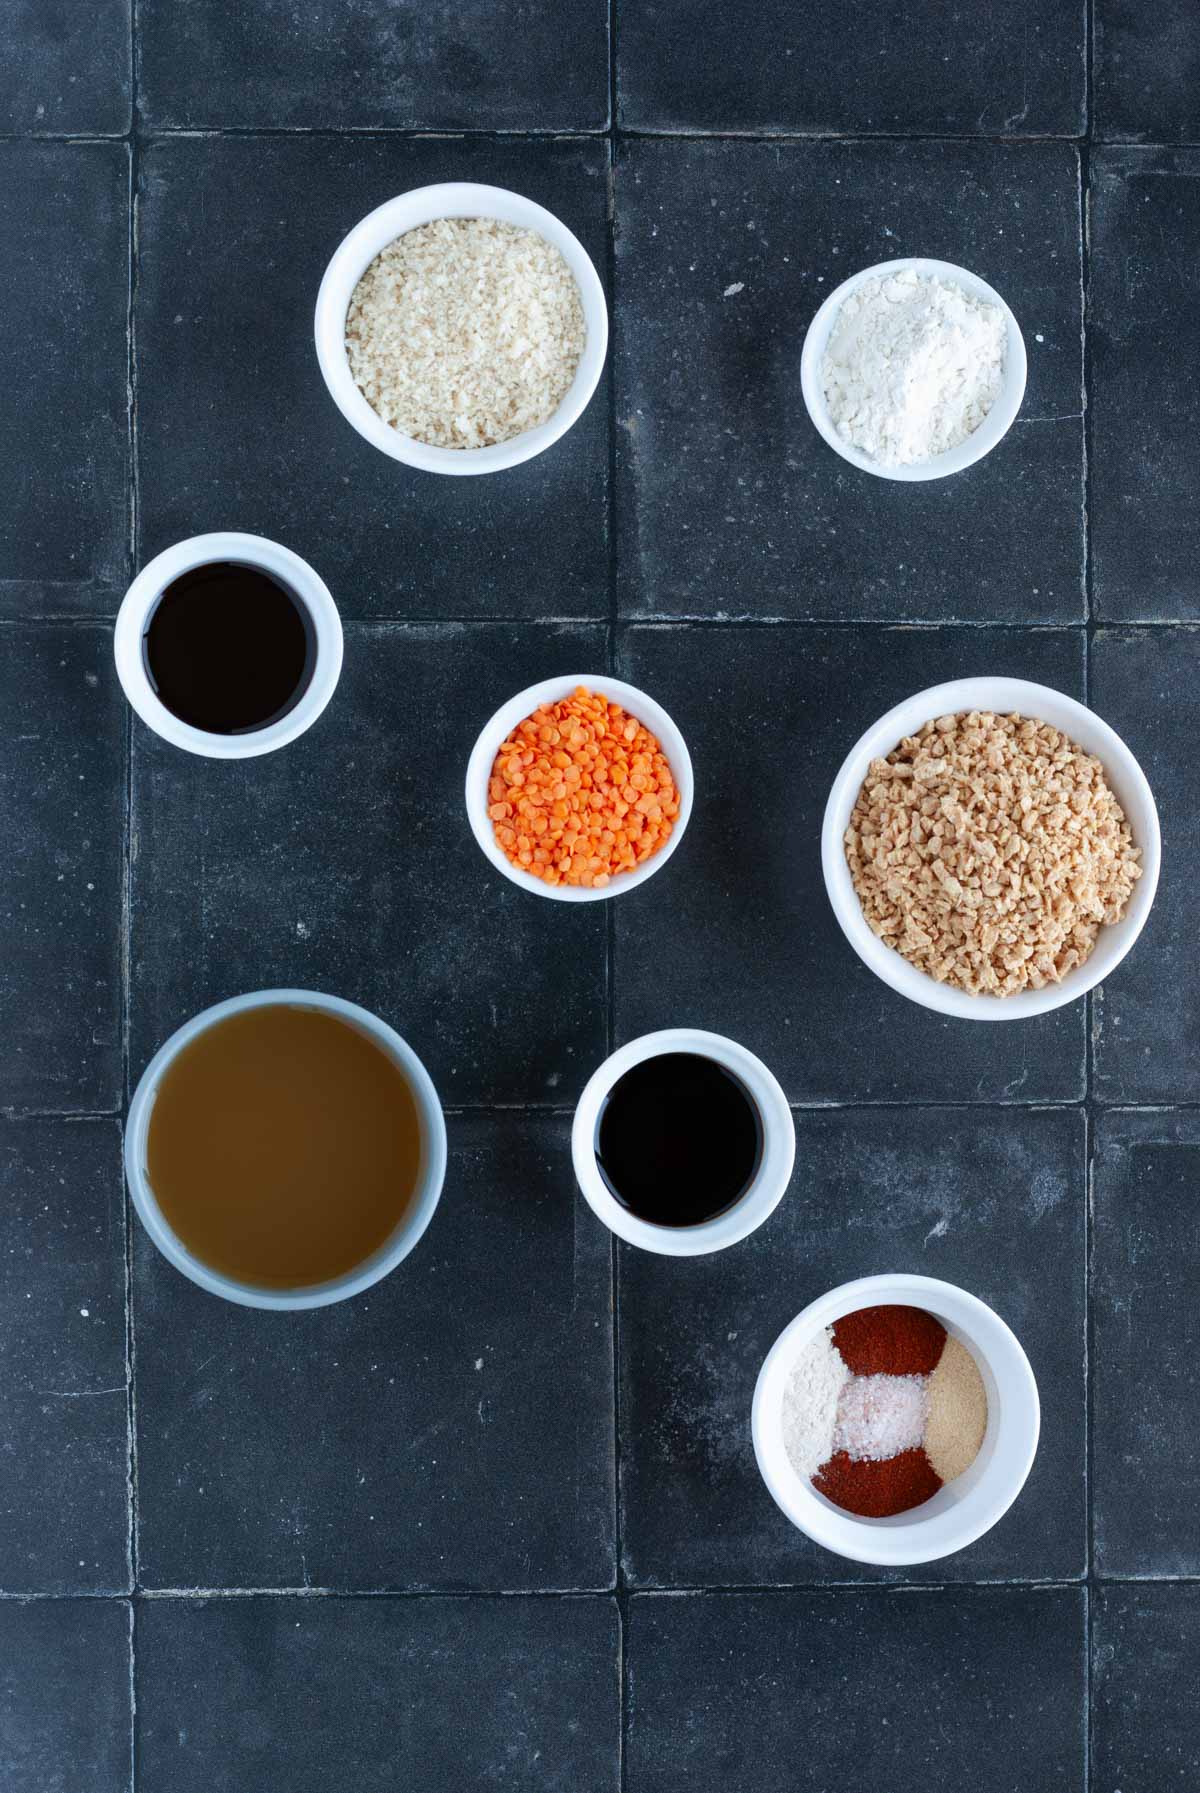
🍔Ingredients
With regard to sodium, I designed this recipe to be low sodium for all to enjoy. If you are not watching sodium or simply love your salt like my Grandma did then feel free to sub with the things you use normally such as regular veggie broth or regular soy sauce.
- Textured Vegetable Protein (TVP)
- Low Sodium Vegetable Broth (I use Pacific Organic Low Sodium Vegetable Broth in all of my recipes because they don't add oil to their broth.
- Dry red lentils (no soaking required, yay!)
- Low Sodium Soy Sauce (opt for GF Tamari for soy free/gluten free option)
- Vegan Worcestershire Sauce
- Garlic Powder, Onion Powder, and Smoked Paprika
- Oat Flour or All-Purpose flour (both work equally fine here, use Oat Flour for gluten free)
- Panko Breadcrumbs (opt for gluten free if desired)
🔪Instructions
1.) Gather up all of your ingredients, get the kiddos involved and make it a scavenger hunt! Then preheat your oven to 375 degrees F (190 Celsius), and line a baking sheet with parchment.

2.) Rinse and add ¼ cup red lentils to a pot of ¾ cup water, bring to a boil then reduce to heat to medium/low and simmer uncovered until water is mostly all absorbed, (about ten minutes). Check it halfway to make sure lentils are not sticking to the pan.
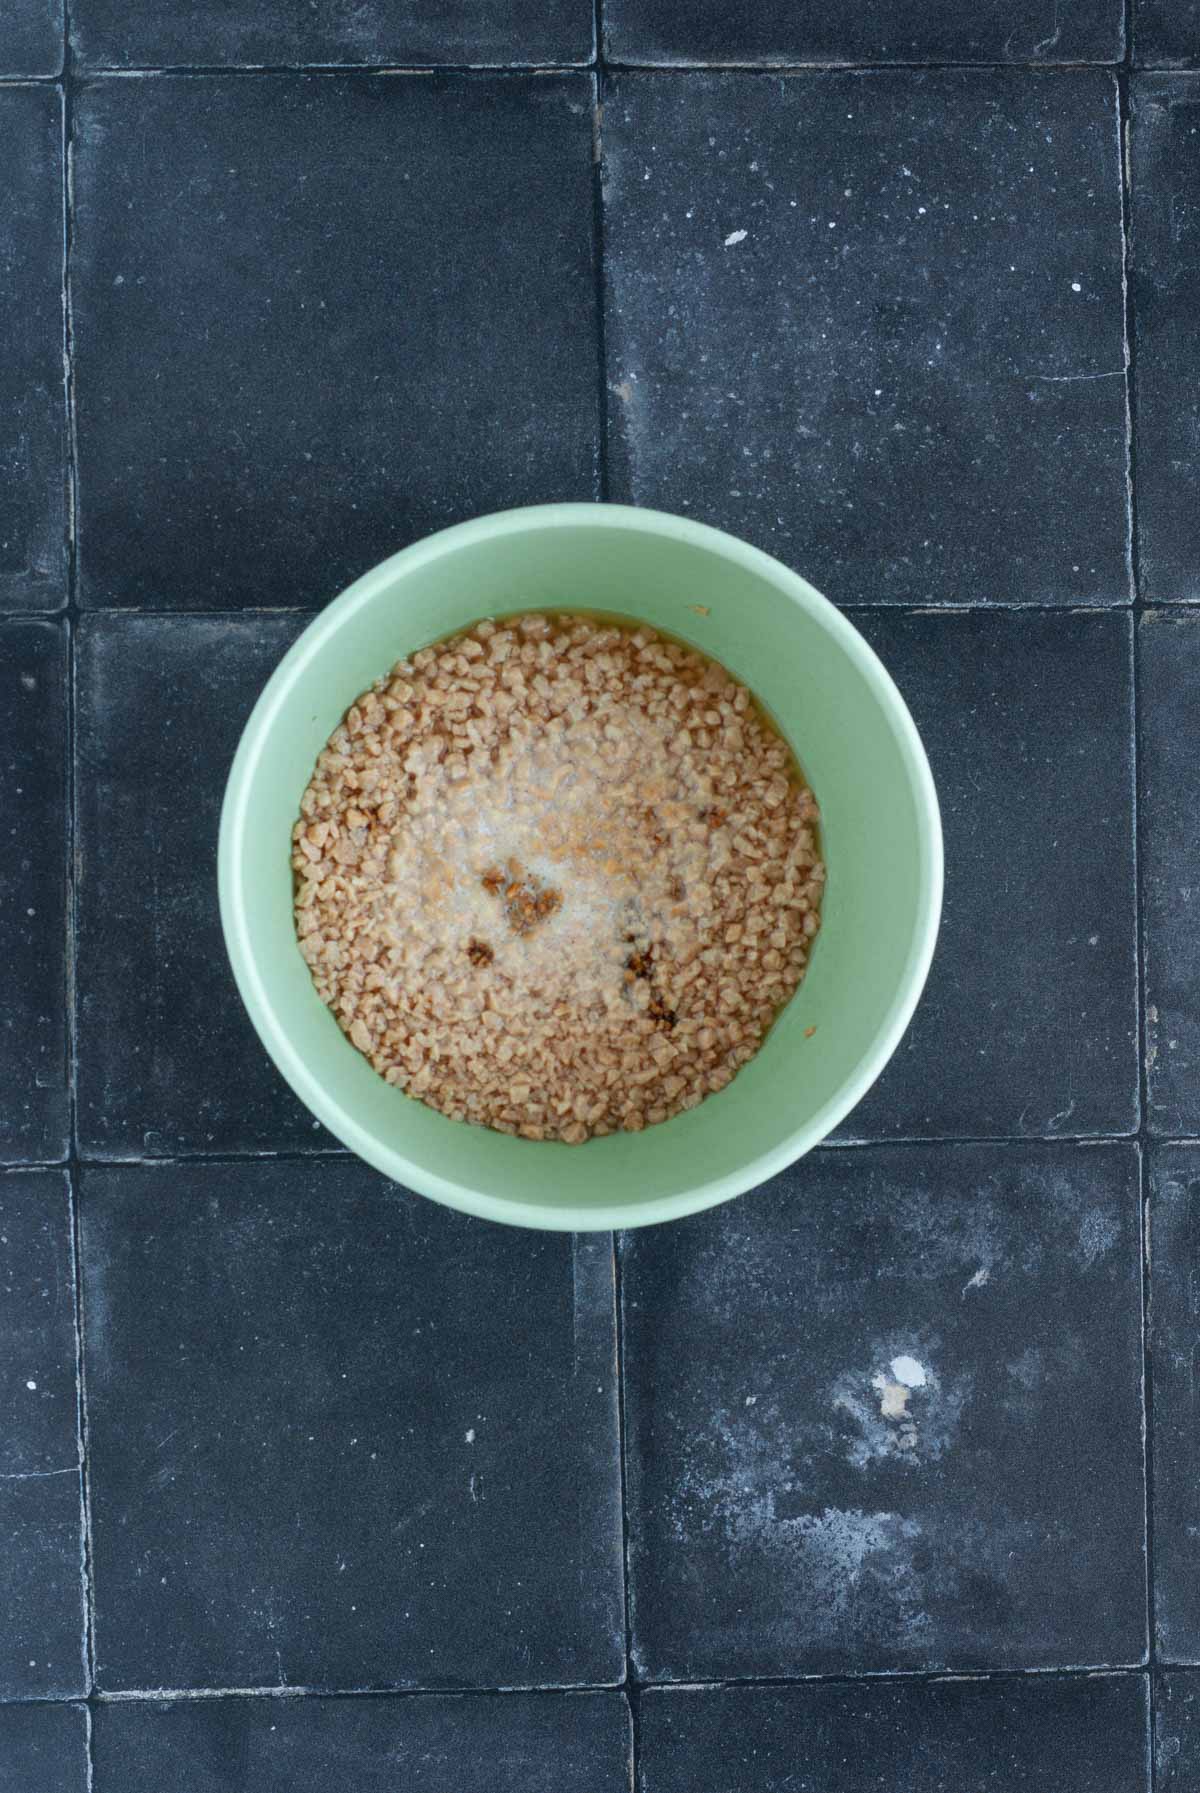
3.) While the lentils are doing their thing add your TVP, broth, soy sauce, and Worcestershire to a large mixing bowl, and give it a quick stir.
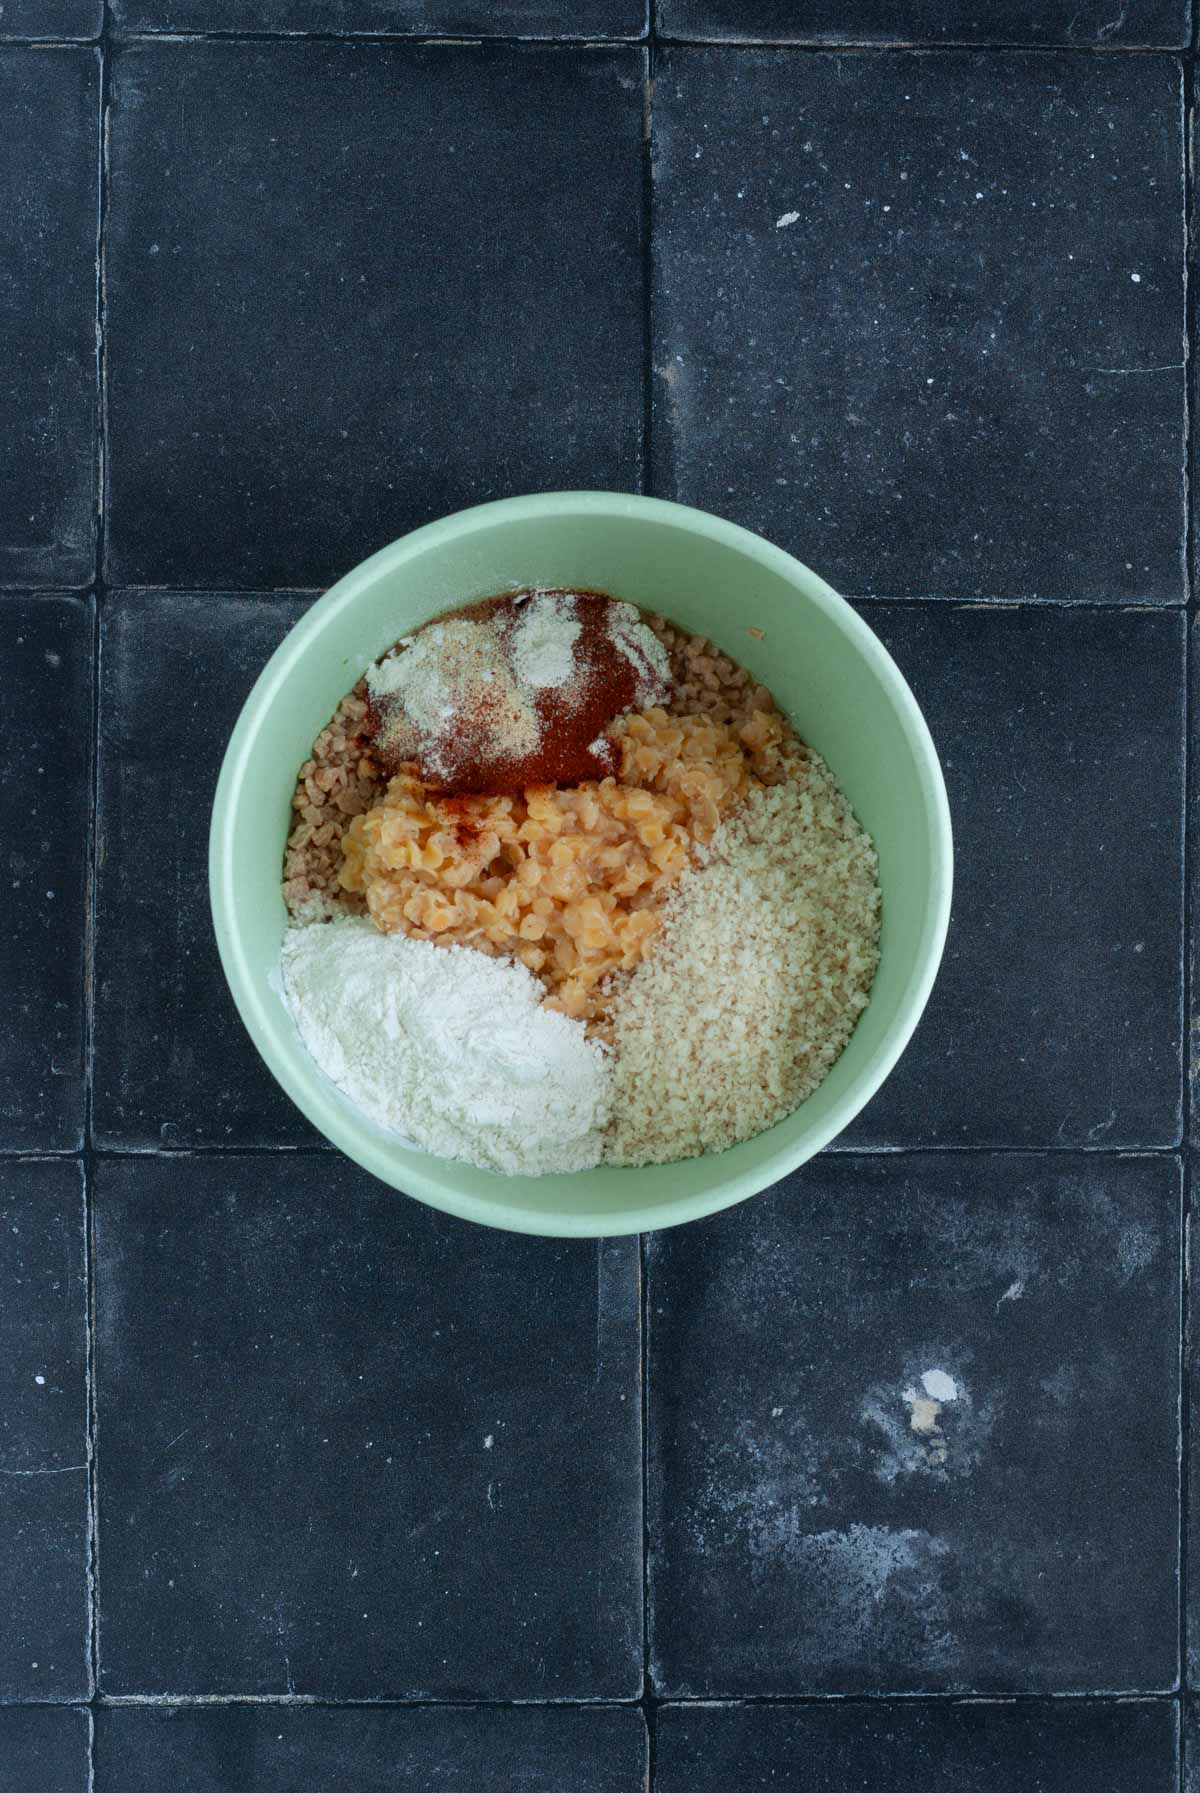
4.) Now add the Garlic powder, Onion powder, Smoked Paprika, Flour, and Breadcrumbs to the bowl. Mix well and let rest until lentils are finished cooking.
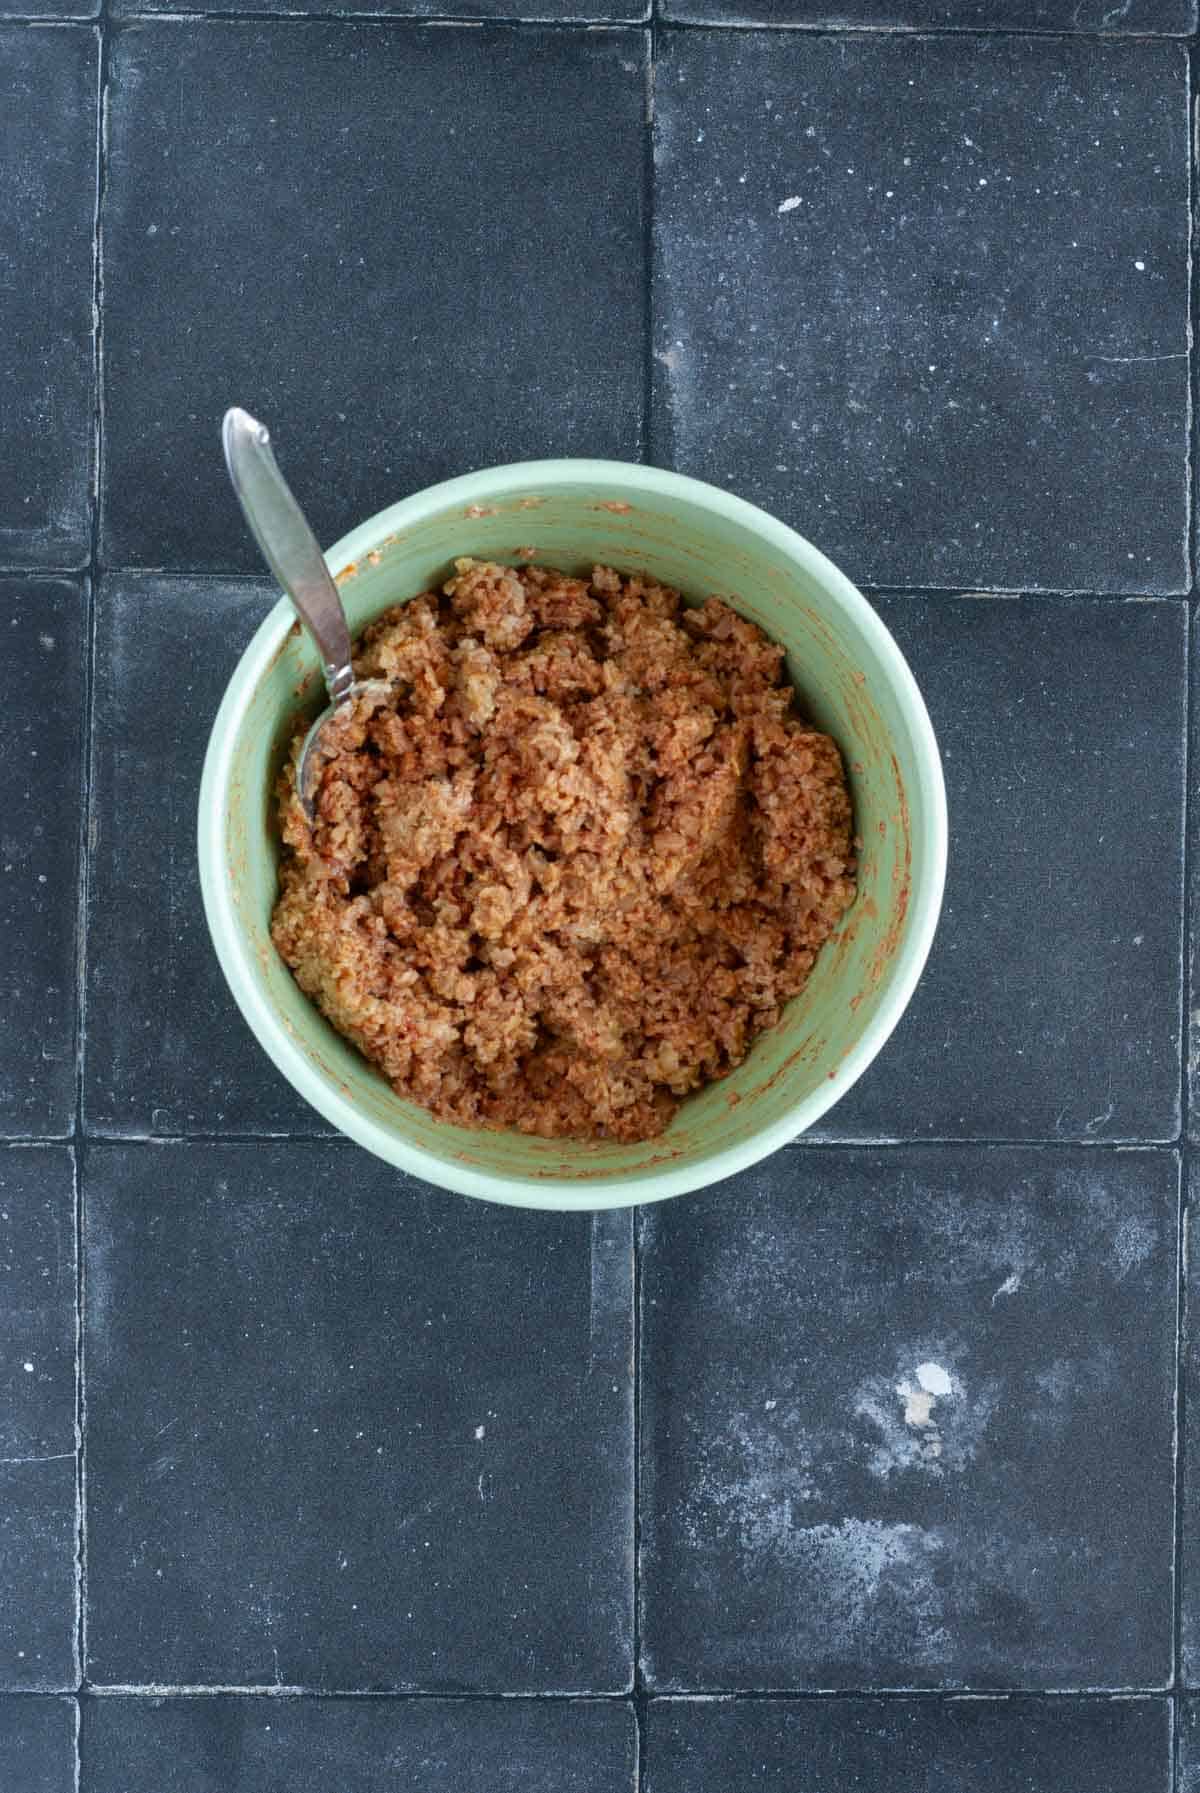
5.) Once lentils are ready add them to the bowl and mix everything until well combined.
If it's too wet add an extra Tablespoon of breadcrumbs. If it's too dry a splash of broth will help. It does thicken a touch after a couple of minutes though once everything is combined.
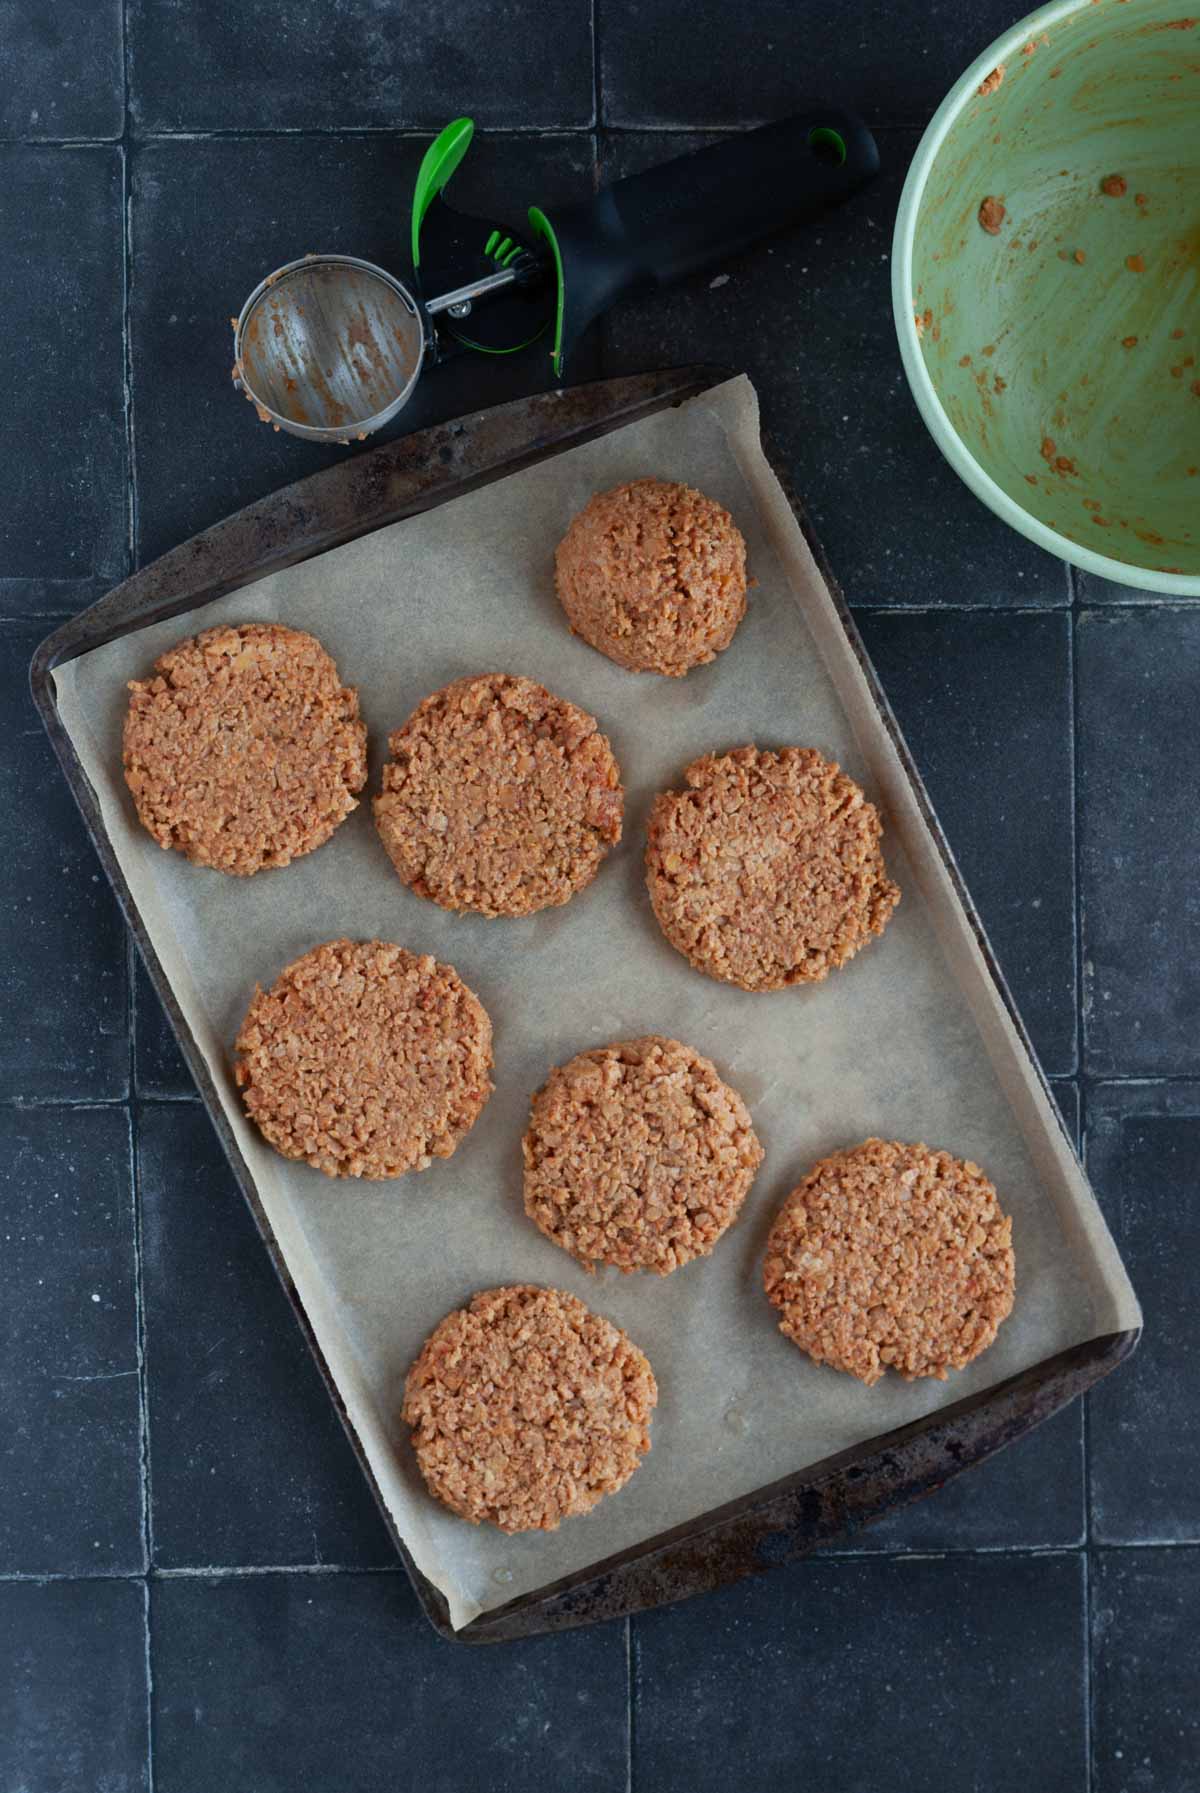
6.) Form the burgers into patties. Makes 6 to 8 depending on the size you want.
I used a large scoop for even patties and then flattened them using the back of a spatula, but you can use your hands too. Messy hands means you're having fun, right?!
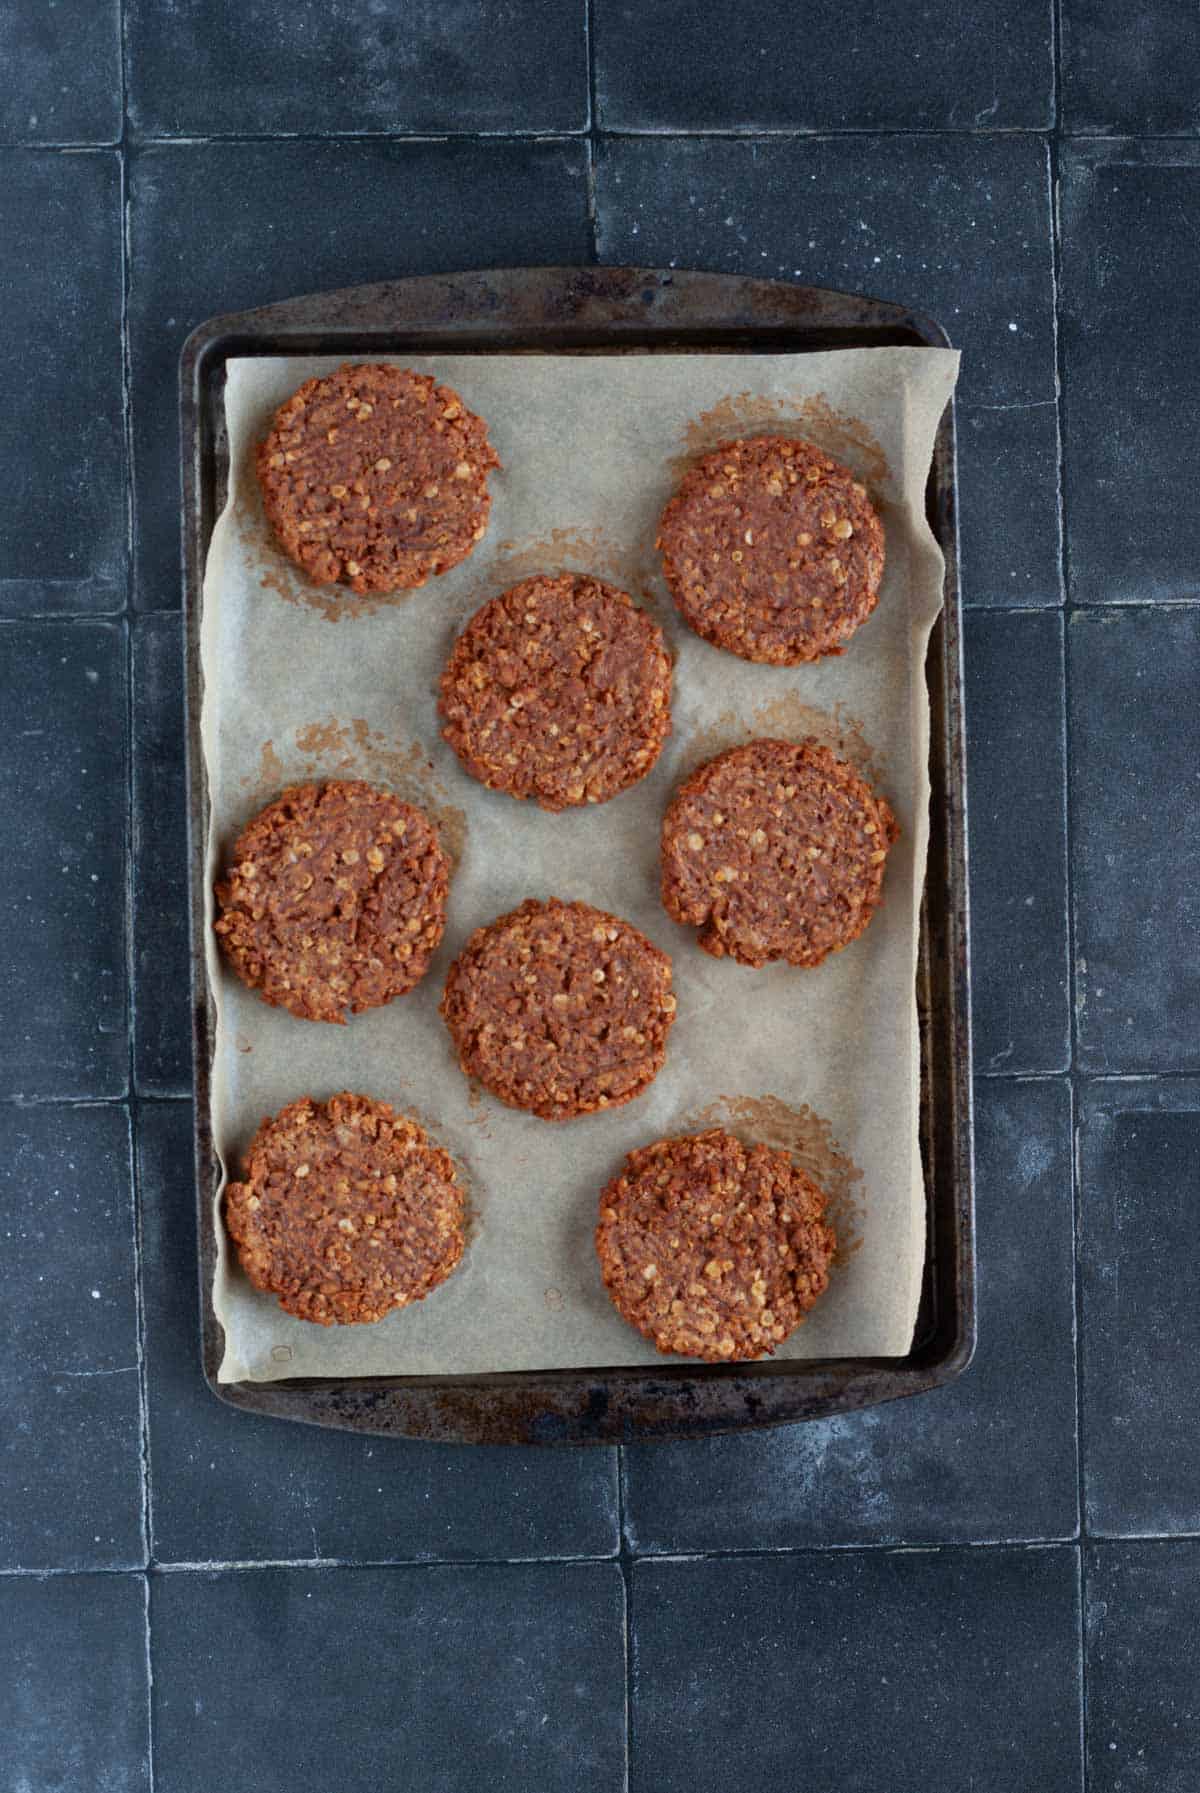
7.) Bake at 375 (190 C) for 15 minutes, flip gently, then bake another 10-15 minutes until firm and lightly browned.
I tested different oven temps and I found that 375° provided the perfect balance of crispy edges and tender insides.
Once done allow them to cool on the pan slightly then it's burger building time!
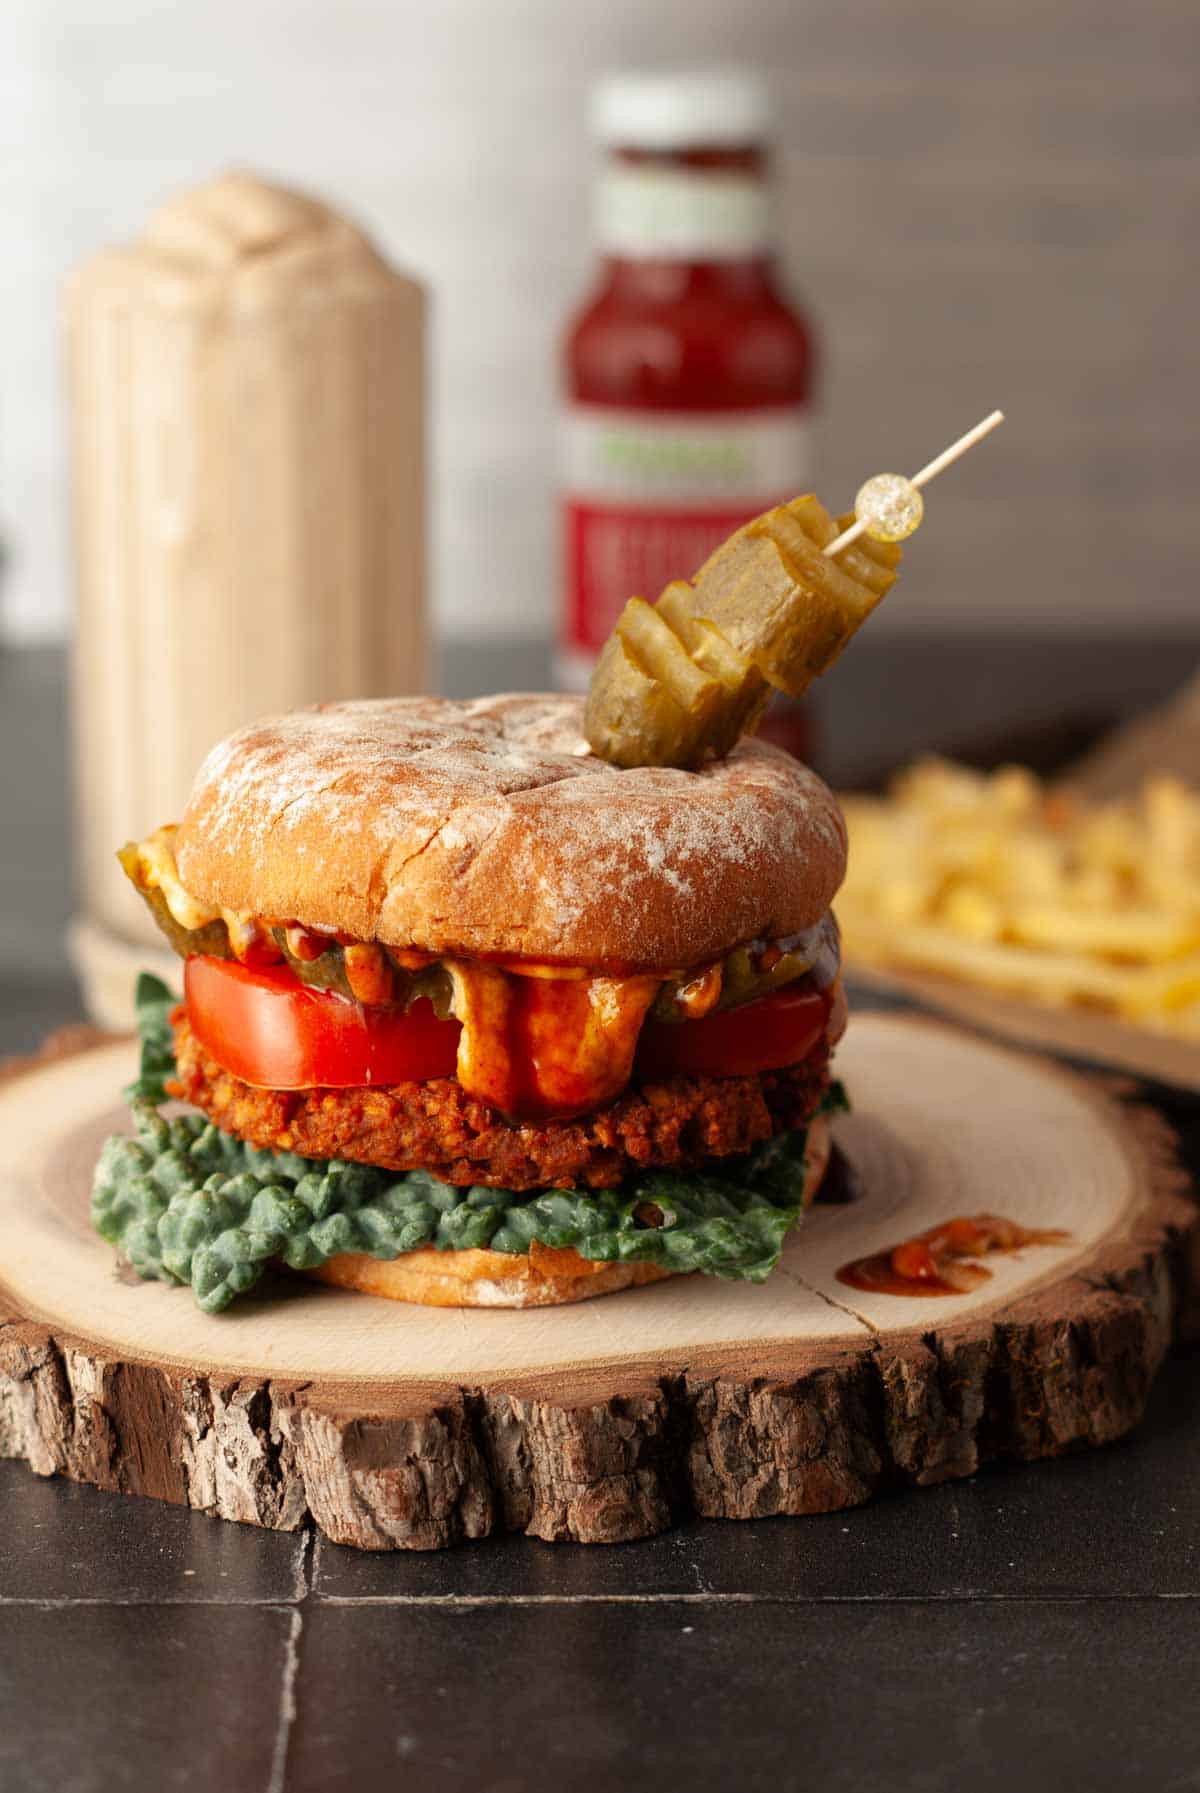
We made ours with some baked french fries and a vegan milkshake and of course, all the burger fixings!
Serving Tips
- Load up these burgers with ketchup, mustard, and kid-approved toppings like pickles or dairy-free cheese slices. For grown ups think avocado slices, red onion, tomato, BBQ Sauce.
- Serve with baked fries, baked sweet potatoes, or fun fruit kabobs!
💭Expert Tip
Let the mixture rest before shaping
Give the mixture 5–10 minutes to sit before forming patties. This allows the breadcrumbs and flour to absorb extra moisture, making the burgers easier to shape and less likely to fall apart.
Reduce stickiness If you form the patties using your hands it helps to dampen your hands just slightly with water so the mixture doesn't stick to them. If using the back of a spatula get it slightly wet to flatten each patty without sticking.
Make them mini for kids or parties
Use a cookie scoop or form into slider sized patties for school lunches, birthday parties, or just a fun size dinner for the kiddos! Baking time should be reduced to 20 minutes for mini burgers.
Cook now, freeze for later
Bake all the patties, then freeze them in a single layer in a zip-top bag. When you need a quick meal, just pop one into the toaster oven for 5 minutes and dinner’s done, no fuss, no mess!
📖Variations & Substitutions
- Use GF Tamari if trying to be soy or gluten free.
- If you're not watching your salt intake feel free to use regular veggie broth and soy sauce instead of low sodium.
- Use GF Panko breadcrumbs and GF Oat Flour if following a gluten free diet.
- No red lentils? Cooked green or brown lentils work too, just mash them before adding to the mix since they don’t break down as easily as red lentils do.
🧊Storage and Meal Prep Tips
Fridge: Store cooked burgers in an airtight container for up to 5 days. Let them cool completely before refrigerating to avoid excess moisture.
Freezer: After baking, let the patties cool completely, then place them in a single layer in a zip-top freezer bag. Freeze flat to keep them from sticking. They’ll keep well for up to 2 months, although they’ll probably get eaten long before that. I always make a double batch because it's such a quick go to meal solution on busy days.
Reheating: Reheat straight from the fridge or freezer! Although Justin and I just eat them cold, I guess we're strange like that.
- Toaster oven or regular oven: 375°F for about 8-10 minutes from the fridge and 10-12 minutes if from the freezer.
- Microwave: 45-60 seconds for a quick fix.
Meal Prep Win: These TVP burgers are perfect for batch cooking which is exactly what I do. Make a double batch, freeze the extras, and you’ve got a speedy meal solution ready anytime. They’re lunchbox friendly too, pack with a bun or a wrap and some pickles and ketchup on the side.
❓FAQ's
Yes! This recipe is completely bean free thanks to a mix of TVP and red lentils (which break down into the mix without being obvious). If you’re not a fan of the mushy texture beans can sometimes bring, this combo gives you a firmer, meatier bite that’s still 100% plant-based. My Dad hates squishy burgers and he was my inspiration for creating this recipe, and he went back for seconds!
The secret is in the balance of moisture and binders. This recipe uses flour and breadcrumbs to help hold everything together, plus a short rest after mixing to let it firm up. Dampening your hands while shaping the patties also helps! And while some recipes call for frying in a pan I found baking them was a fool proof way to ensure a well crafted firmer burger that won't fall apart.
Absolutely! In fact, they freeze beautifully. Let them cool completely, then store in a single layer in a zip-top freezer bag. When you're ready to eat, just reheat in a toaster oven or regular oven for 7–8 minutes. Cooking them first, instead of freezing raw patties, makes these perfect for meal prep or quick weeknight dinners.
Definitely! Easy swaps to the breadcrumbs, soy sauce, and flour will provide gluten free goodness! Instead use GF Panko breadcrumbs, GF Tamari instead of Soy Sauce, and GF Oat Flour (or even a GF all purpose flour) instead of regular flour. Enjoy!!
👩🏻🍳Creating the shot: A behind the scenes look
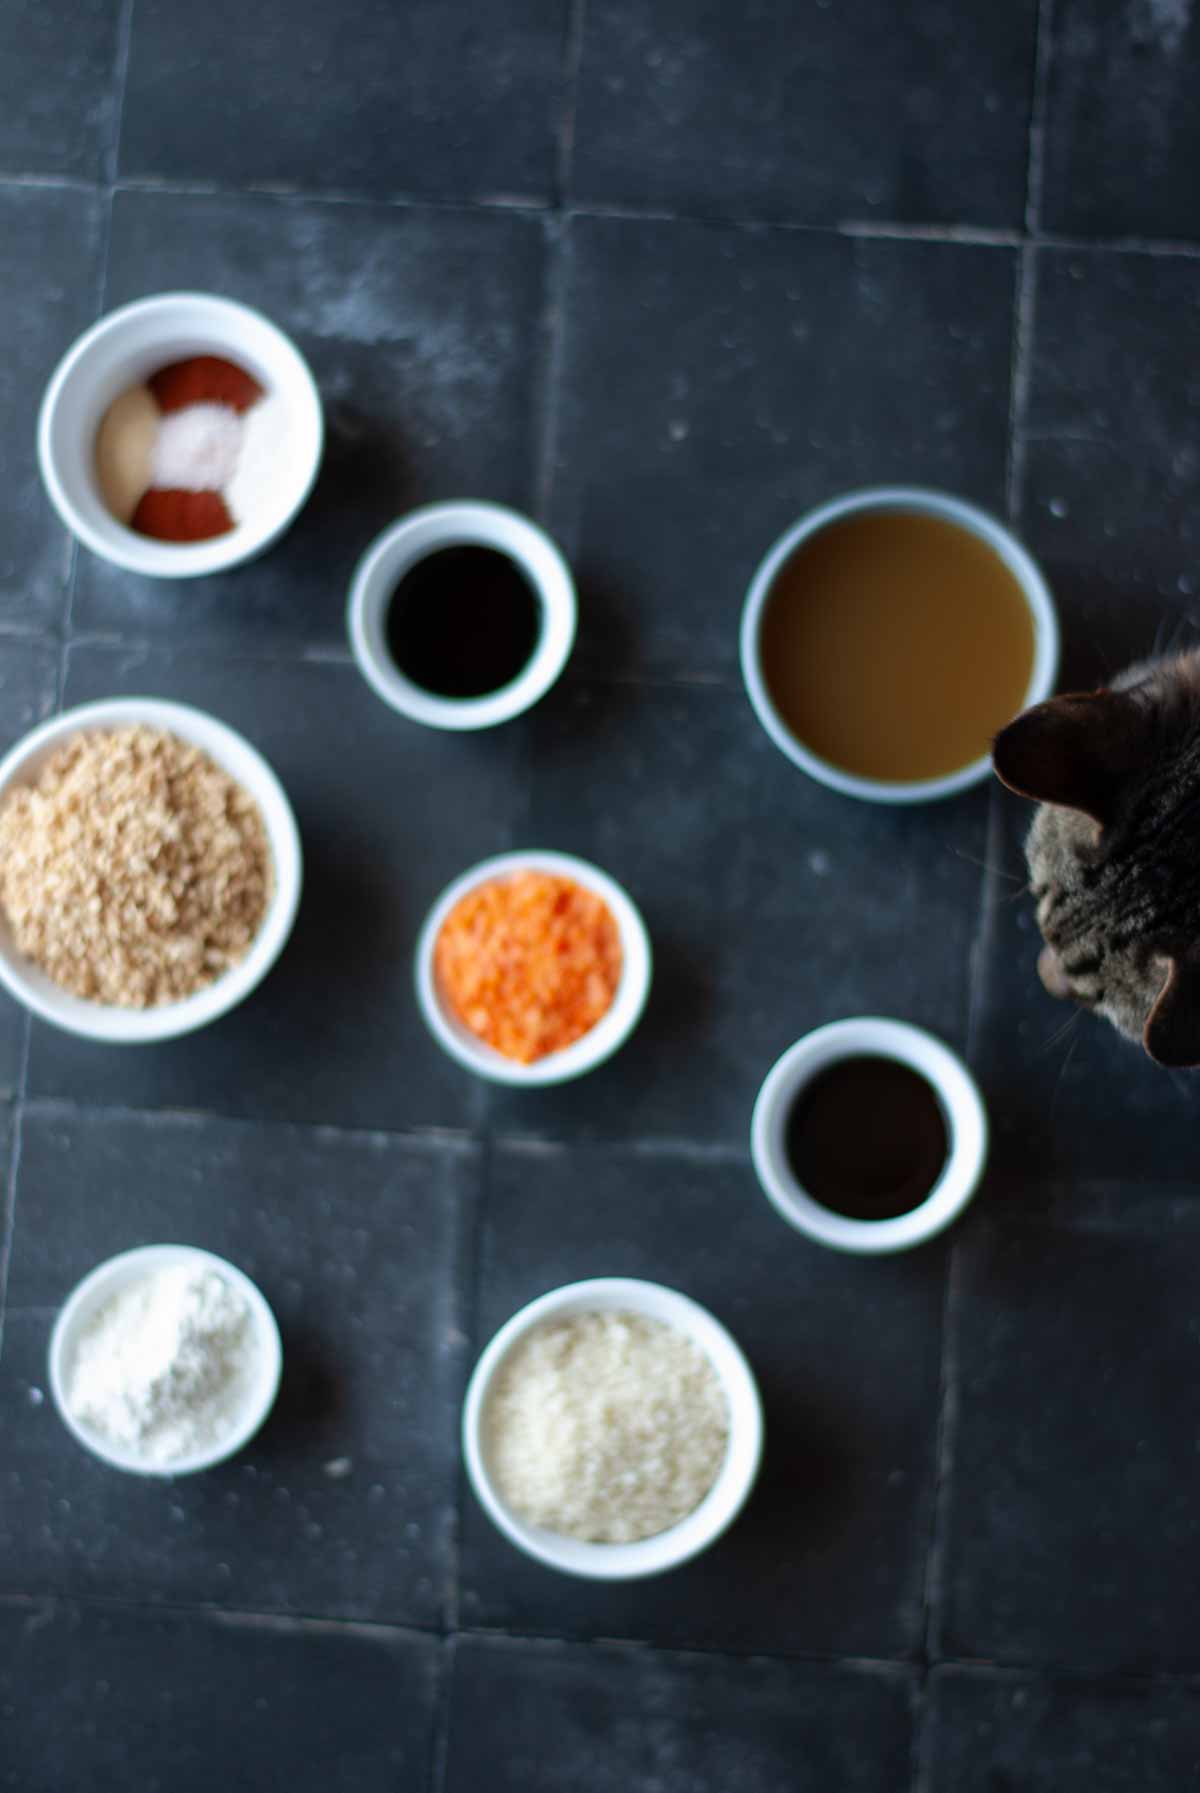
Charlie always feels the need to make an appearance, this time as I was taking the ingredients shot.

Burger patty mania!
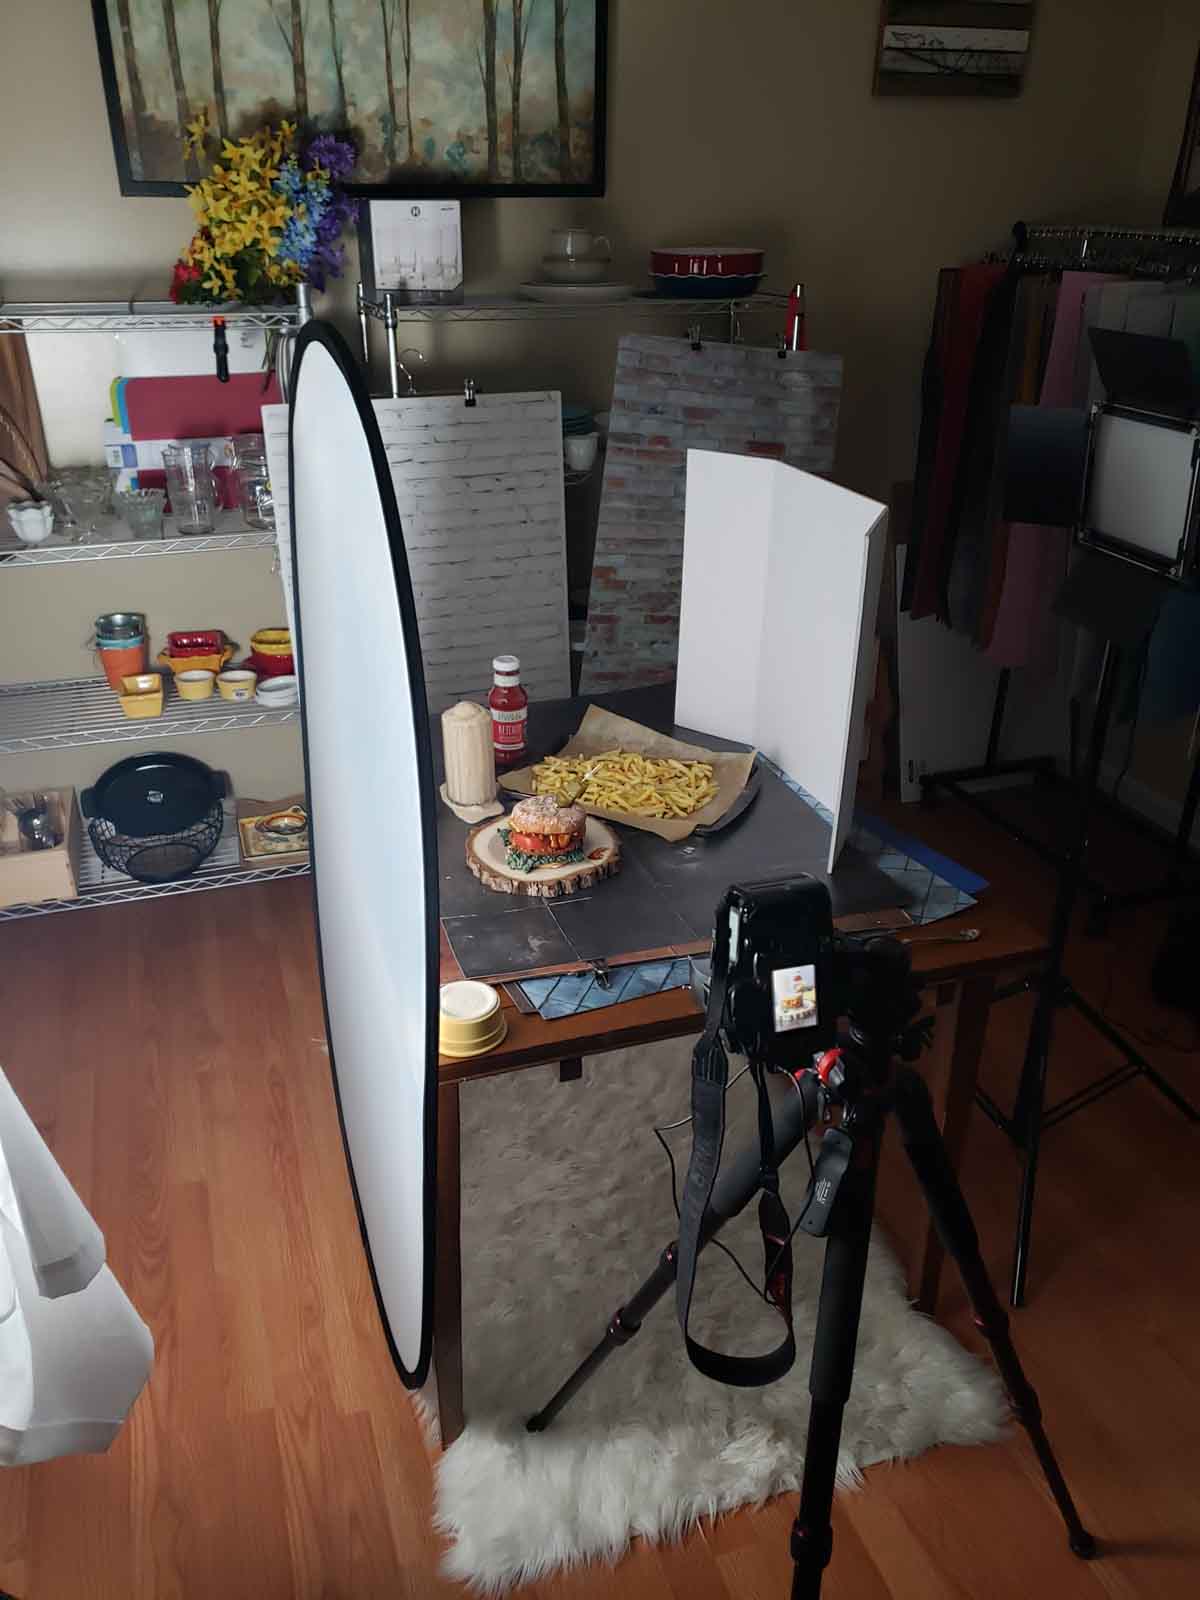
Setting the scene.
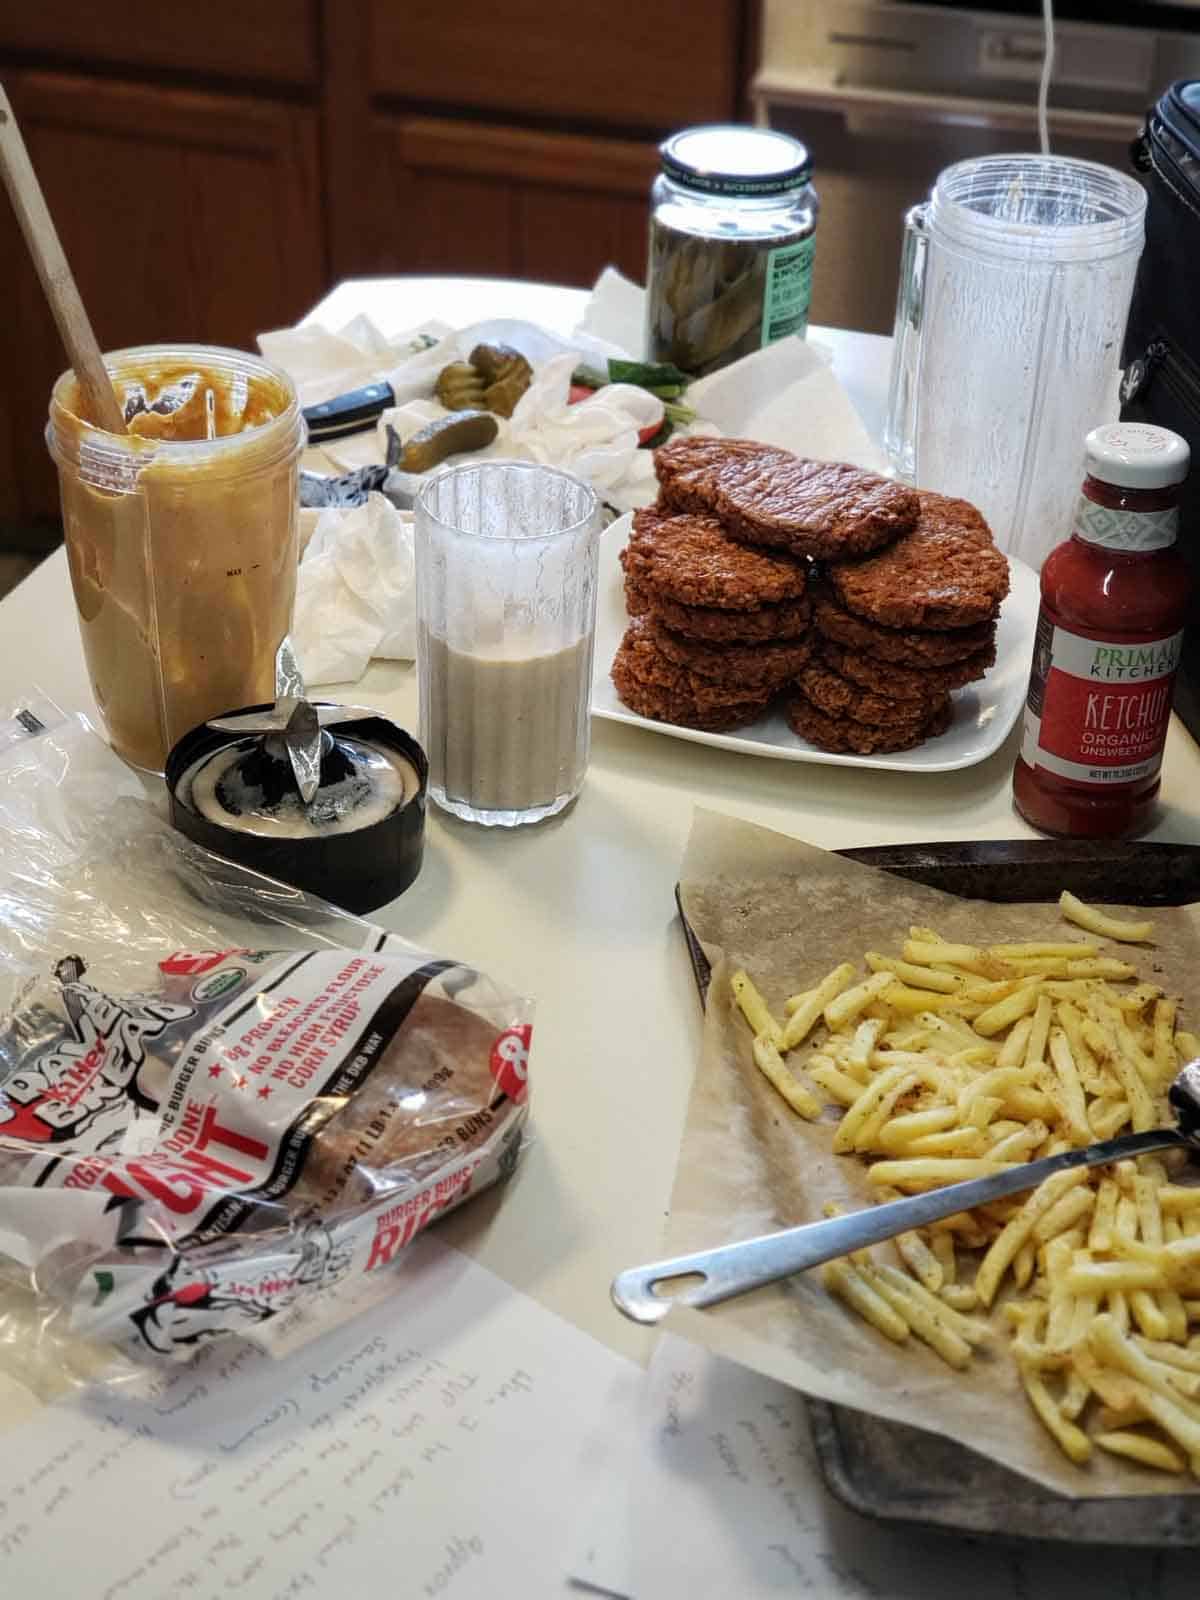
If you're not making a mess, you're not having fun!
What really happened
This was a tricky shoot. I wanted the burger to have that drippy yummy goodness look to it, so I whipped up a cashew cheese sauce to go on the bun with the bbq sauce. But once I put that top bun on (oh, and the first bun fell on the floor) the clock was ticking before the food went from picture perfect, to just messy.
I also wanted to have a vegan milkshake in the background to complete the scene, this was overachieving and it ended up being a barely recognizable and quickly melting prop....but the whole ordeal tasted amazing once I was done! And it was all so worth it. Also, I made this recipe so many times to get it perfect for you guys that we've been eating burgers for days.....so many days, haha! And, by the time I finished this post I became really good at spelling Worcestershire 😂.
💬Did you enjoy this recipe?
If you give these Easy TVP and Lentil Burgers a try, I’d love to hear how they turned out! Leave a review below or share your own twist in the comments—your feedback and creativity make this space even more delicious.


Easiest TVP Burger Recipe with Lentils (Baked, Vegan, Low Sodium)
- Total Time: 45 minutes
- Yield: 6-8 burgers 1x
- Diet: Vegan
Description
A flavorful vegan burger that’s low in sodium and picky eater approved. These TVP burgers are hearty with a firmer texture, and come together with just 9 pantry friendly ingredients (don't worry, NO BEANS). They're ready to eat in just 45 minutes and are perfect for backyard burger night!
Ingredients
¼ Cup Red Lentils
¾ cup water for cooking lentils
1 Cup Textured Vegetable Protein (TVP)
1 Cup Low Sodium Vegetable Broth
1 Tablespoon Low Sodium Soy Sauce (or Tamari)
1 Tablespoon Vegan Worcestershire
1 teaspoon Garlic Powder
1 teaspoon Onion Powder
2 teaspoons Smoked Paprika
¼ cup Oat Flour (or all purpose flour, or GF flour)
½ cup Panko Breadcrumbs (Gluten Free works too)
Instructions
- Gather up all of your ingredients, get the kiddos involved and make it a scavenger hunt! Then preheat your oven to 375 degrees F (190 Celsius), and line a baking sheet with parchment.
- Rinse and add ¼ cup red lentils to a pot of ¾ cup water, bring to a boil then reduce to heat to medium/low and simmer uncovered until water is mostly all absorbed, (about ten minutes). Check it halfway to make sure lentils are not sticking to the pan.
- While the lentils are doing their thing add your TVP, broth, soy sauce, and Worcestershire to a large mixing bowl and give it a quick stir.
- Now add the Garlic powder, Onion powder, Smoked Paprika, Flour, and Breadcrumbs to the bowl. Mix well and let rest until lentils are finished cooking.
-
Once lentils are ready add them to the bowl and mix everything until well combined.
If it's too wet add an extra Tablespoon of breadcrumbs. If it's too dry a splash of broth will help. It does thicken a touch after a couple of minutes though once everything is combined.
-
Form the burgers into patties. Makes 6 to 8 depending on the size you want.
I used a large scoop for even patties and then flattened them using the back of a spatula, but you can use your hands too. Messy hands means you're having fun, right?!
-
Bake at 375 (190 C) for 15 minutes, flip gently, then bake another 10-15 minutes until firm and lightly browned.
Once done allow them to cool on the pan slightly then it's burger building time!
Notes
Use GF Tamari if you are aiming for soy or gluten free.
If you're not watching your salt intake feel free to use regular veggie broth and soy sauce instead of low sodium.
Use GF Panko breadcrumbs and GF Oat Flour if following a gluten free diet.
No red lentils? Cooked green or brown lentils work too, just mash them before adding to the mix since they don’t break down as easily as red lentils do.
Give the mixture 5–10 minutes to sit before forming patties. This allows the breadcrumbs and flour to absorb extra moisture, making the burgers easier to shape and less likely to fall apart.
If you form the patties using your hands it helps to dampen your hands just slightly with water so the mixture doesn't stick to them. If using the back of a spatula get it slightly wet to flatten each patty without sticking.
Use a cookie scoop or form into slider sized patties for school lunches, birthday parties, or just a fun size dinner for the kiddos!
Bake all the patties, then freeze them in a single layer in a zip-top bag. When you need a quick meal, just pop one into the toaster oven for 5 minutes and dinner’s done, no fuss, no mess!
Freezer: After baking, let the patties cool completely, then place them in a single layer in a zip-top freezer bag. Freeze flat to keep them from sticking. They’ll keep well for up to 2 months
Fridge: Store cooked burgers in an airtight container for up to 5 days. Let them cool completely before refrigerating to avoid excess moisture.
Reheating: Toaster oven or regular oven: 375°F for about 5-6 minutes from the fridge and 7–8 minutes if from the freezer. Or microwave for 30-45 seconds.
- Prep Time: 15 minutes
- Cook Time: 30 minutes
- Category: Main Course
- Method: Baked
- Cuisine: American
Disclaimer: The nutritional information provided for Easy TVP Burger with Lentils is an estimate calculated using Nutrifox, an online tool. Please note that this information is for general guidance only and should not replace advice from a qualified professional. Additionally, this page may include affiliate links, meaning I may earn a small commission if you purchase through those links at no extra cost to you. Thank you for supporting Fresh Fun Flavor!


Meghan G. says
Loved these! We made them for dinner last night and they were a hit. This is my first time using TVP and I love it!! Such a great meat replacer and very easy to use. The burgers are full of flavor and we decided to try and cook them on our flat top and that worked great. So glad we tried these!
Rhonda Jones @ Fresh Fun Flavor says
Oh, I’m so happy to hear that, thank you Meghan! I love that you tried cooking them on the flat top (great idea!). TVP is such an easy and fun ingredient to work with. Glad they were a hit at dinner, that just made my day! 💚